
PythonでWebサイトの情報を自動取得する際に、最初に名前が挙がるライブラリがBeautifulSoupです。
本記事では、入門者でも理解しやすいように、環境構築から基本的な使い方、実践的なスクレイピングの例、さらに応用テクニックやトラブル時の考え方まで、ステップを追って詳しく解説します。
スクレイピングのマナーや注意点も合わせて学び、安全で効率の良いデータ取得を身につけていきましょう。
BeautifulSoupとは
BeautifulSoupでできること
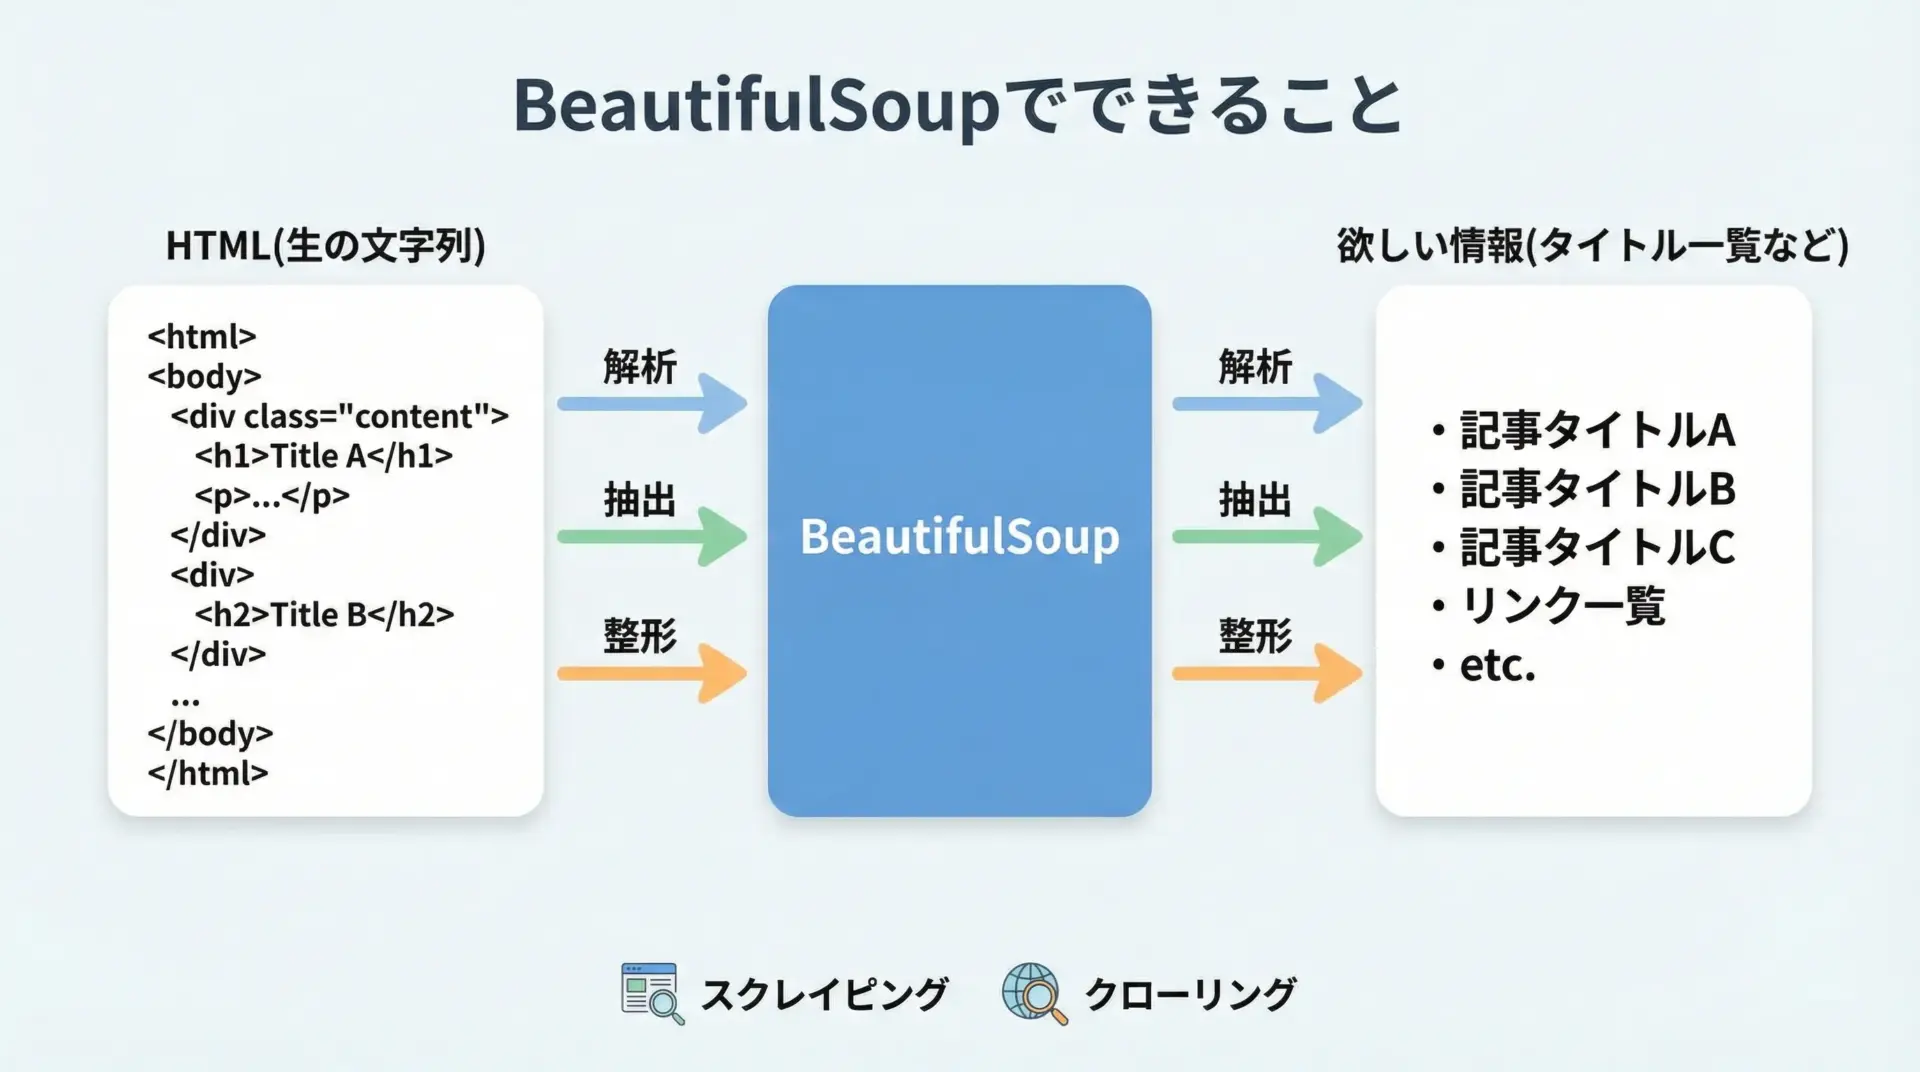
BeautifulSoupは、PythonでHTMLやXMLを簡単に解析して情報を取り出すためのライブラリです。
WebページのHTMLは人間がブラウザで見るには読みやすくても、プログラムで扱うには構造を理解しにくいことが多いです。
BeautifulSoupはこのHTMLをパース(解析)し、ツリー構造として扱いやすく整えてくれます。
具体的には、次のような操作が可能です。
1つ目は、HTMLの中から特定のタグを検索することです。
例えばh1タグだけを集めたり、class属性が特定の値を持つ<div>の一覧を取得したりできます。
2つ目は、取得した要素からテキストや属性値を取り出す操作です。
リンクのURL(href)や画像のURL(src)、商品名や価格など、人間が目で見ている情報をプログラムが扱える形に変換できます。
3つ目は、取得した情報をリストや辞書として構造化することです。
これにより、のちほどCSVやデータベースに保存したり、機械学習やデータ分析の前処理として利用したりすることが容易になります。
このように、BeautifulSoupは「HTMLをデータとして扱いやすい形に変換する橋渡し役」のような存在です。
スクレイピングにBeautifulSoupを使う理由
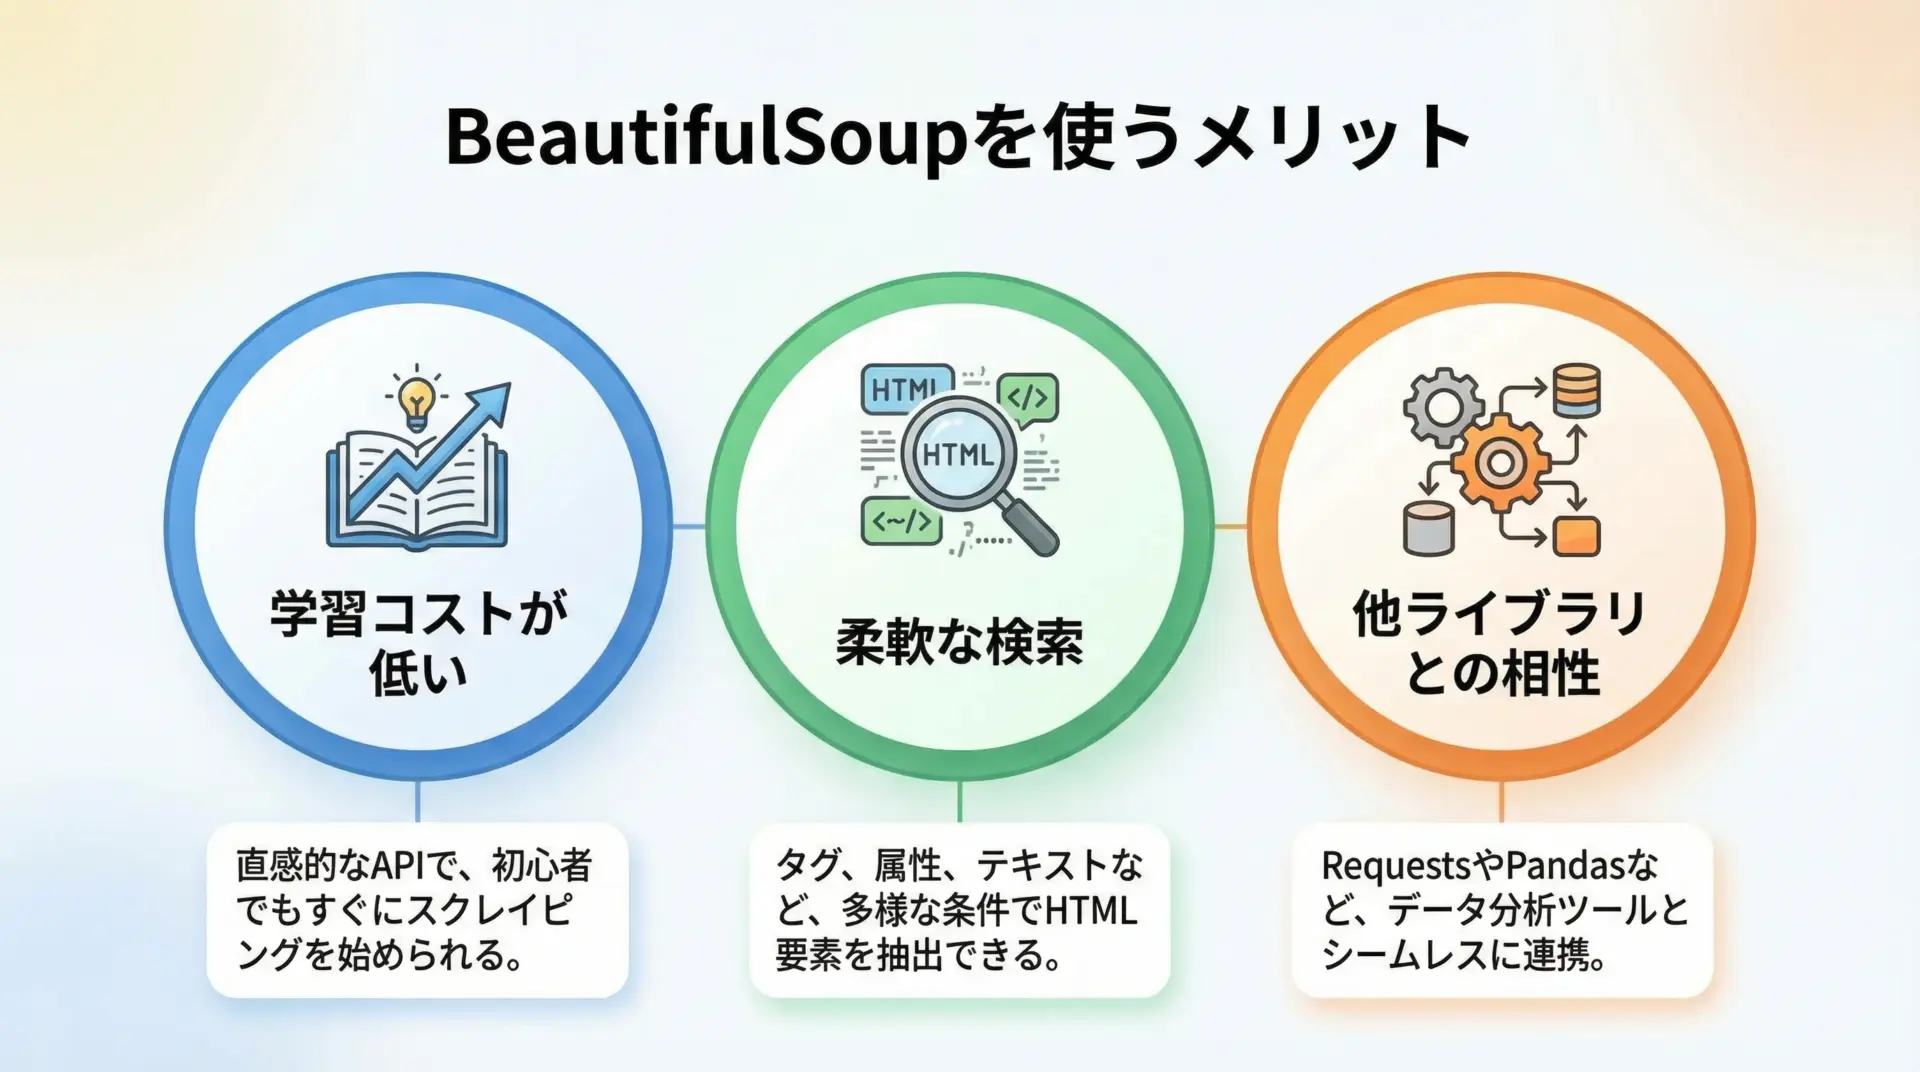
Pythonには他にもHTML解析やスクレイピングに使えるライブラリがいくつかありますが、その中でもBeautifulSoupがよく選ばれる理由はいくつかあります。
1つ目の理由は学習コストの低さです。
タグを検索するfindやfind_all、CSSセレクタで指定するselectなど、メソッド名が直感的で覚えやすく、入門者でもすぐに基礎を使いこなせます。
2つ目の理由は柔軟な検索が可能である点です。
タグ名や属性だけでなく、正規表現や関数を使った条件指定もできるため、複雑なページ構造でも比較的シンプルなコードで目的の要素にたどり着けます。
3つ目は他ライブラリとの組み合わせのしやすさです。
HTTPリクエストにはrequests、ブラウザ操作にはSeleniumやPlaywright、データ保存にはpandasなど、多くのライブラリと自然に連携できます。
BeautifulSoup自体はHTML解析に専念しているため、用途に応じて組み合わせることで拡張が容易です。
このような理由から、「Pythonでスクレイピングを始めるならBeautifulSoup」といえるほど、定番の存在になっています。
環境構築とインストール
Pythonとpipの準備
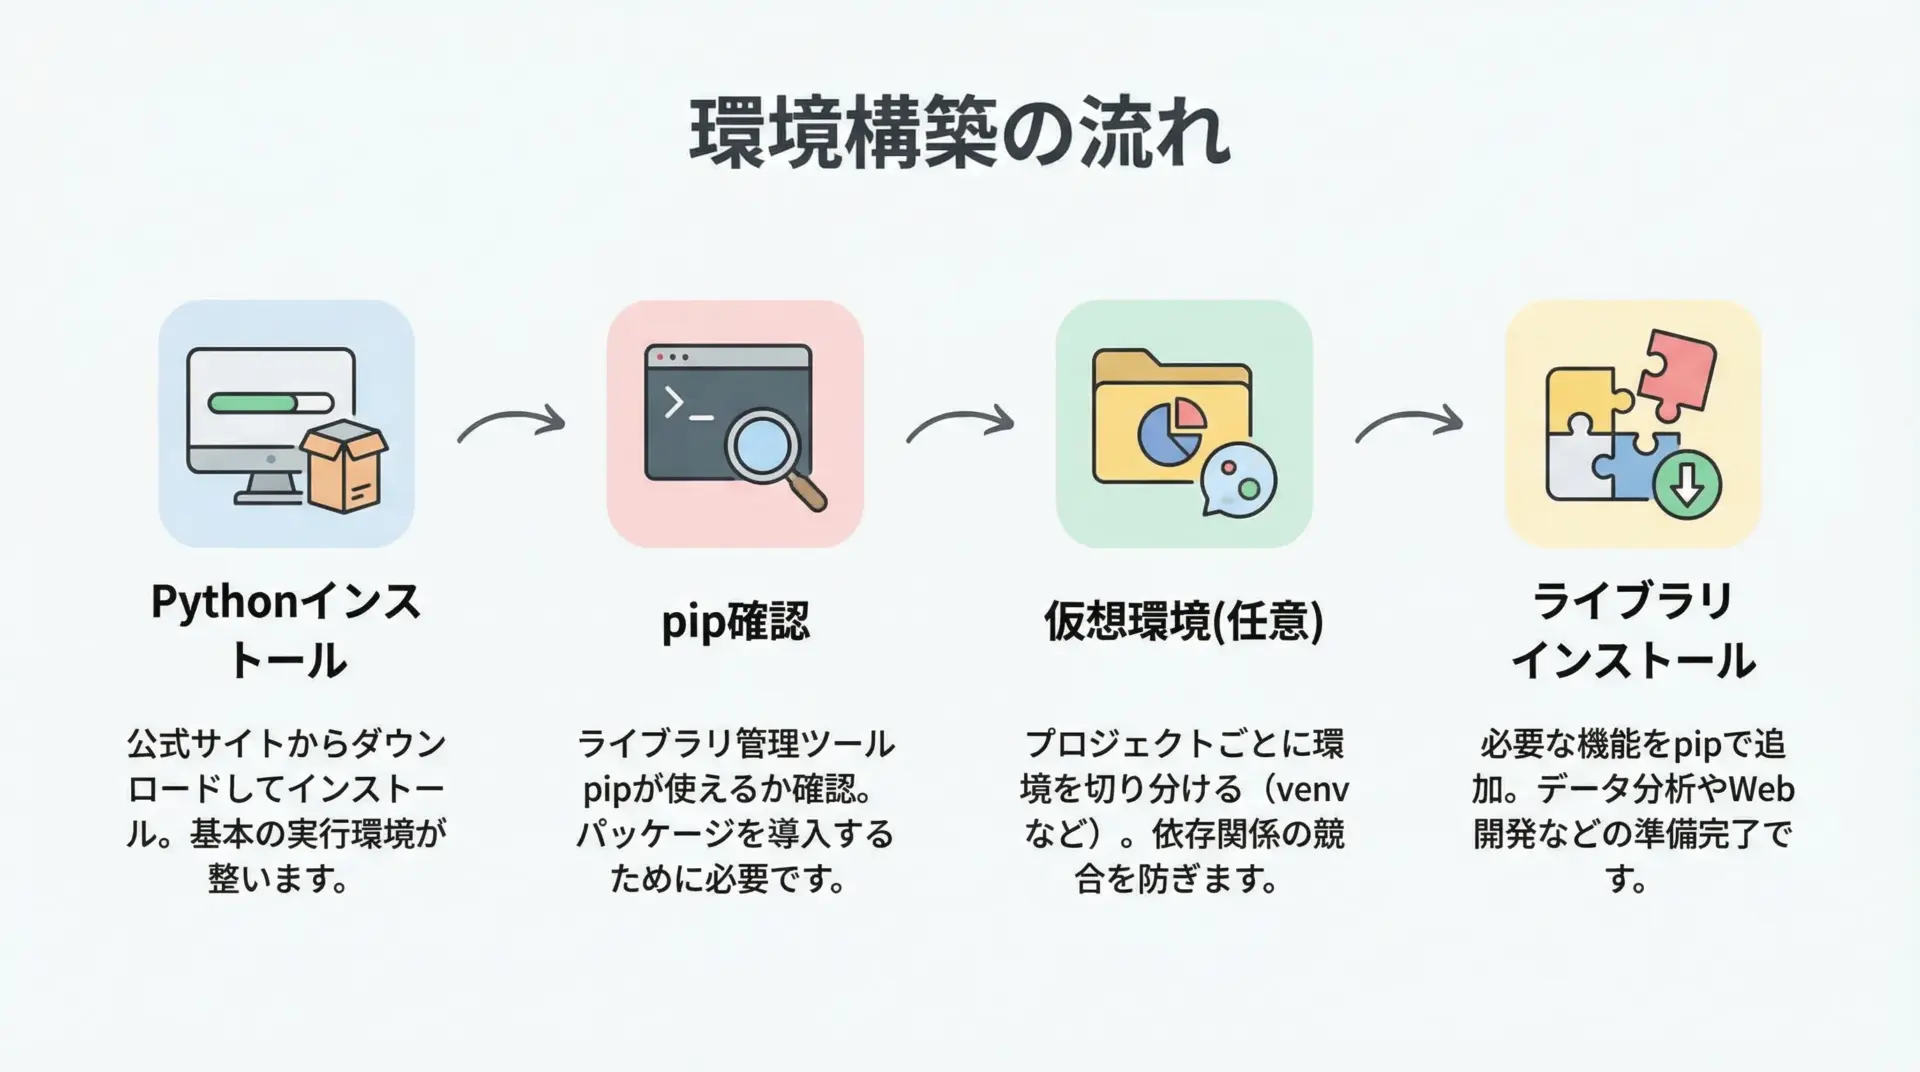
BeautifulSoupを使うには、まずPython本体とパッケージ管理ツールであるpipが必要です。
すでにPythonを利用している方であれば、多くの場合pipも同時にインストールされています。
Pythonがインストールされているかどうかは、ターミナル(またはコマンドプロンプト)で次のように確認できます。
python --version
# もしくは環境によっては
python3 --versionバージョンが3系であればBeautifulSoupを問題なく利用できます。
次にpipのバージョンも確認しておくと安心です。
pip --version
# もしくは
pip3 --versionプロジェクトごとにライブラリを分けて管理したい場合は、venvによる仮想環境の作成も検討すると良いです。
これは必須ではありませんが、依存関係のトラブルを避ける助けになります。
BeautifulSoupとrequestsのインストール方法

スクレイピングでは、HTMLの取得と解析の2つのステップが基本になります。
そのため、HTTPリクエスト用のrequestsと、HTML解析用のbeautifulsoup4をインストールします。
pip install requests beautifulsoup4BeautifulSoupは内部でHTMLパーサを利用します。
標準のhtml.parserのほか、lxmlなどを使うと解析が高速になったり、より堅牢になったりします。
余裕があればlxmlも入れておくと便利です。
pip install lxmlインストール後、Pythonの対話シェルやスクリプトでインポートできるか確認します。
import requests
from bs4 import BeautifulSoup

print("OK")
BeautifulSoupの基本的な使い方
HTMLを取得してBeautifulSoupオブジェクトを作成
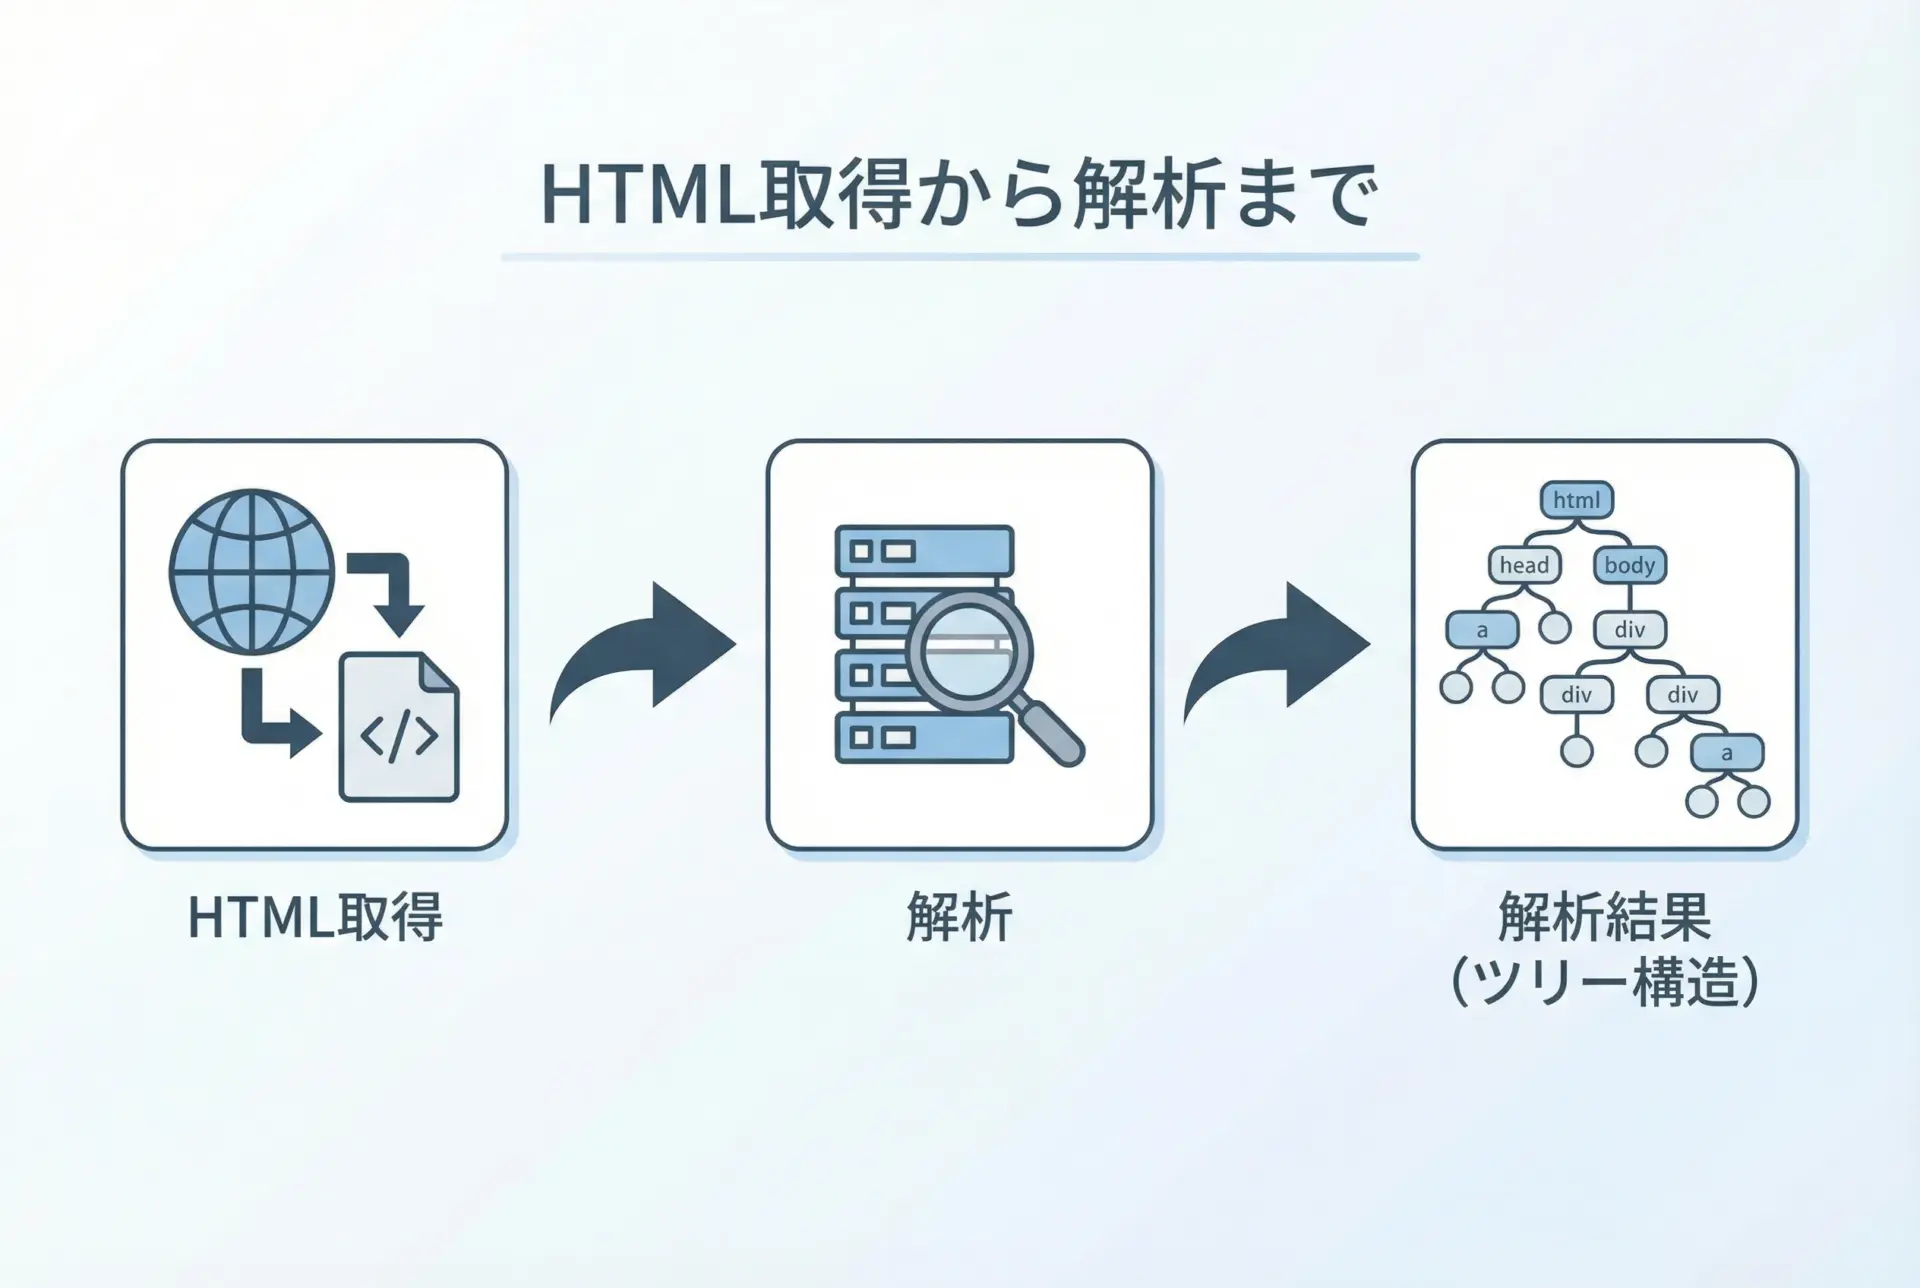
最初の基本パターンは、「requestsでHTMLを取得し、それをBeautifulSoupに渡す」という流れです。
import requests
from bs4 import BeautifulSoup

# 取得したいページのURL
url = "https://example.com/"

# HTTP GETリクエストを送信
response = requests.get(url)

# ステータスコードを確認(200なら成功)
print("Status:", response.status_code)

# レスポンスのHTMLを文字列として取得
html = response.text

# BeautifulSoupオブジェクトを作成
# 第2引数の"html.parser"は標準のパーサを利用する指定
soup = BeautifulSoup(html, "html.parser")

# ページタイトルを取得して表示
title_tag = soup.find("title")
print("Title:", title_tag.text if title_tag else "タイトルが見つかりません")Status: 200
Title: Example Domainここで作成したsoupが、HTML全体を表すBeautifulSoupオブジェクトです。
このオブジェクトから、さまざまなタグやテキストを探索していきます。
findとfind_allによる要素の取得

BeautifulSoupで最もよく使うメソッドがfindとfind_allです。
findは条件に合う最初の1件だけを返し、find_allは条件に合うすべての要素をリストで返します。
from bs4 import BeautifulSoup

html = """
<html>
  <body>
    <h1 class="title">記事タイトル1</h1>
    <h1 class="title">記事タイトル2</h1>
    <p id="description">これは説明文です。</p>
  </body>
</html>
"""

soup = BeautifulSoup(html, "html.parser")

# 最初のh1タグを取得
first_h1 = soup.find("h1")  # タグ名だけ指定
print("find:", first_h1.text)

# 全てのh1タグを取得
all_h1 = soup.find_all("h1")
print("find_all件数:", len(all_h1))
for i, tag in enumerate(all_h1, start=1):
    print(f"h1[{i}]:", tag.text)

# idやclassを指定して検索
desc = soup.find("p", id="description")  # id属性で検索
print("説明:", desc.text)

title1 = soup.find("h1", class_="title")  # class属性で検索(class_に注意)
print("最初のtitleクラス:", title1.text)find: 記事タイトル1
find_all件数: 2
h1[1]: 記事タイトル1
h1[2]: 記事タイトル2
説明: これは説明文です。
最初のtitleクラス: 記事タイトル1属性指定ではclassがPythonの予約語と重なるため、class_と末尾にアンダースコアを付ける点に注意します。
selectとCSSセレクタの使い方
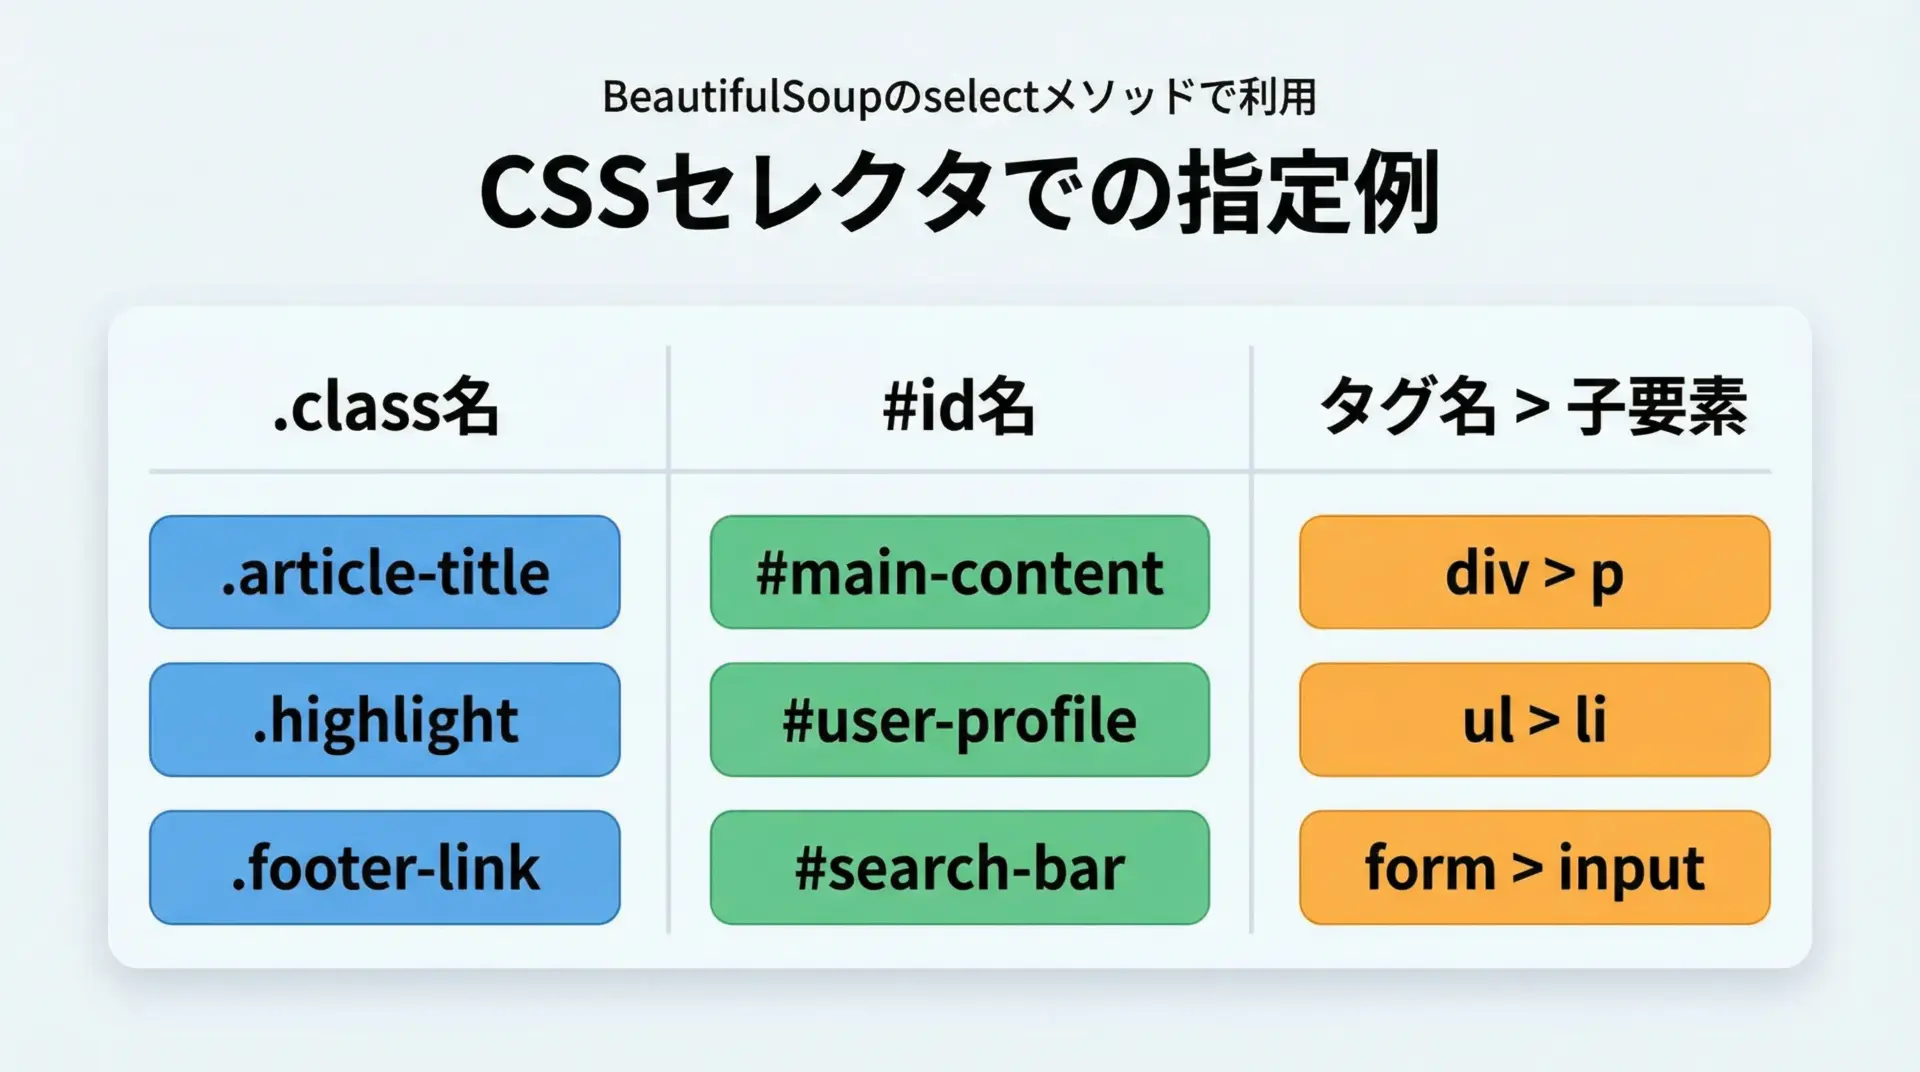
CSSセレクタに慣れている方は、selectメソッドを使うと直感的に要素を指定できます。
クラスは.class名、IDは#id名という書き方がそのまま利用できます。
from bs4 import BeautifulSoup

html = """
<html>
  <body>
    <div id="main">
      <h1 class="title">メインタイトル</h1>
      <ul class="items">
        <li class="item">りんご</li>
        <li class="item">バナナ</li>
        <li class="item special">オレンジ</li>
      </ul>
    </div>
  </body>
</html>
"""

soup = BeautifulSoup(html, "html.parser")

# id=main の要素を取得
main_div = soup.select_one("#main")  # 1件だけ欲しい場合はselect_one
print("mainの子要素タグ:", [child.name for child in main_div.children if child.name])

# class=title のh1を取得
title = soup.select_one("h1.title")
print("タイトル:", title.text)

# .items 内の .item を全て取得
items = soup.select("ul.items li.item")
for item in items:
    print("アイテム:", item.text)

# 特定のクラスを複数持つ要素
special_items = soup.select("li.item.special")
for s in special_items:
print("スペシャル:", s.text)mainの子要素タグ: ['h1', 'ul']
タイトル: メインタイトル
アイテム: りんご
アイテム: バナナ
アイテム: オレンジ
スペシャル: オレンジCSSセレクタはブラウザの開発者ツールでも確認できるため、実際のページ構造を見ながら指定を作りやすいという利点があります。
HTML要素の情報取得
テキスト(text)の取得と整形
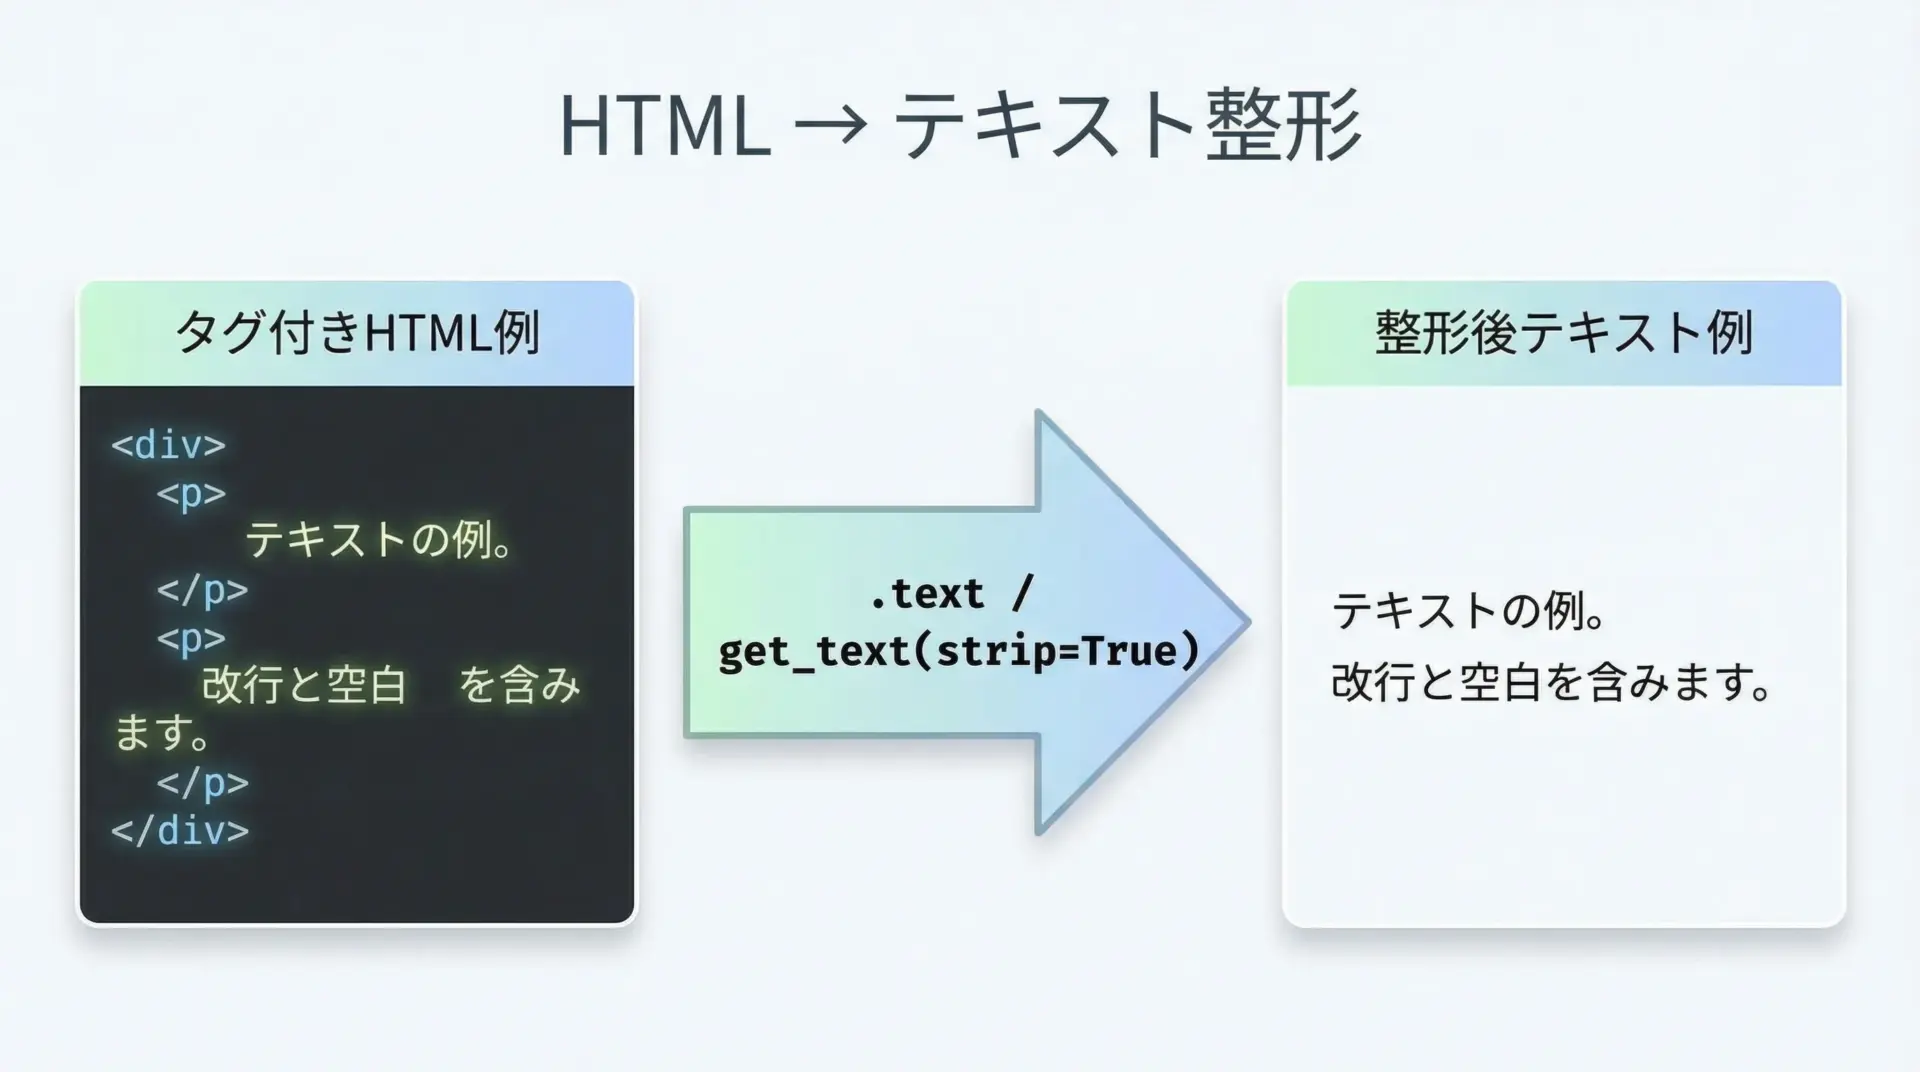
HTML要素から文章だけを取り出したい場合は、.textや.get_text()を利用します。
from bs4 import BeautifulSoup

html = """
<div class="content">
  <h1>タイトル</h1>
  <p>  これは <b>テスト</b> です。 </p>
  <p>改行も
    含まれます。</p>
</div>
"""

soup = BeautifulSoup(html, "html.parser")
content = soup.find("div", class_="content")

# 素直にtextを取得
raw_text = content.text
print("raw_text:")
print(repr(raw_text))

# 余計な空白を取り除きつつテキスト化
clean_text = content.get_text(separator="\n", strip=True)
print("\nclean_text:")
print(clean_text)raw_text:
'\n タイトル\n これは テスト です。 \n 改行も\n 含まれます。\n'
clean_text:
タイトル
これは テスト です。
改行も
含まれます。strip=Trueで前後の空白や改行を取り除き、separatorで要素ごとの区切り文字を指定できるため、用途に応じて読みやすい形に整形できます。
属性(href・srcなど)の取得方法
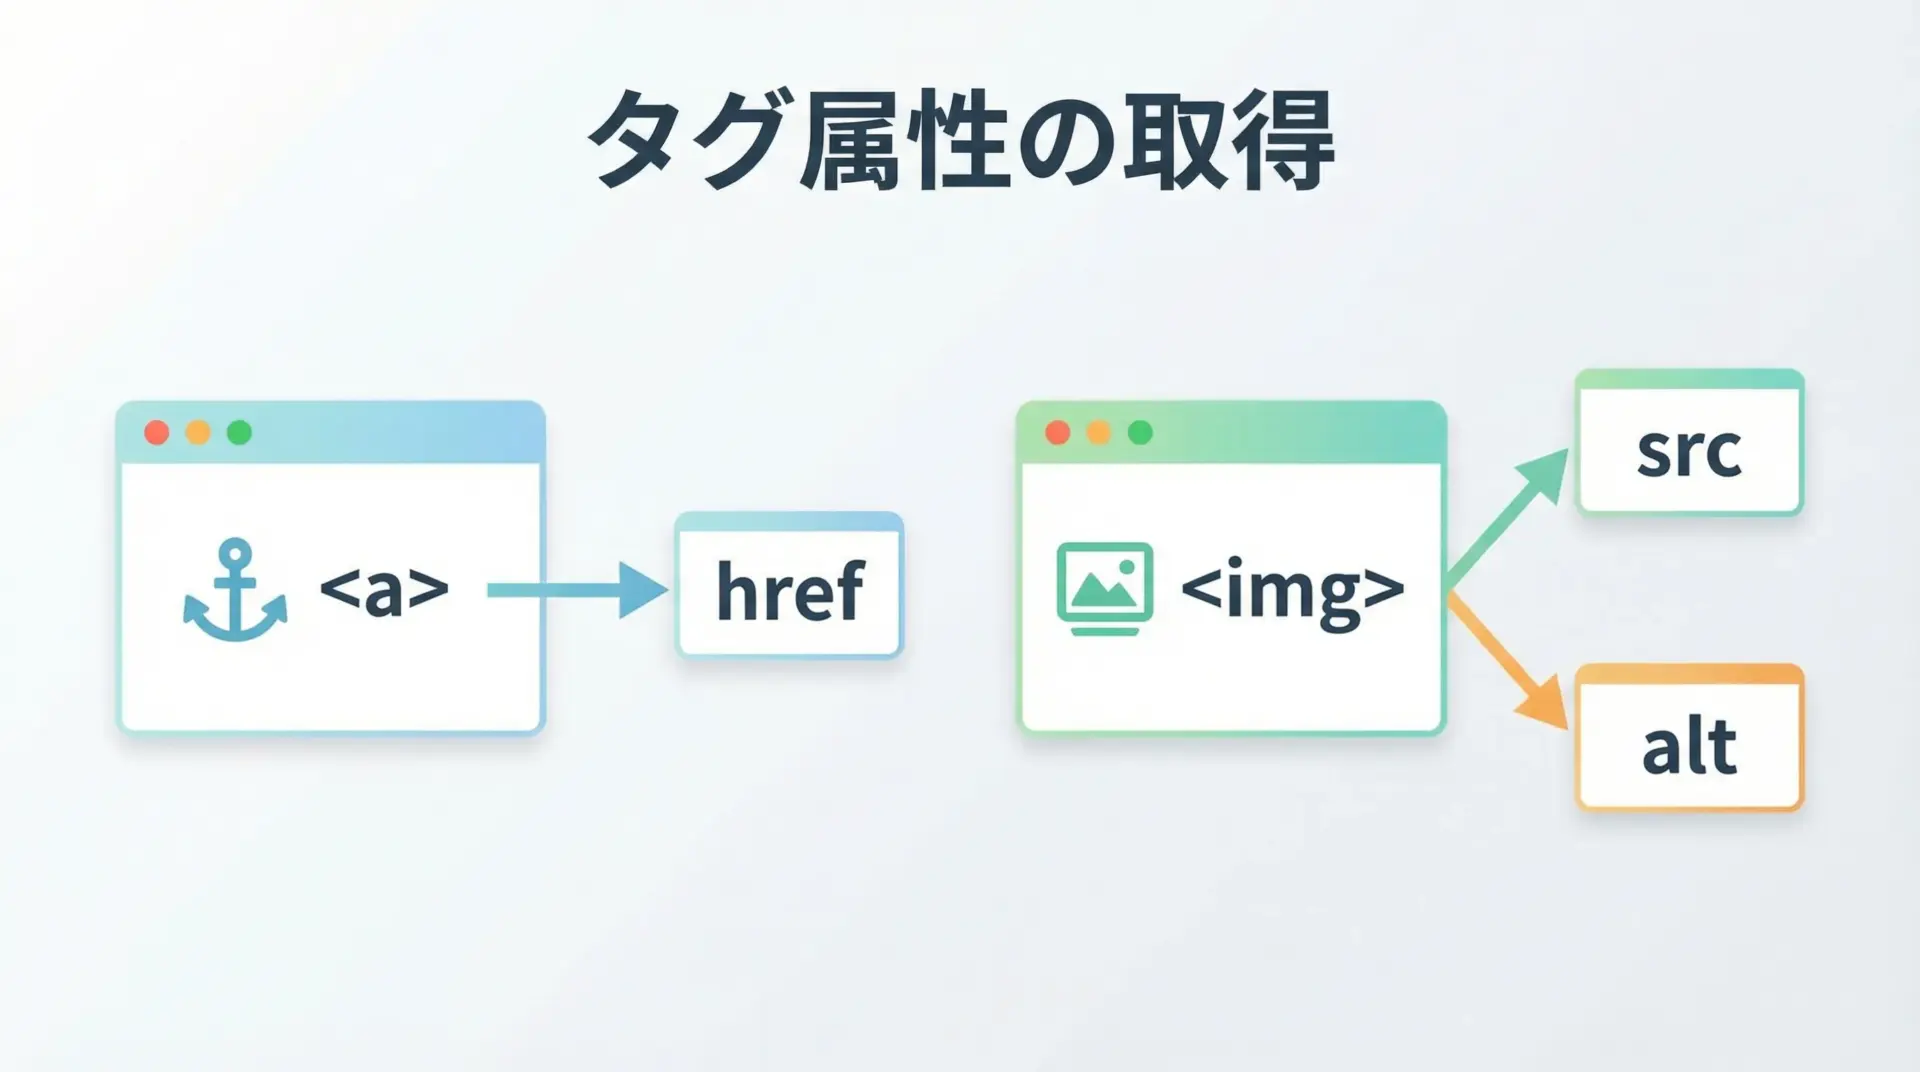
リンクURLや画像URLなど、HTMLタグの属性は.get()または辞書風アクセスで取得できます。
from bs4 import BeautifulSoup

html = """
<div>
  <a href="https://example.com/page1" title="リンク1">ページ1</a>
  <a href="/page2" title="リンク2">ページ2</a>
  <img src="https://example.com/image.jpg" alt="サンプル画像">
</div>
"""

soup = BeautifulSoup(html, "html.parser")

# 1つ目のリンク(aタグ)を取得
link = soup.find("a")

# href属性を取得
href = link.get("href")
title = link.get("title")

print("リンクURL:", href)
print("タイトル属性:", title)

# 画像のsrcとaltを取得
img = soup.find("img")
img_src = img["src"]       # 辞書のようにアクセス
img_alt = img.get("alt")   # getでもOK

print("画像URL:", img_src)
print("代替テキスト:", img_alt)リンクURL: https://example.com/page1
タイトル属性: リンク1
画像URL: https://example.com/image.jpg
代替テキスト: サンプル画像存在しない属性を辞書風にtag["属性名"]で取得しようとするとエラーになるため、不確実な属性はget()を使い、デフォルト値を指定しておくと安全です。
複数要素のループ処理での抽出
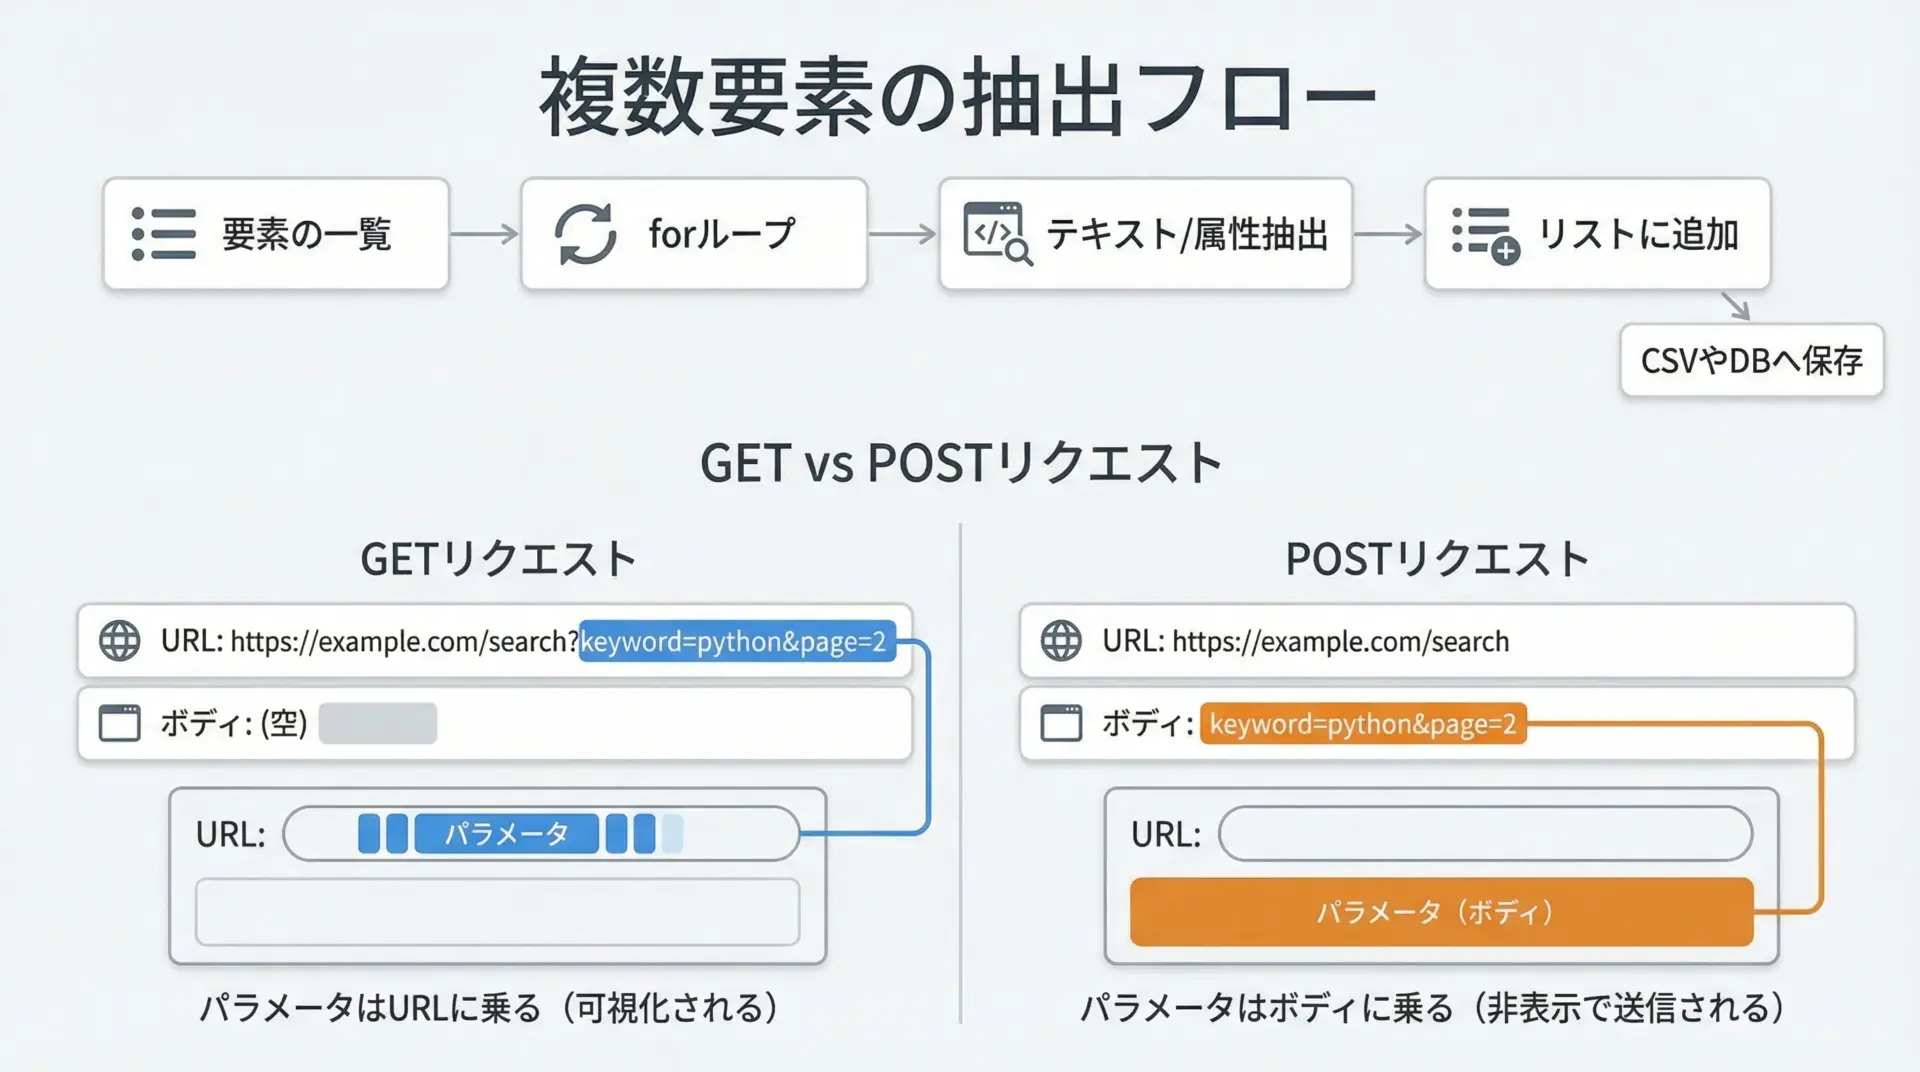
スクレイピングでは、同じ構造の要素が何十件、何百件と並んでいることが多くあります。
このような場合はループ処理で1件ずつ情報を取り出し、リストや辞書にまとめるのが基本です。
from bs4 import BeautifulSoup

html = """
<ul class="products">
  <li class="product">
    <span class="name">商品A</span>
    <span class="price">1000円</span>
  </li>
  <li class="product">
    <span class="name">商品B</span>
    <span class="price">1500円</span>
  </li>
  <li class="product">
    <span class="name">商品C</span>
    <span class="price">2000円</span>
  </li>
</ul>
"""

soup = BeautifulSoup(html, "html.parser")

products = []
for li in soup.select("ul.products li.product"):
    name = li.select_one(".name").get_text(strip=True)
    price = li.select_one(".price").get_text(strip=True)
    products.append({"name": name, "price": price})

for p in products:
print(p){'name': '商品A', 'price': '1000円'}
{'name': '商品B', 'price': '1500円'}
{'name': '商品C', 'price': '2000円'}このように、「1件分の情報の塊」を1つの辞書にし、それをリストとして積み重ねていくと、後の処理もしやすくなります。
スクレイピングの実践例
ニュースサイトから記事タイトルを取得

ここでは、ニュースサイトのトップページから記事タイトルの一覧を取得する例を見ていきます。
実際の運用では対象サイトの利用規約やrobots.txtを必ず確認してください。
ここでは構造の似た仮想のHTMLを使った例を示します。
import requests
from bs4 import BeautifulSoup

def fetch_news_titles(url: str) -> list[str]:
    """ニュースサイトのトップページから記事タイトル一覧を取得する例"""
    response = requests.get(url, timeout=10)
    response.raise_for_status()  # ステータスコードがエラーなら例外を投げる

    soup = BeautifulSoup(response.text, "html.parser")

    # 仮に、記事タイトルが <h2 class="news-title"> に入っているとする
    title_tags = soup.select("h2.news-title")

    titles = []
    for tag in title_tags:
        title_text = tag.get_text(strip=True)
        if title_text:  # 空文字は除外
            titles.append(title_text)
    return titles

if __name__ == "__main__":
    # 実際には対象サイトの構造に合わせてURLとセレクタを調整してください
    demo_html = """
    <html>
      <body>
        <h2 class="news-title">速報: Python 4.0リリース</h2>
        <h2 class="news-title">入門者向けスクレイピング解説</h2>
        <h2 class="news-title">データ分析最新トレンド</h2>
      </body>
    </html>
    """

    # オンラインにアクセスせず、デモHTMLでBeautifulSoupを実行
    soup = BeautifulSoup(demo_html, "html.parser")
    titles = [t.get_text(strip=True) for t in soup.select("h2.news-title")]

    for i, t in enumerate(titles, start=1):
print(f"{i}. {t}")1. 速報: Python 4.0リリース
2. 入門者向けスクレイピング解説
3. データ分析最新トレンド実際のサイトでは、ブラウザの開発者ツールでタイトル部分のタグやクラス名を確認し、その構造に合わせてselect()のセレクタを調整します。
ECサイトの商品名と価格を抽出
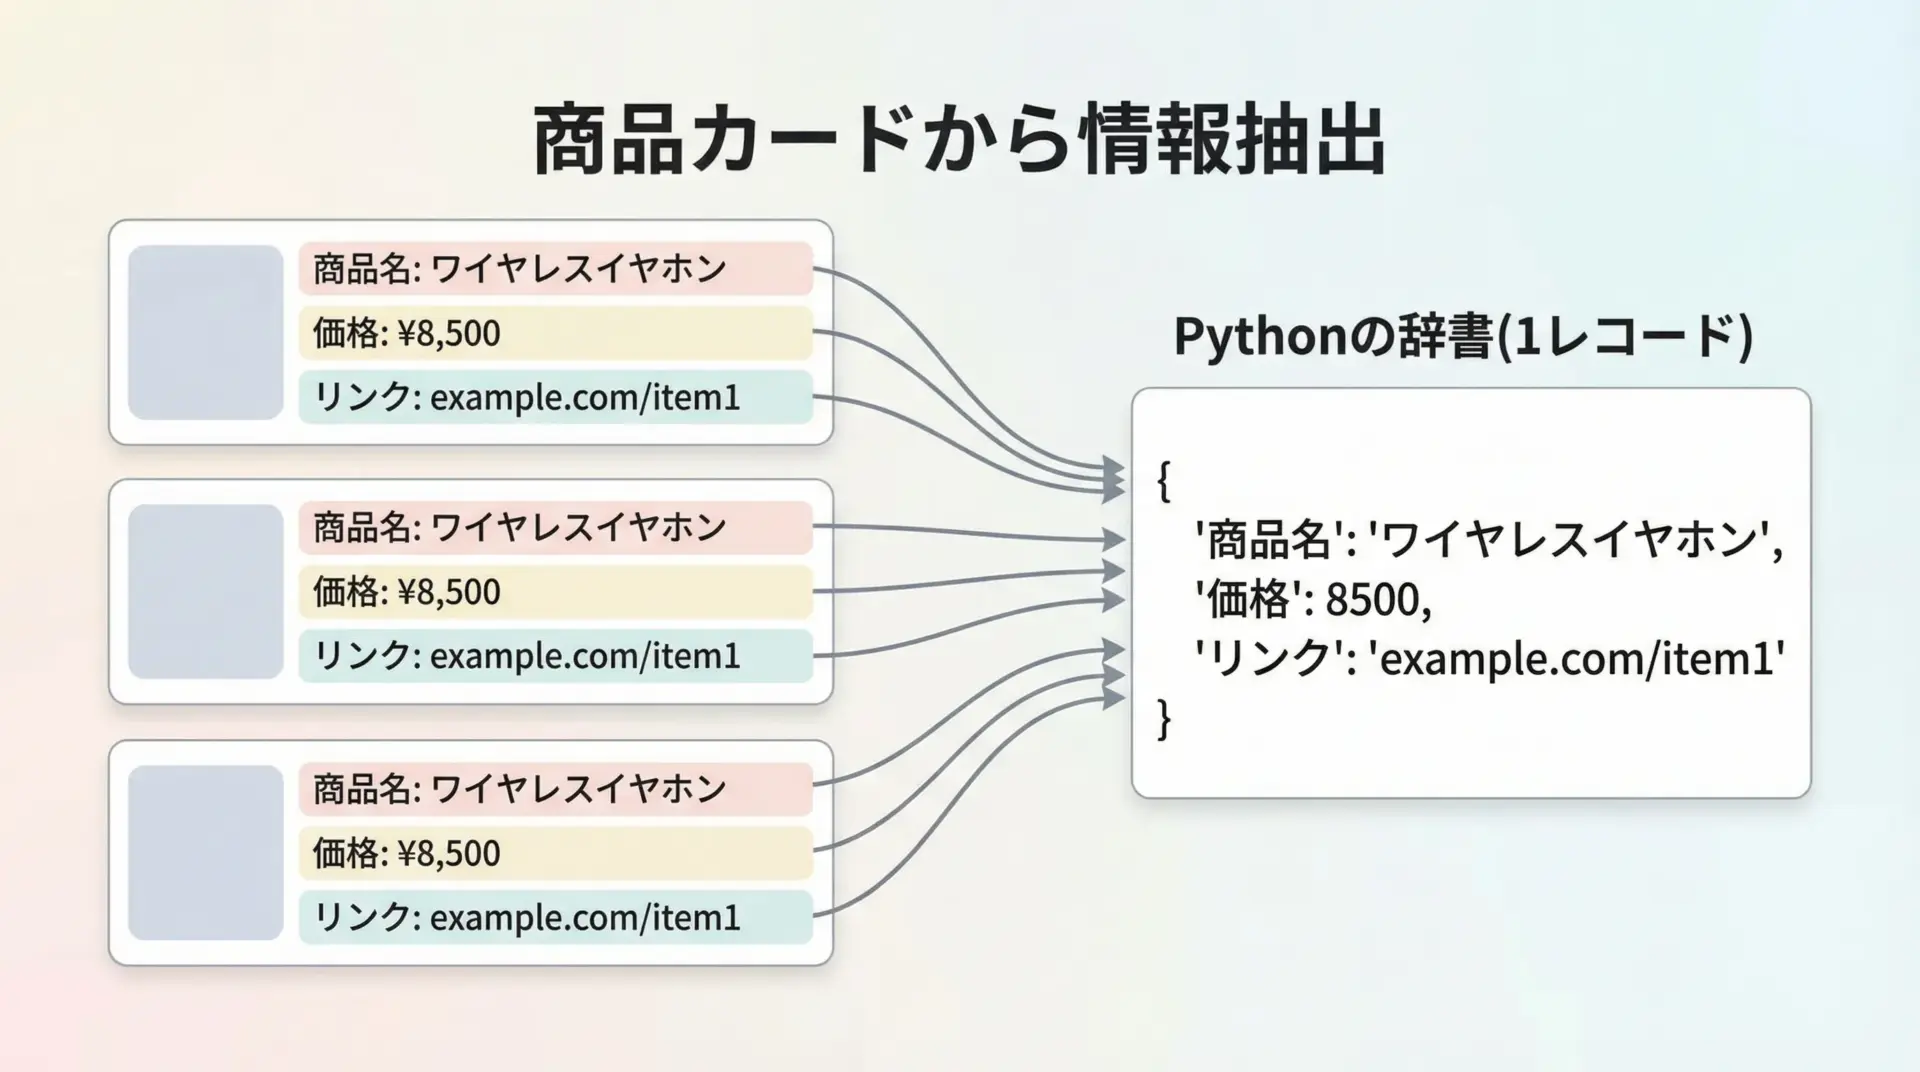
次に、ECサイトの商品一覧ページから商品名と価格を抽出する想定の例を見てみます。
こちらも実サイトではなく、サンプルHTMLを用いて構造を理解することに集中します。
from bs4 import BeautifulSoup

html = """
<div class="product-list">
  <div class="product-card">
    <a class="product-link" href="/item/1">
      <span class="product-name">Python入門書</span>

    <span class="product-price">1,980円</span>
  </div>
  <div class="product-card">
    <a class="product-link" href="/item/2">
      <span class="product-name">スクレイピング実践ガイド</span>

    <span class="product-price">2,480円</span>
  </div>
</div>
"""

soup = BeautifulSoup(html, "html.parser")

base_url = "https://shop.example.com"  # 相対URLを絶対URLに変換するためのベースURL

products = []
for card in soup.select(".product-list .product-card"):
    name_tag = card.select_one(".product-name")
    price_tag = card.select_one(".product-price")
    link_tag = card.select_one(".product-link")

    name = name_tag.get_text(strip=True) if name_tag else ""
    price = price_tag.get_text(strip=True) if price_tag else ""
    href = link_tag.get("href") if link_tag else ""

    # 相対URLを絶対URLに変換(非常に簡易的な例)
    if href and href.startswith("/"):
        url = base_url + href
    else:
        url = href

    products.append({"name": name, "price": price, "url": url})

for p in products:
print(p){'name': 'Python入門書', 'price': '1,980円', 'url': 'https://shop.example.com/item/1'}
{'name': 'スクレイピング実践ガイド', 'price': '2,480円', 'url': 'https://shop.example.com/item/2'}商品カードの塊を1つの単位として捉え、その中から必要な情報(名前・価格・リンクなど)を取り出すというパターンは、多くのECサイトや検索結果ページにも応用できます。
テーブルデータをリストやCSVに保存
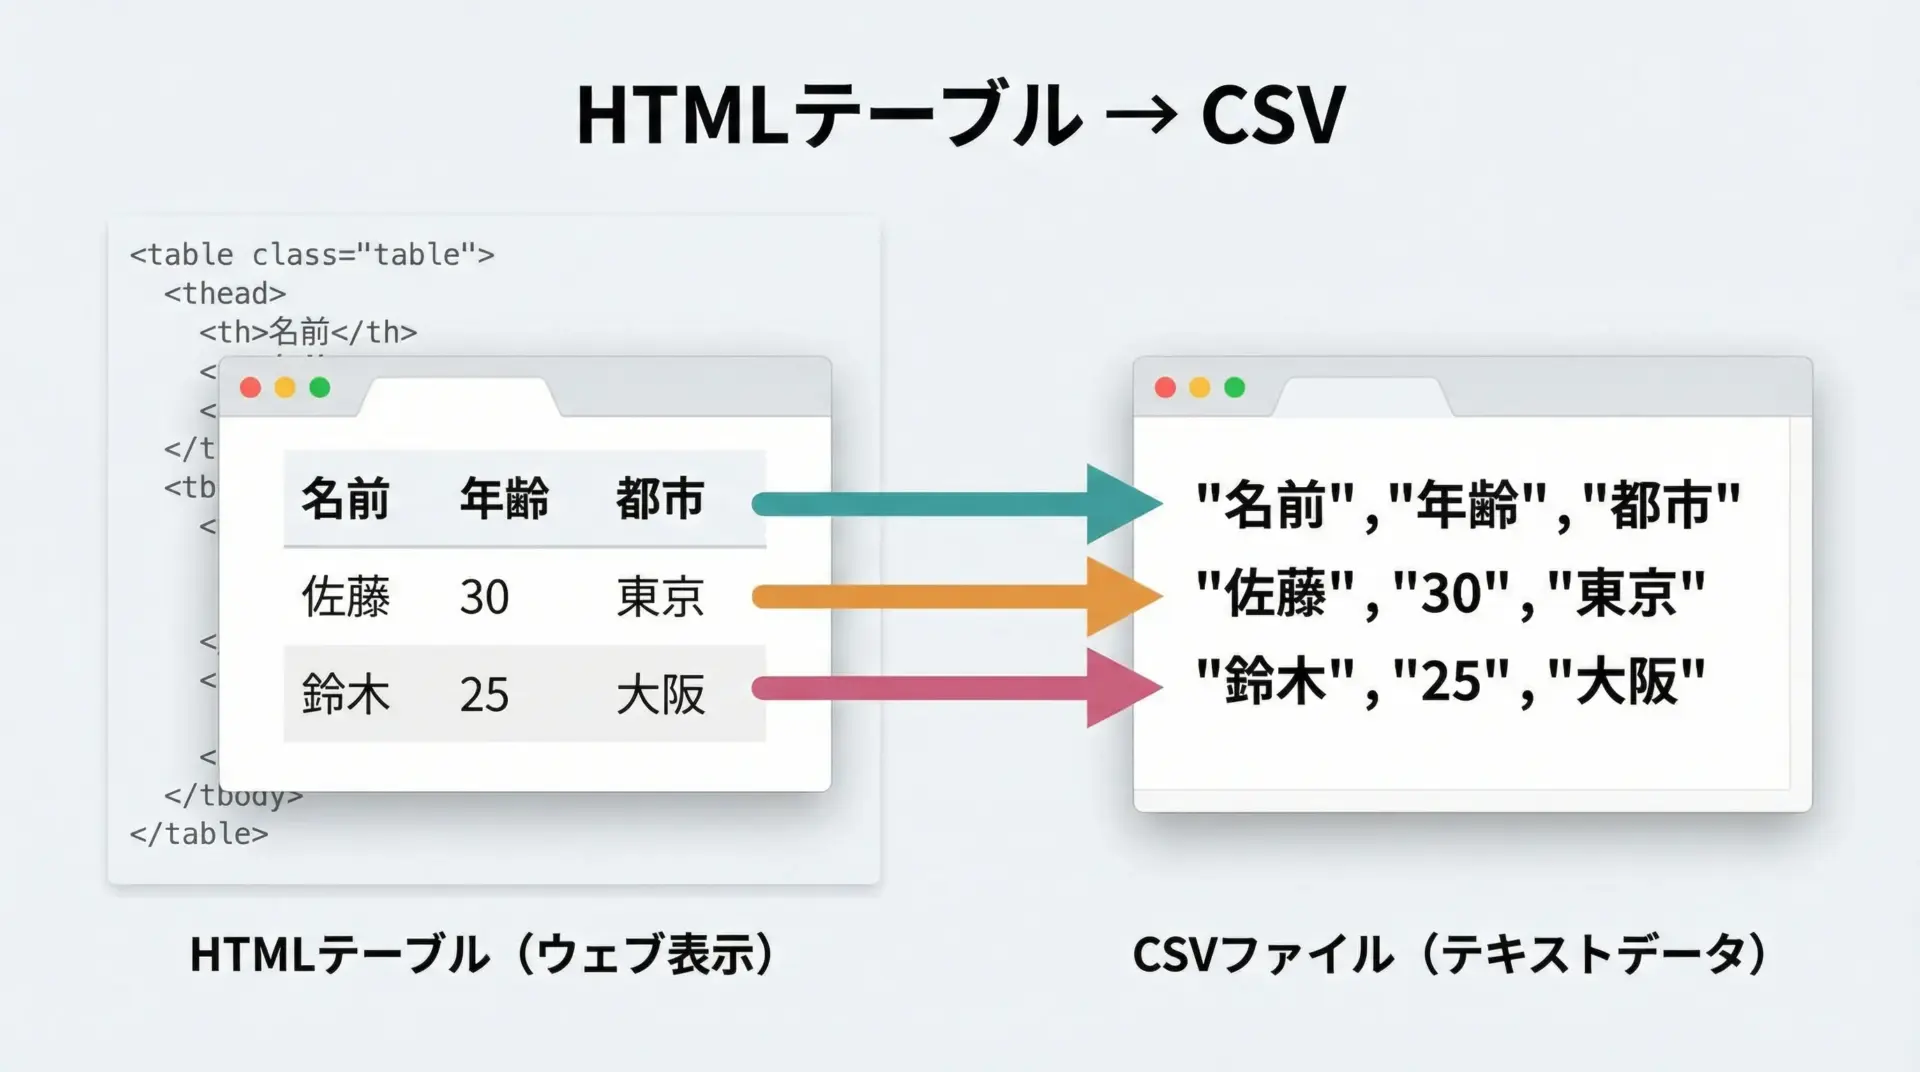
統計情報や一覧表はHTMLの<table>タグで記載されていることが多く、これをCSVに変換できると非常に便利です。
import csv
from bs4 import BeautifulSoup
from io import StringIO

html = """
<table id="scores">
  <thead>
    <tr><th>名前</th><th>国語</th><th>数学</th></tr>
  </thead>
  <tbody>
    <tr><td>佐藤</td><td>80</td><td>90</td></tr>
    <tr><td>鈴木</td><td>75</td><td>85</td></tr>
    <tr><td>高橋</td><td>90</td><td>95</td></tr>
  </tbody>
</table>
"""

soup = BeautifulSoup(html, "html.parser")
table = soup.find("table", id="scores")

# ヘッダー行を取得
headers = [th.get_text(strip=True) for th in table.select("thead tr th")]

# データ行を取得
rows = []
for tr in table.select("tbody tr"):
    cols = [td.get_text(strip=True) for td in tr.select("td")]
    rows.append(cols)

# メモリ上の文字列としてCSVを書き出す例(実際はファイルに書くことが多い)
output = StringIO()
writer = csv.writer(output)
writer.writerow(headers)
writer.writerows(rows)

csv_text = output.getvalue()
print(csv_text)名前,国語,数学
佐藤,80,90
鈴木,75,85
高橋,90,95このように、テーブル構造は行(tr)とセル(td/th)の2段階でループすることで、きれいに二次元の配列に落とし込むことができます。
実際にはopen("scores.csv", "w", newline="", encoding="utf-8")のようにファイルに書き出します。
応用テクニック
ネストした要素からのデータ抽出
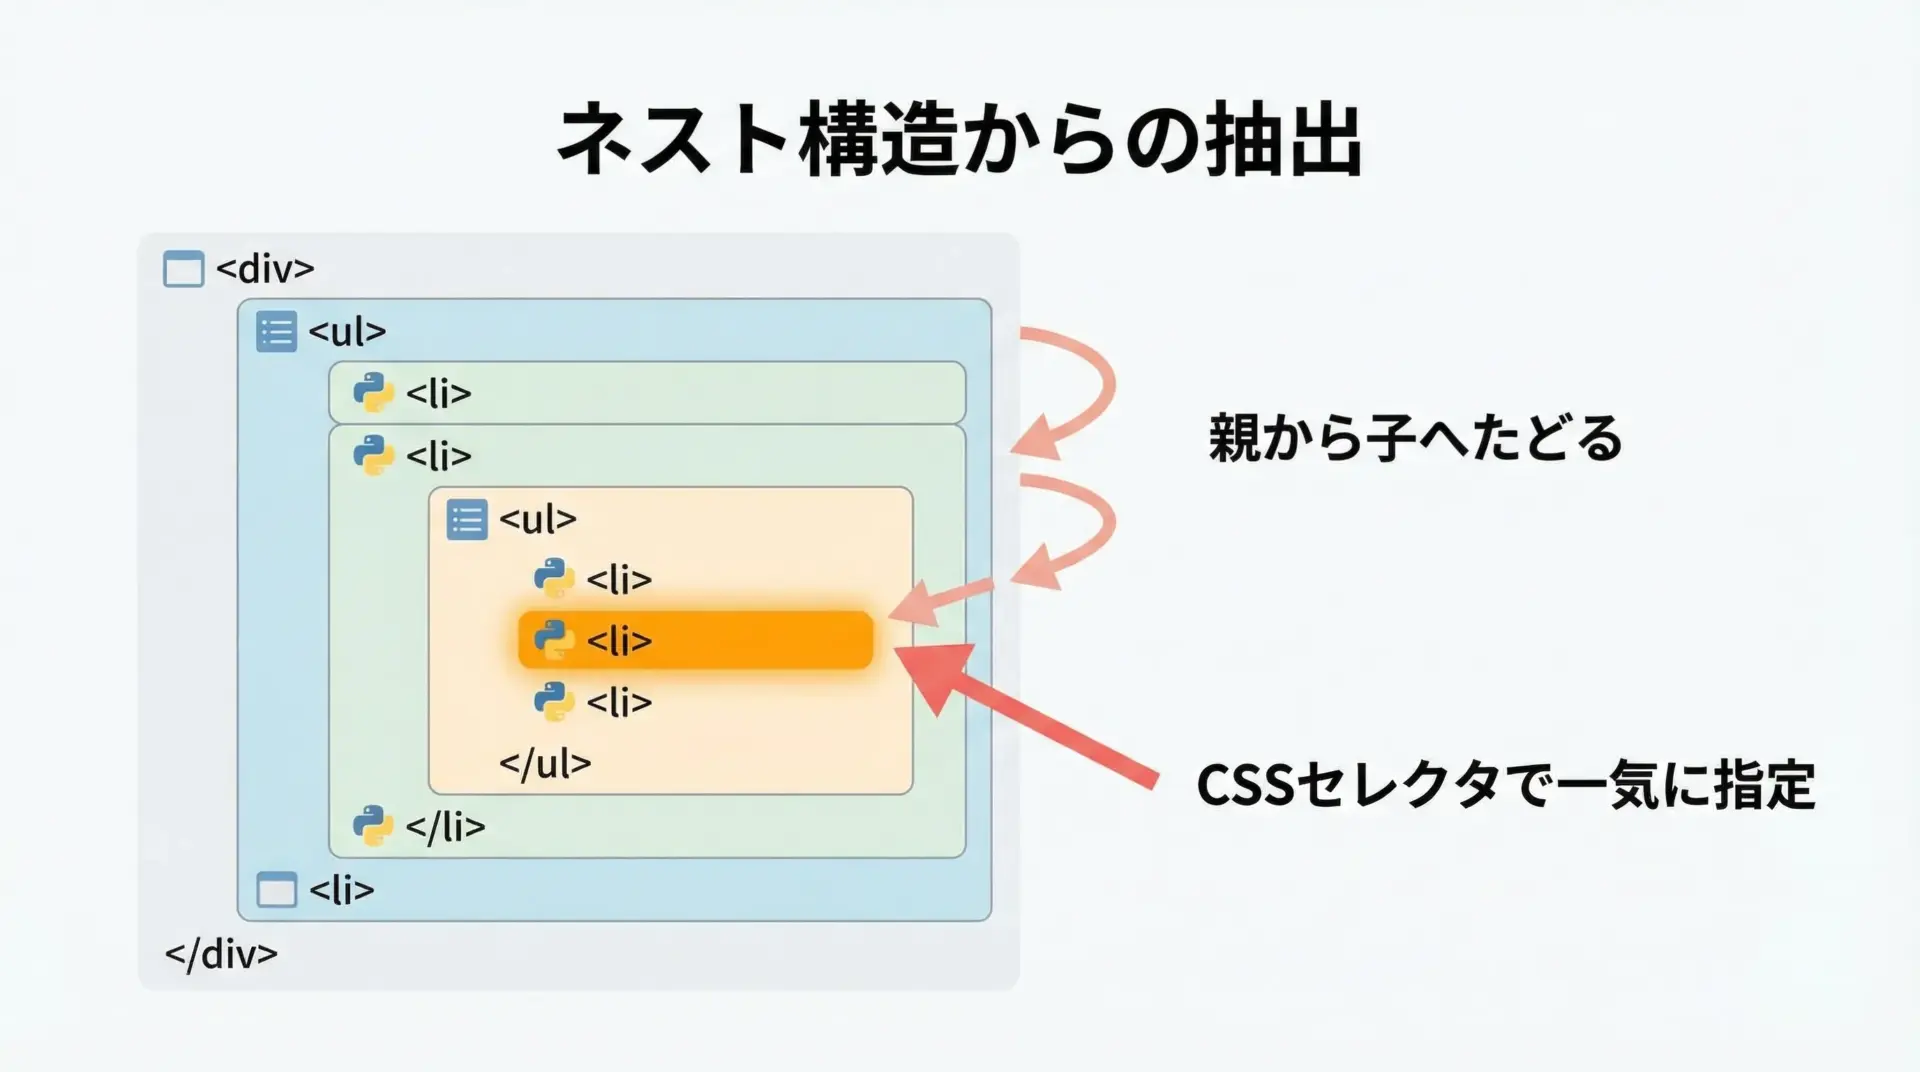
現実のWebページでは、タグが何重にも入れ子になっていることが多く、目的のデータが深い階層にある場合があります。
このような場合、親要素から順にたどる方法と、CSSセレクタで一気に指定する方法の2つを状況に応じて使い分けます。
from bs4 import BeautifulSoup

html = """
<div class="article">
  <div class="header">
    <h1 class="title">スクレイピング入門</h1>
    <div class="meta">
      <span class="author">山田太郎</span>
      <span class="date">2025-01-01</span>
    </div>
  </div>
  <div class="body">
    <p>この記事ではBeautifulSoupの使い方を解説します。</p>
  </div>
</div>
"""

soup = BeautifulSoup(html, "html.parser")

article = soup.find("div", class_("article")) if False else soup.find("div", class_="article")  # ダミー行(後で説明)
上記のコードには誤りが含まれているため、正しい形で改めて示します。
from bs4 import BeautifulSoup

html = """
<div class="article">
  <div class="header">
    <h1 class="title">スクレイピング入門</h1>
    <div class="meta">
      <span class="author">山田太郎</span>
      <span class="date">2025-01-01</span>
    </div>
  </div>
  <div class="body">
    <p>この記事ではBeautifulSoupの使い方を解説します。</p>
  </div>
</div>
"""

soup = BeautifulSoup(html, "html.parser")

# 親要素(article)から順番にたどる方法
article = soup.find("div", class_="article")
header = article.find("div", class_="header")
title = header.find("h1", class_="title").get_text(strip=True)
author = header.find("span", class_="author").get_text(strip=True)
date = header.find("span", class_="date").get_text(strip=True)
body_text = article.find("div", class_="body").get_text(strip=True)

print(title, author, date)
print(body_text)

# CSSセレクタで一気に指定する方法
title2 = soup.select_one(".article .header h1.title").get_text(strip=True)
author2 = soup.select_one(".article .meta .author").get_text(strip=True)

print(title2, author2)スクレイピング入門 山田太郎 2025-01-01
この記事ではBeautifulSoupの使い方を解説します。
スクレイピング入門 山田太郎ネストが深い場合でも、「親→子→孫」と段階的に絞り込むと、思わぬ要素を拾ってしまうリスクを減らせます。
一方、目標がはっきりしている場合は、CSSセレクタで直接指定した方がコードは簡潔になります。
正規表現を使った柔軟な検索
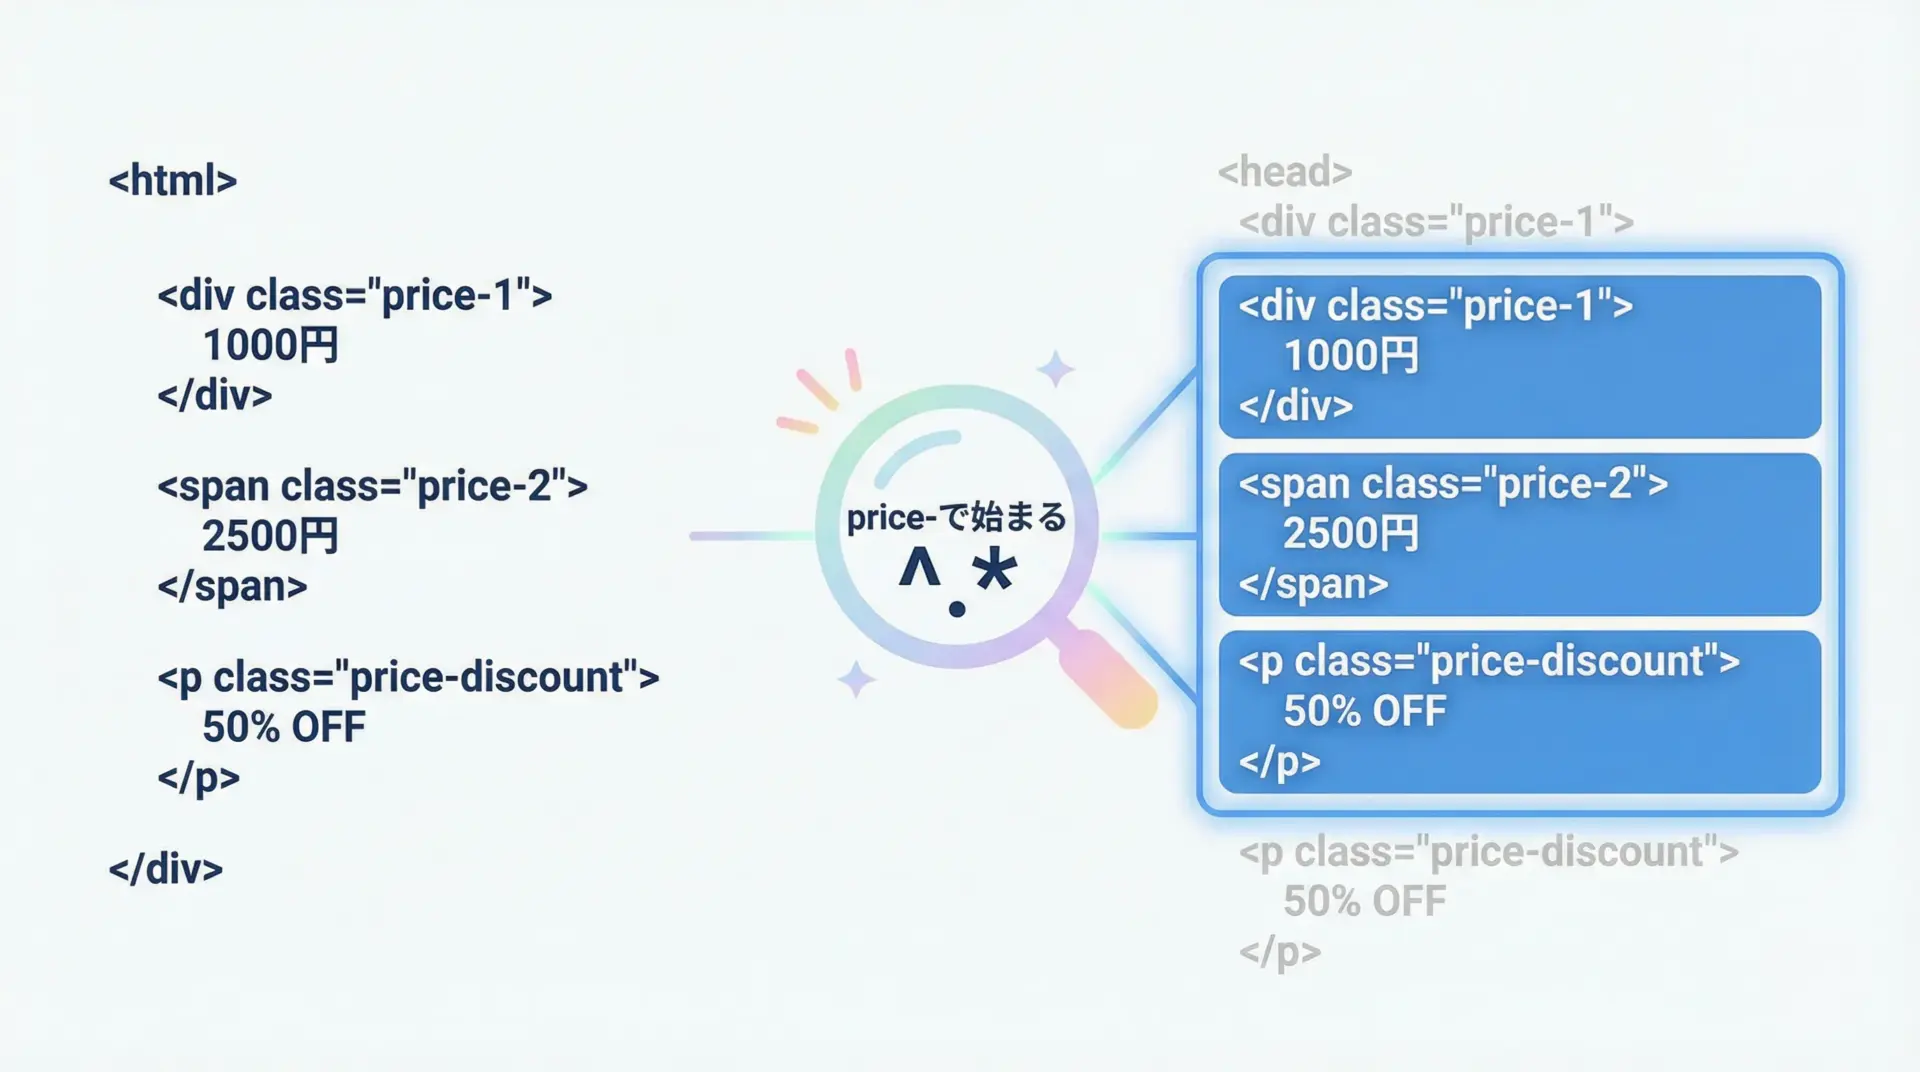
タグ名やクラス名、テキスト内容が一定の規則はあるものの完全には決まっていない場合、正規表現を使うと柔軟な検索が可能になります。
import re
from bs4 import BeautifulSoup

html = """
<ul>
  <li class="price-normal">1000円</li>
  <li class="price-discount">800円</li>
  <li class="price-special">500円</li>
  <li class="other">対象外</li>
</ul>
"""

soup = BeautifulSoup(html, "html.parser")

# class属性が "price-" で始まる要素を全て取得
pattern = re.compile(r"^price-")
price_tags = soup.find_all("li", class_=pattern)

for tag in price_tags:
    print(tag["class"], ":", tag.get_text(strip=True))

# テキストに「円」が含まれる要素を検索
yen_pattern = re.compile("円")
yen_tags = soup.find_all(string=yen_pattern)  # テキストノードで検索

for text in yen_tags:
print("テキスト:", text.strip())['price-normal'] : 1000円
['price-discount'] : 800円
['price-special'] : 500円
テキスト: 1000円
テキスト: 800円
テキスト: 500円
テキスト: 対象外パターンに合致するものを一括で処理したい場合や、部分一致で対象を絞りたい場合に正規表現は非常に有効です。
ただし、複雑な正規表現は可読性を損なうため、コメントを付けたりシンプルなパターンに留める工夫が必要です。
ページネーション対応のスクレイピング
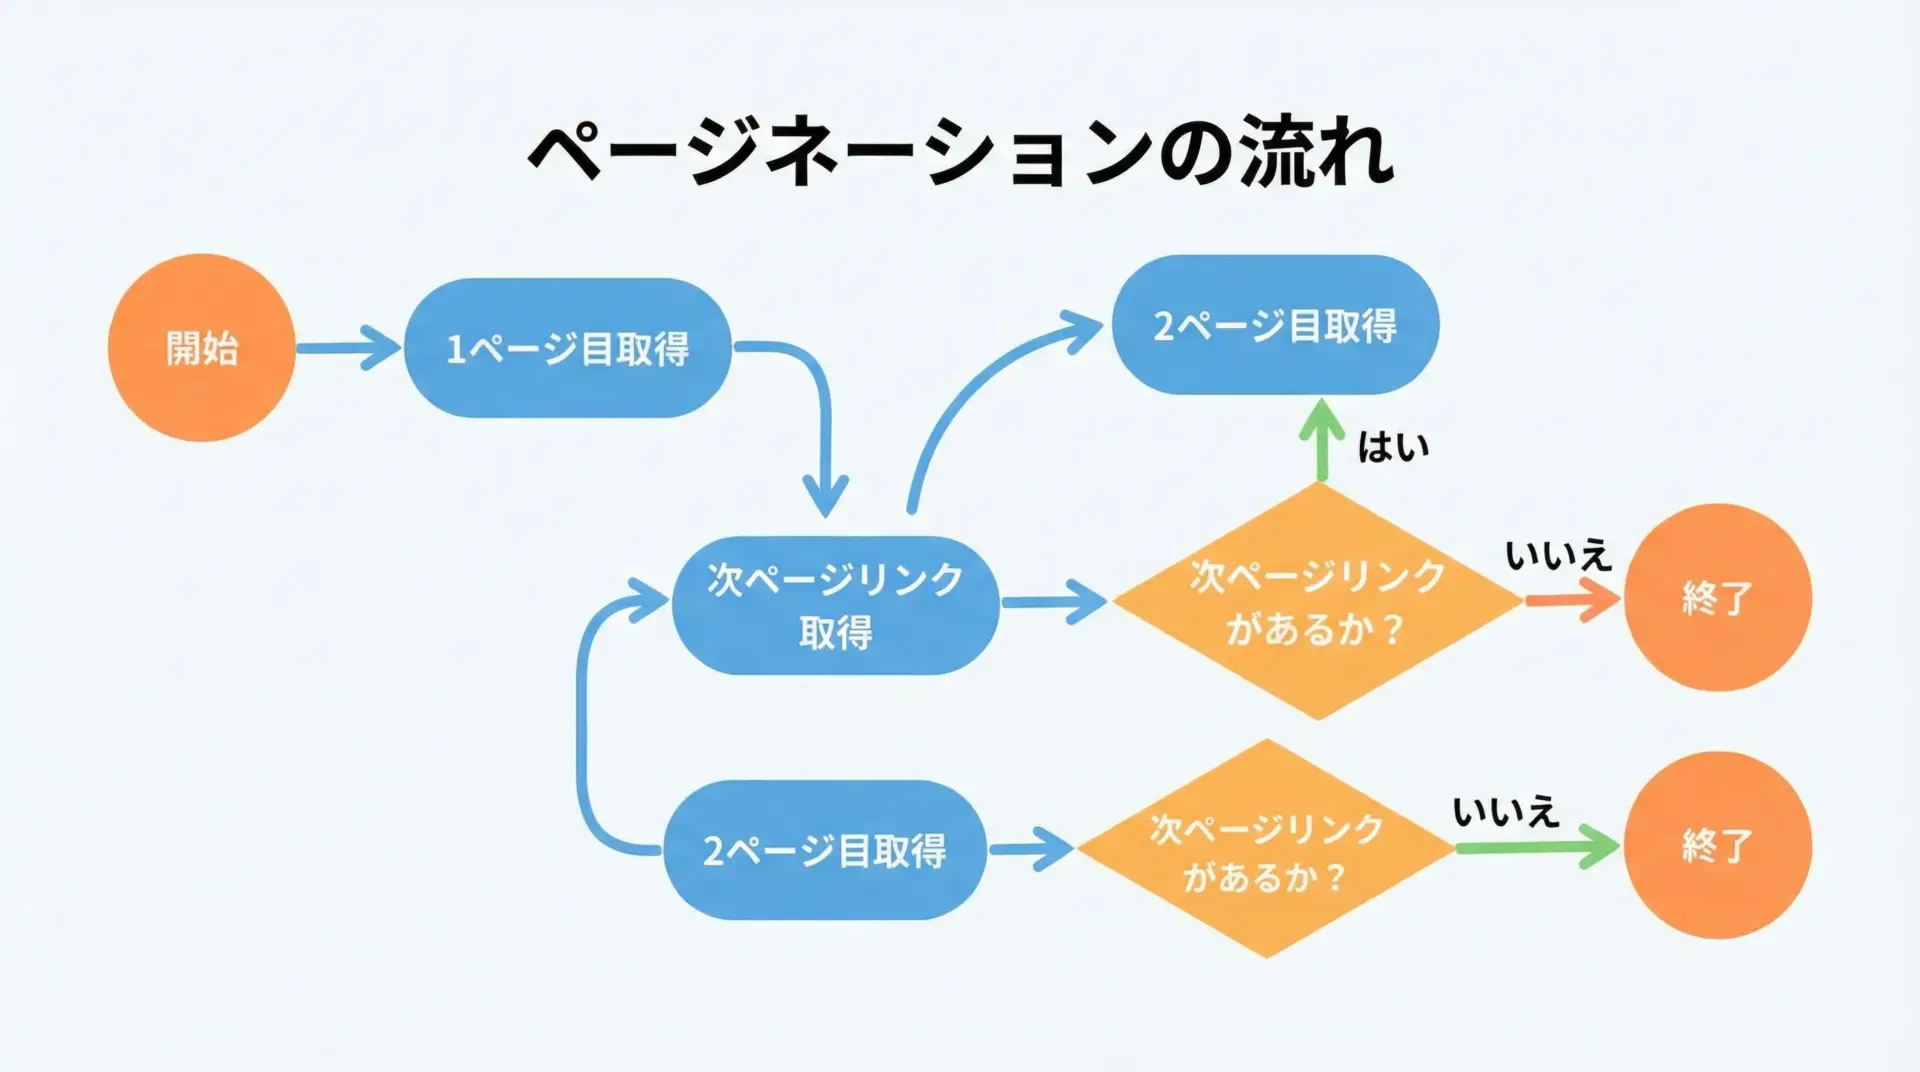
多くのサイトでは、検索結果や商品一覧が複数ページに分かれて表示されます。
これをすべて取得したい場合、「ページネーション」の仕組みに対応したループ処理が必要になります。
import requests
from bs4 import BeautifulSoup
from urllib.parse import urljoin

def scrape_all_pages(start_url: str) -> list[str]:
    """ページネーションされた記事一覧から、全ページ分のタイトルを取得する例"""
    titles: list[str] = []
    url = start_url

    while url:
        print("Fetching:", url)
        response = requests.get(url, timeout=10)
        response.raise_for_status()
        soup = BeautifulSoup(response.text, "html.parser")

        # 仮: 記事タイトルが .article-title にあるとする
        for tag in soup.select(".article-title"):
            title = tag.get_text(strip=True)
            if title:
                titles.append(title)

        # 仮: 「次へ」のリンクが a.next にあるとする
        next_link = soup.select_one("a.next")
        if next_link and next_link.get("href"):
            # 相対URLを絶対URLに変換
            url = urljoin(url, next_link["href"])
        else:
            url = None  # 次ページがないのでループ終了

    return titles

# 上記関数は実際のWebサイトに対して利用する想定のため、ここでは呼び出し例だけを示します。
if __name__ == "__main__":
print("この関数は実際のサイトURLを指定して利用します。")この関数は実際のサイトURLを指定して利用します。ページネーション対応では、「1ページ分のスクレイピングロジック」と「次ページのURLを取得するロジック」をきれいに分けておくと、後からの修正もしやすくなります。
スクレイピング時の注意点
robots.txtと利用規約の確認
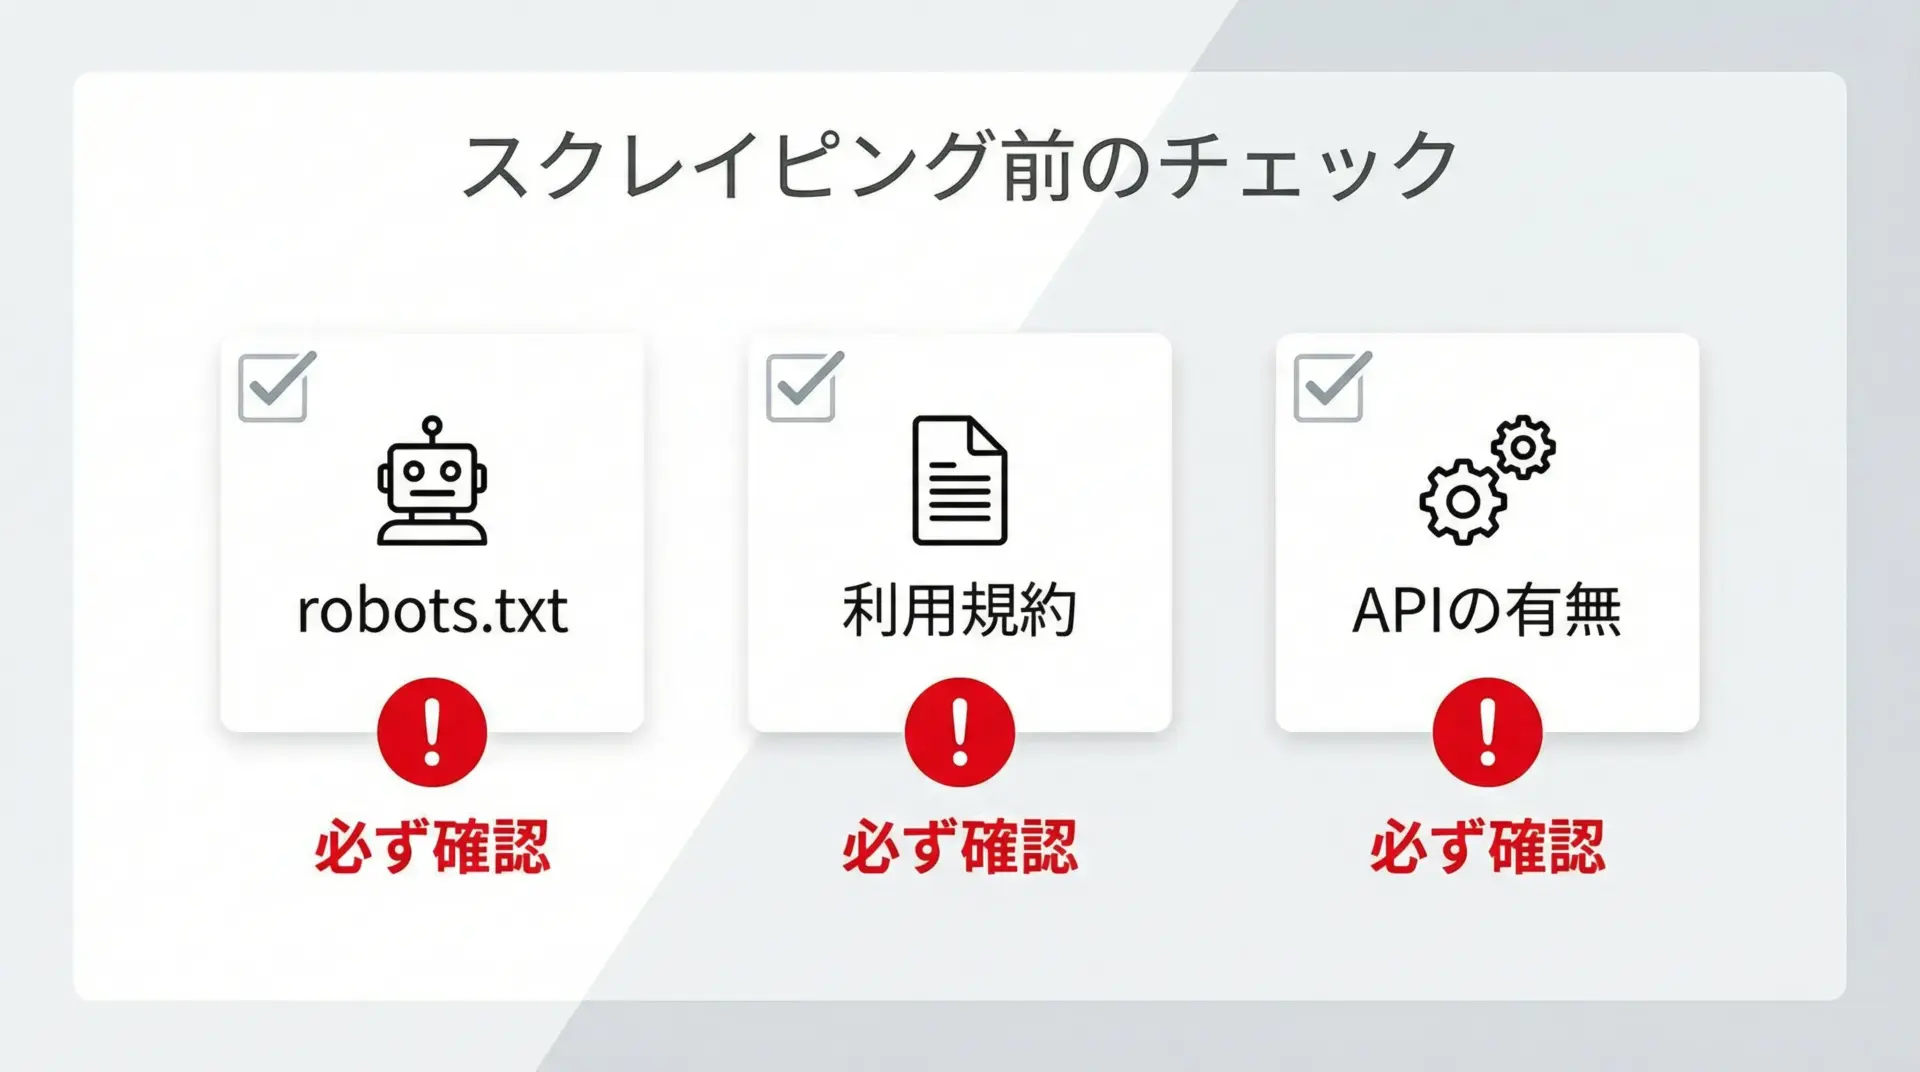
スクレイピングは技術的には簡単に行えますが、法的・倫理的な観点から必ず守るべきルールとマナーがあります。
最初に確認すべきなのがrobots.txtと利用規約です。
robots.txtは、サイトの管理者がクローラーに対してアクセスして良いパスと悪いパスを指定するファイルです。
多くの場合、https://example.com/robots.txtのようなURLで公開されています。
ここで禁止されているパスにスクレイピングでアクセスすることは避けなければなりません。
また、サイトの利用規約には自動取得やクローリングに関する明確な禁止事項が書かれている場合があります。
利用規約に反するスクレイピングは、最悪の場合法的トラブルに発展する可能性があるため、必ず事前に確認し、疑わしい場合は問い合わせることをおすすめします。
さらに、公式APIが提供されている場合は、できる限りAPIを利用するのが基本です。
APIは機械によるデータ取得を前提としているため、HTMLスクレイピングよりも安定しており、サイト側にかかる負荷もコントロールしやすくなっています。
アクセス頻度とマナー
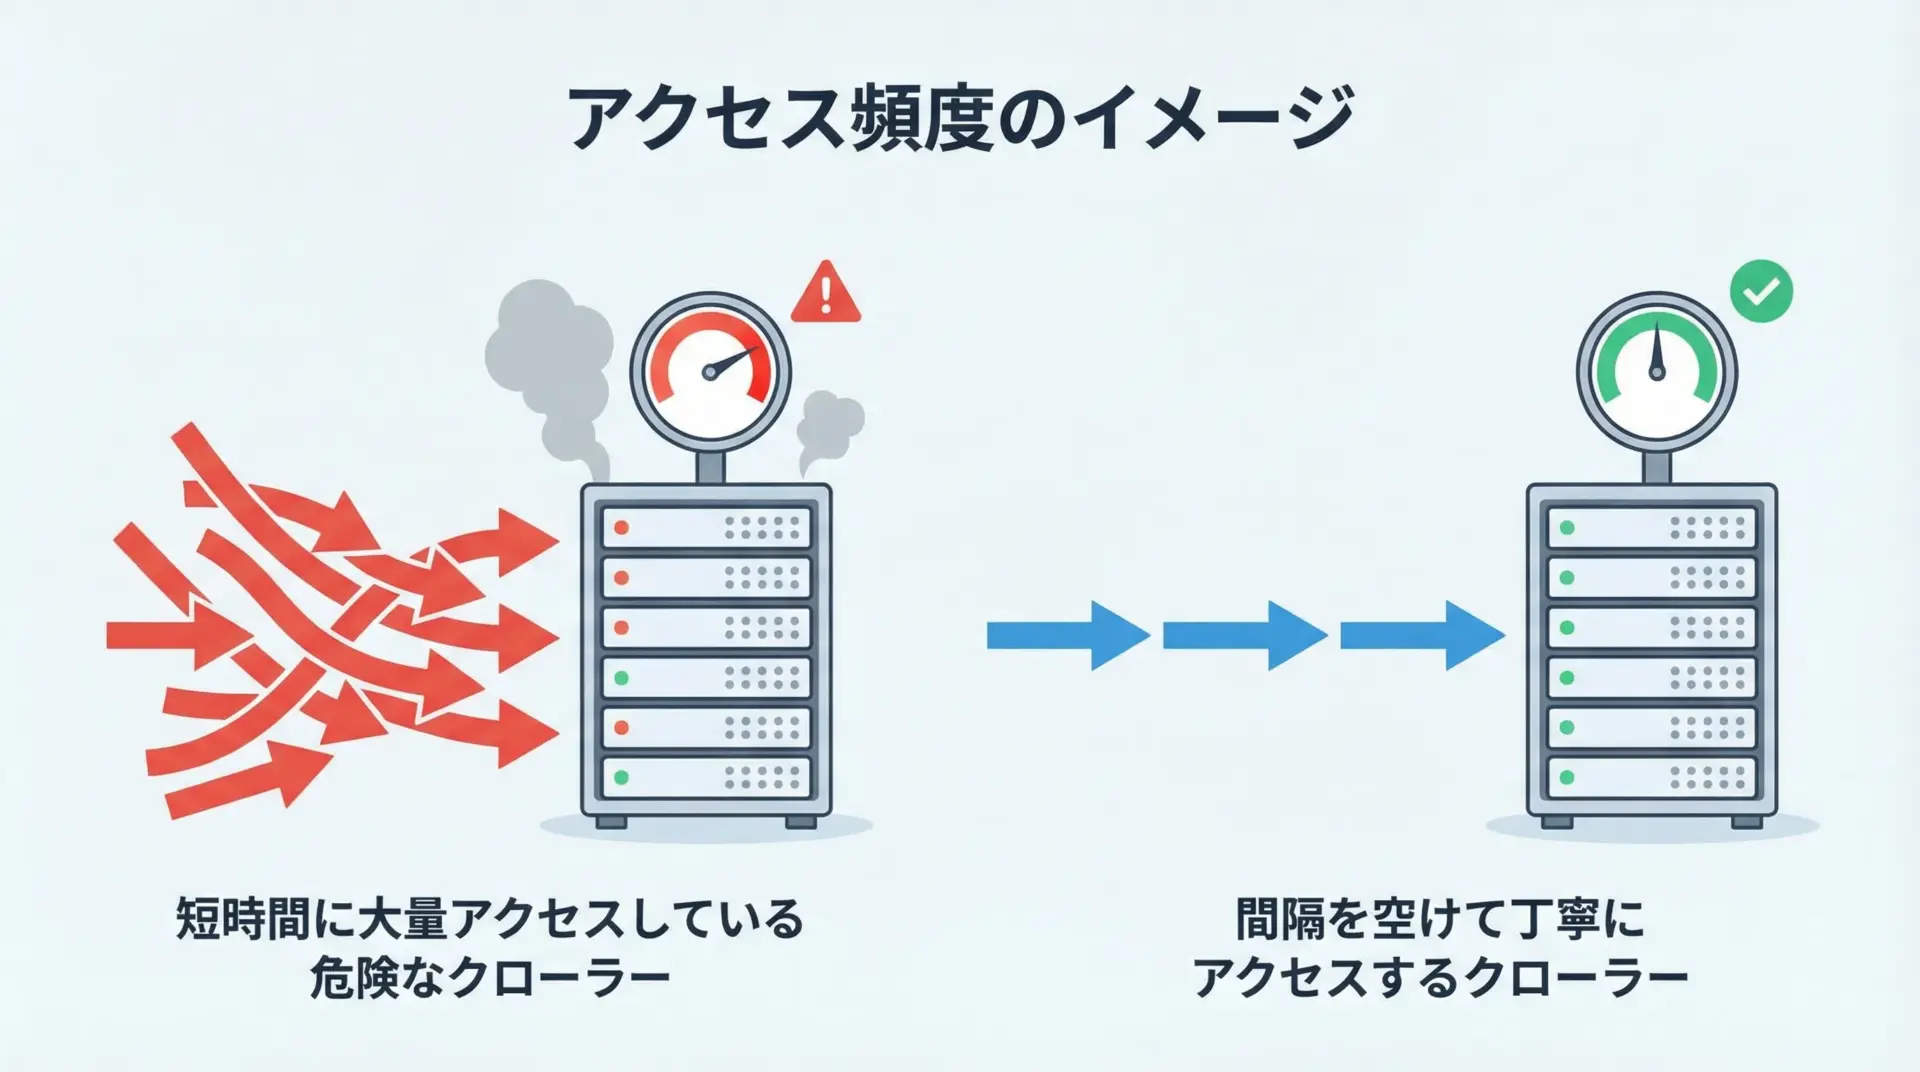
スクレイピングでは、短時間に大量のリクエストを送ると、対象サイトに大きな負荷をかけてしまう恐れがあります。
場合によってはDDoS攻撃とみなされ、アクセスがブロックされたり、IPアドレスが遮断される可能性もあります。
マナーとして意識したいポイントを文章で整理すると、まずアクセス間隔を十分に空けることが挙げられます。
1秒〜数秒に1回程度のアクセスに抑え、負荷がかからないよう配慮します。
Pythonではtime.sleep()を使って簡単に実装できます。
次に、User-Agentを適切に設定することも重要です。
デフォルトのUser-Agentでは不審なアクセスと判断されることがあり、適切な説明と連絡先を含む文字列に設定しておくと、問題が発生した際にもサイト運営者とのコミュニケーションが取りやすくなります。
最後に、必要以上にデータを取得しないという姿勢も大切です。
目的に必要な最小限のページと項目だけを取得するよう設計し、無駄なトラフィックを発生させないように心がけましょう。
動的サイトとJavaScript対応の限界
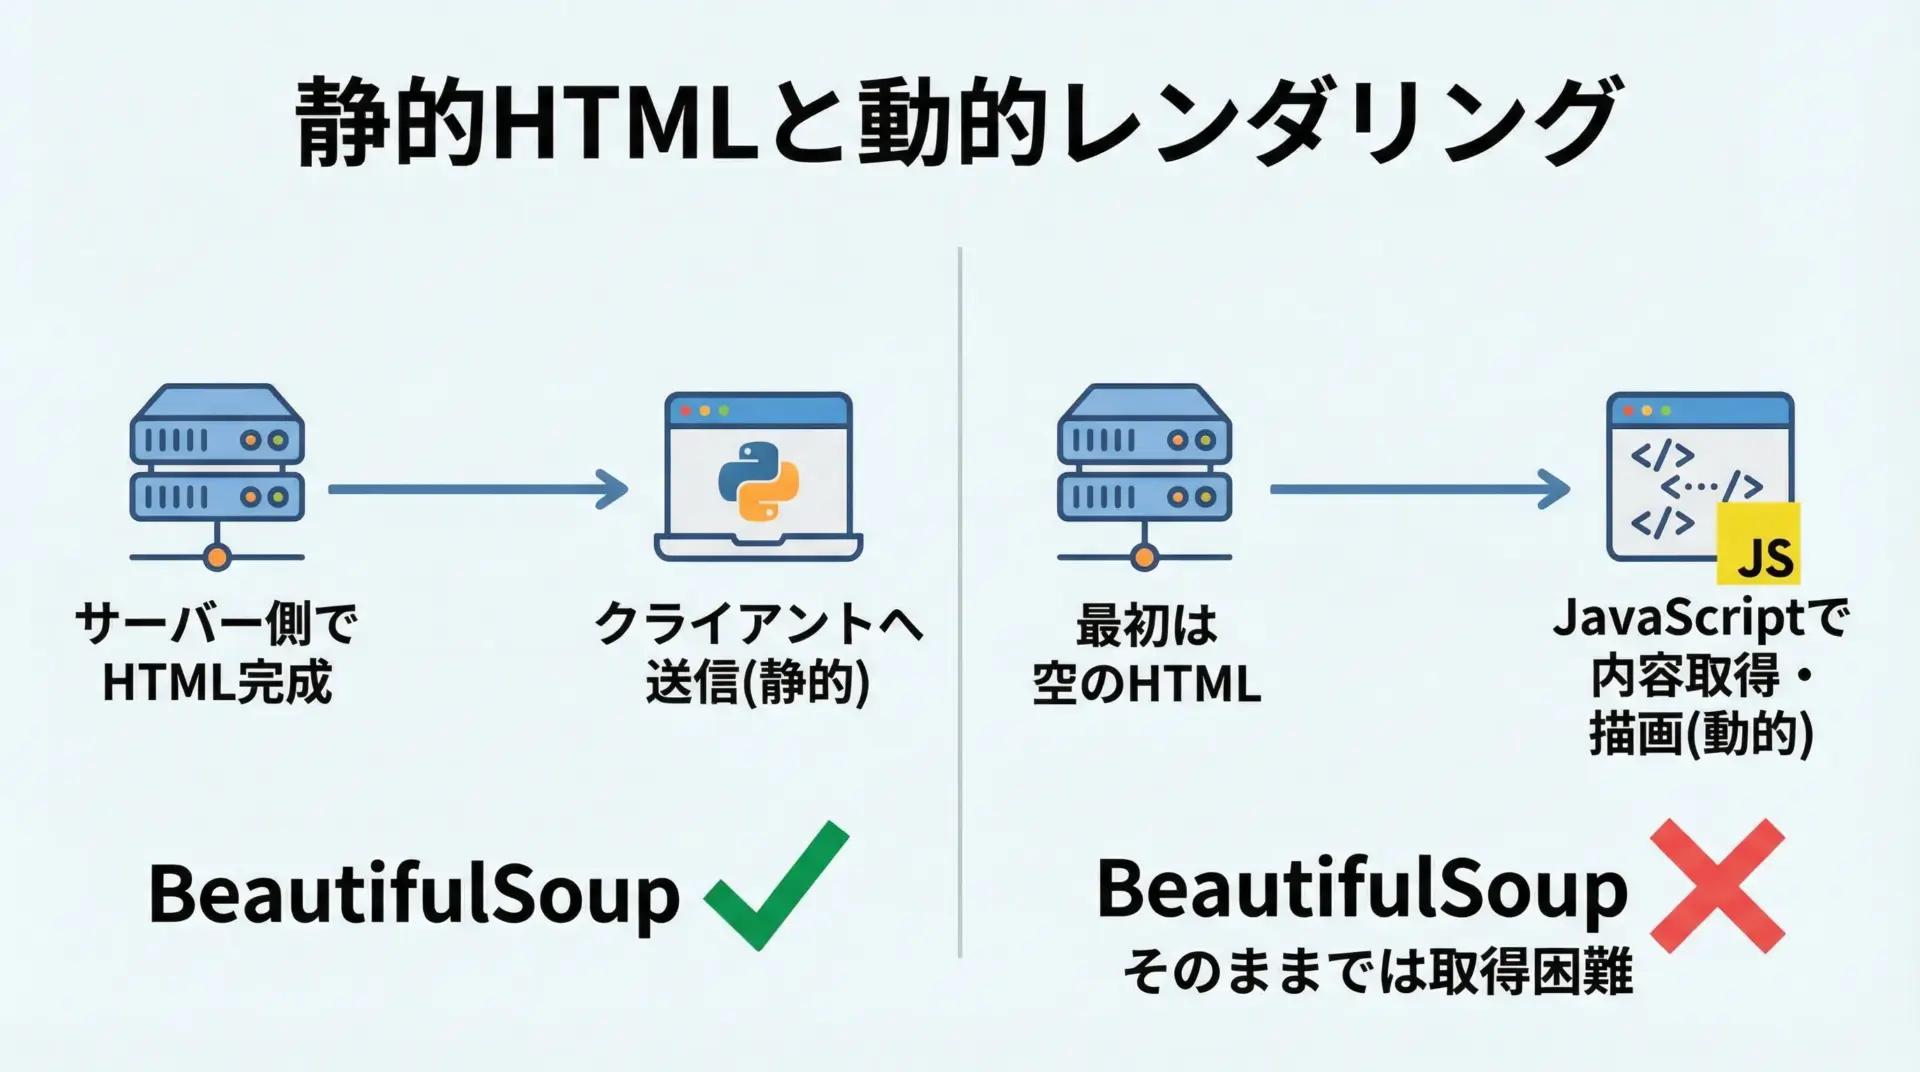
近年のWebサイトは、JavaScriptで動的にコンテンツを生成するケースが増えています。
BeautifulSoupはあくまで「取得したHTMLを解析する」ライブラリであり、JavaScriptの実行は行いません。
そのため、ブラウザで見ると情報が表示されているのに、requests.get()で取得したHTMLにはその情報が含まれていない、という状況が起こり得ます。
このような場合は、いくつかの対処方針があります。
1つは、ブラウザのネットワークタブを確認して、実際にデータを返しているAPIエンドポイントを見つける方法です。
多くのSPA(シングルページアプリケーション)では、JSON形式のAPIを叩いてデータを取得し、JavaScriptで表示しているため、そのAPIに直接アクセスできれば、BeautifulSoupを使わずに効率良くデータを得られる場合があります。
もう1つは、SeleniumやPlaywrightなどのヘッドレスブラウザを利用し、実際にJavaScriptを実行させた結果のHTMLをBeautifulSoupに渡すという方法です。
ただし、この方法は処理が重く、またサイトへの負荷も高くなりがちなので、慎重な設計が必要です。
このように、BeautifulSoup単体では「静的なHTML」の解析に強みがある一方で、JavaScriptによる動的描画には限界があることを理解しておくと、適切な道具選びがしやすくなります。
トラブルシューティング
取得できない原因の切り分け
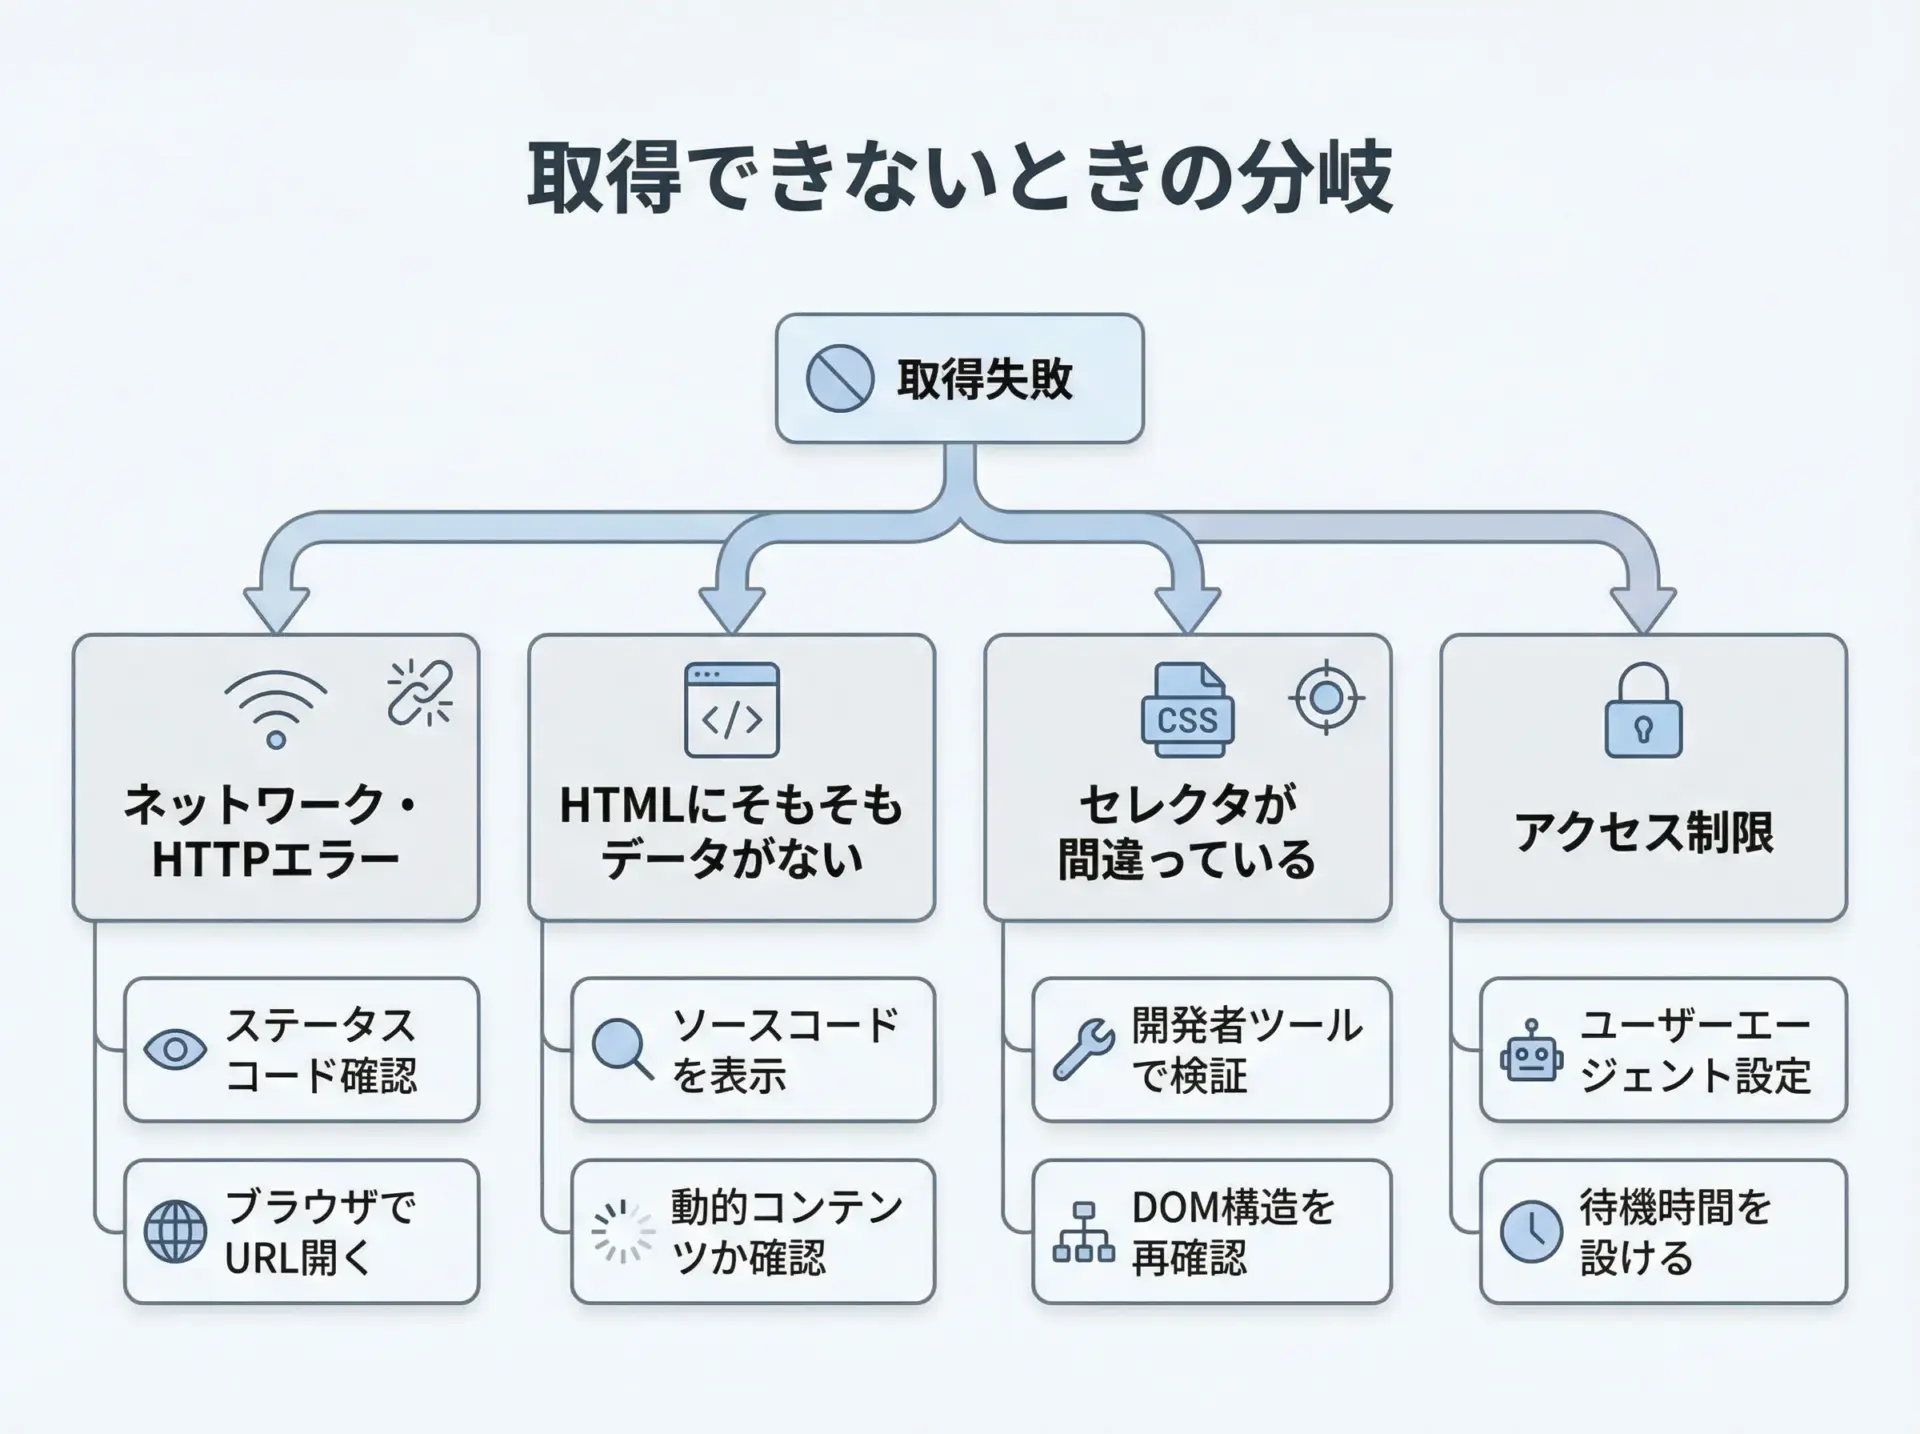
スクレイピングを行っていると、「欲しい情報が取得できない」という状況に頻繁に遭遇します。
このときは、原因を段階的に切り分けていくことが重要です。
最初に確認すべきは、HTTPリクエスト自体が正常に成功しているかです。
ステータスコードを確認し、200系以外(特に403や404)であれば、アクセス制限やURLの誤り、ログインが必要などの可能性を考えます。
次に確認したいのは、取得したHTMLの中に本当に目的のデータが含まれているかです。
print(response.text[:1000])のように一部を出力したり、ファイルに保存してブラウザで開いてみたりして、ブラウザで見える内容と一致しているかチェックします。
それでもなお取得できない場合は、セレクタやfind()の条件が正しいかを疑います。
ブラウザの開発者ツールで正確なタグ、クラス名、階層を確認し、それに沿った指定になっているかを見直します。
最後に、アクセス元やUser-Agentによる振る舞いの違いも考慮する必要があります。
PCブラウザと異なるHTMLが返されている場合や、クッキーやヘッダが不足している場合もあるため、ブラウザのリクエストヘッダを参考にしながら、必要な情報をrequestsに設定していきます。
HTML構造の変化への対応方法
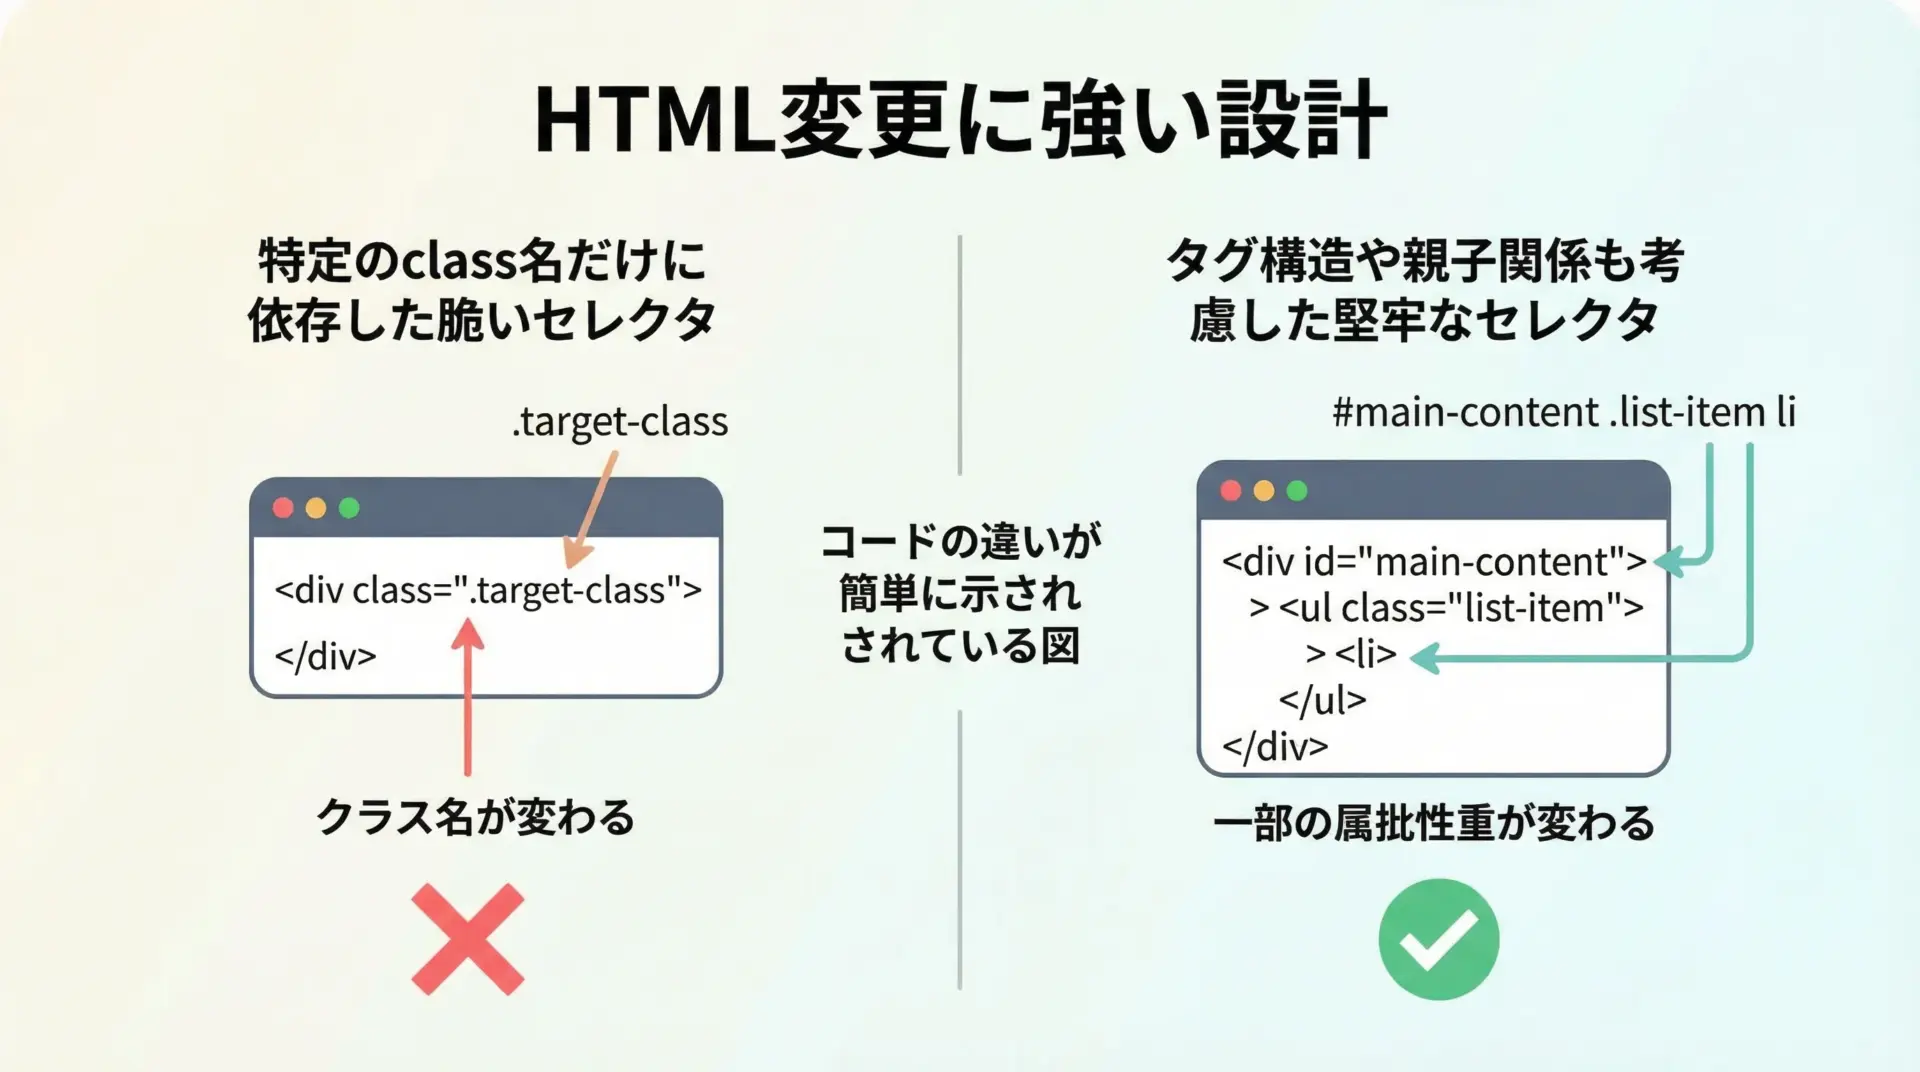
スクレイピング対象のサイト側でデザイン変更が行われると、HTML構造が変わり、これまでのセレクタが通用しなくなることがあります。
これを完全に避けることはできませんが、変更に強い構造を意識することで、影響を小さく抑えられます。
まず、極端に細かいセレクタ(深すぎる入れ子指定やランダムなclass名)を避けることが大切です。
例えばdiv#main > div > ul > li > span.nameのような指定は、少しの構造変更で簡単に壊れてしまいます。
次に、安定していそうな識別子(意味のあるidやclass名、data属性など)を優先して利用すると良いです。
名前から役割が推測できるものや、テストや追跡用に付与されているdata-*属性などは変更されにくい傾向があります。
また、テストコードや簡易的なチェックスクリプトを用意し、定期的に実行して異常を検知することも有効です。
想定より取得件数が少ない、必須項目が空になっているなどの兆候を早期に把握できれば、本番処理への影響を抑えられます。
エラー処理と例外対策

安定したスクレイピングを行うには、ネットワークエラーや一時的な不調に耐えられるエラー処理が欠かせません。
ここでは、基本的な例を見てみます。
import time
import requests
from bs4 import BeautifulSoup
from requests.exceptions import RequestException

def safe_get(url: str, max_retries: int = 3, delay: float = 2.0) -> BeautifulSoup | None:
    """リトライと簡易エラー処理付きでHTMLを取得し、BeautifulSoupを返す関数"""
    for attempt in range(1, max_retries + 1):
        try:
            response = requests.get(url, timeout=10)
            response.raise_for_status()
            return BeautifulSoup(response.text, "html.parser")
        except RequestException as e:
            print(f"[{attempt}/{max_retries}] Error fetching {url}: {e}")
            if attempt < max_retries:
                print(f"{delay}秒後に再試行します...")
                time.sleep(delay)
            else:
                print("最大リトライ回数に達したため、このURLはスキップします。")
                return None

if __name__ == "__main__":
    url = "https://example.com/"
    soup = safe_get(url)
    if soup:
        title = soup.find("title")
print("Title:", title.get_text(strip=True) if title else "タイトルなし")Title: Example Domainこのように、例外発生時にすぐプログラムを中断するのではなく、一定回数のリトライやログ出力を行いながら、致命的な場合のみ処理を止めるという設計にしておくと、長時間実行するバッチ処理でも安定性が高まります。
まとめ
BeautifulSoupは、Pythonによるスクレイピングの中核を担うシンプルかつ強力なHTML解析ライブラリです。
requestsと組み合わせることで、WebページのHTMLを取得し、タグ検索やCSSセレクタで目的の情報を抽出し、テキストや属性を自在に扱えるようになります。
本記事で紹介した基本操作、実践例、応用テクニック、そしてマナーやトラブルシューティングの考え方を押さえておけば、多くのスクレイピング案件に対応できるはずです。
あとは実際のサイト構造を観察しながら、小さなスクリプトから手を動かしてみてください。
