PythonでWebアプリや自動化スクリプトを作るとき、APIキーやパスワード、接続情報などの「秘密情報」をどこに置くかは非常に重要なテーマです。
この記事では、python-dotenvを使って、.envファイルから環境変数を安全かつシンプルに扱う方法を、実践的なコード例とともに詳しく解説します。
これからPythonでの開発を本格的に進めたい方や、チーム開発で設定管理を整えたい方に向けた入門ガイドです。
Pythonで環境変数を使うべき理由
環境変数とは何か
環境変数は、OSやプロセスに紐づいて管理される「設定情報を入れておくための変数」です。
Pythonに限らず、LinuxやWindows、コンテナなど、さまざまな環境で共通して利用できます。
具体的には、次のような特徴があります。
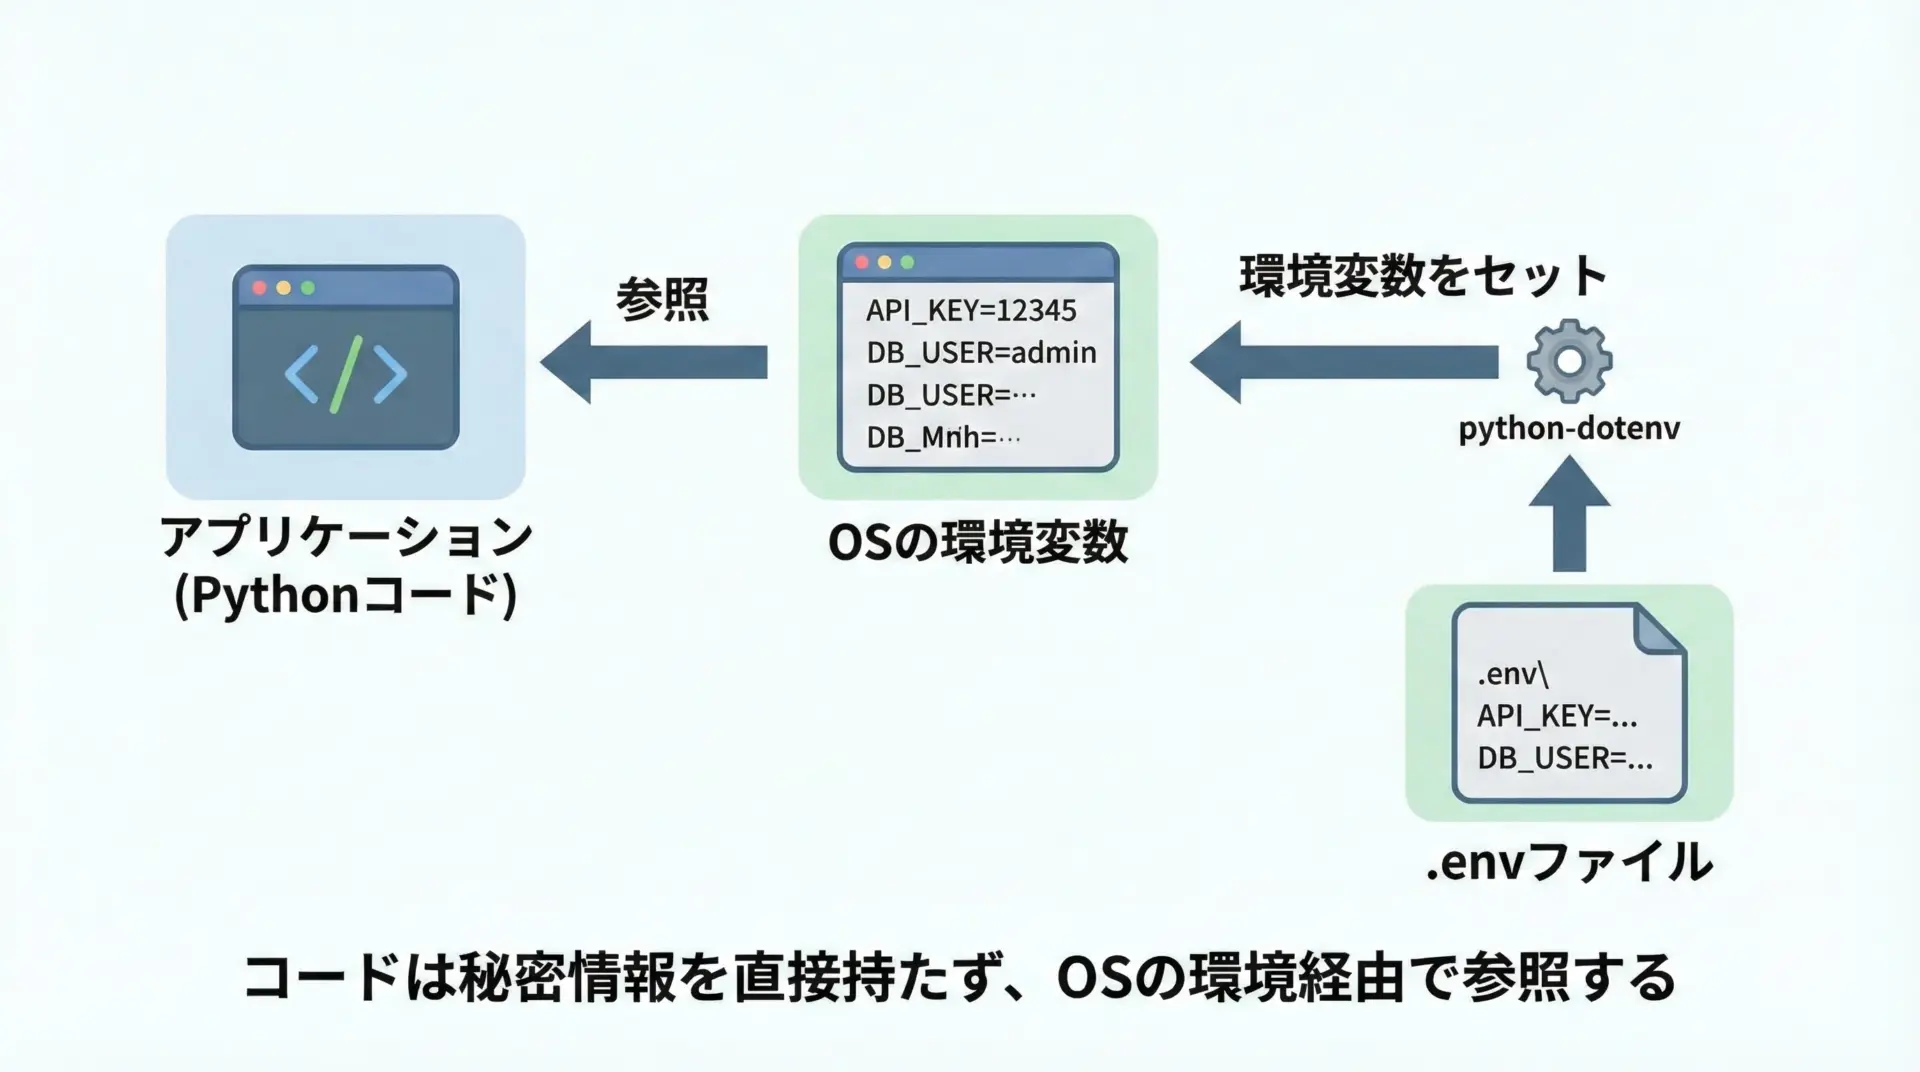
環境変数はプログラムの外側にあり、アプリケーションはos.getenvなどを使ってその値を参照します。
この仕組みにより、コードを書き換えなくても、実行環境ごとに異なる設定値を簡単に切り替えることができます。
環境変数で設定すべき情報の例
環境変数に入れる代表的な情報としては、主に次のようなものがあります。
これらは、コードに直接書いてしまうと問題が起きやすい情報です。
| 種類 | 例 | 解説 |
|---|---|---|
| 認証情報 | APIキー、シークレットキー、トークン、パスワード | GitHubやクラウドサービスのキーなどをコードに直書きすると漏洩リスクが高いです。 |
| 接続情報 | DBホスト名、ユーザー名、パスワード、ポート | 開発・本番で異なることが多く、環境変数で切り替えると便利です。 |
| アプリ設定 | DEBUGフラグ、ログレベル、外部サービスURL | デバッグのオンオフを環境ごとに変える際に有用です。 |
| パス類 | 一時ファイルディレクトリ、ストレージパス | 実行環境の違いを吸収しやすくなります。 |
とくにAPIキーやデータベースのパスワードなどの機密情報は、必ず環境変数や専用の設定ストアで扱うことが推奨されます。
設定ファイルやハードコーディングとの違いとリスク
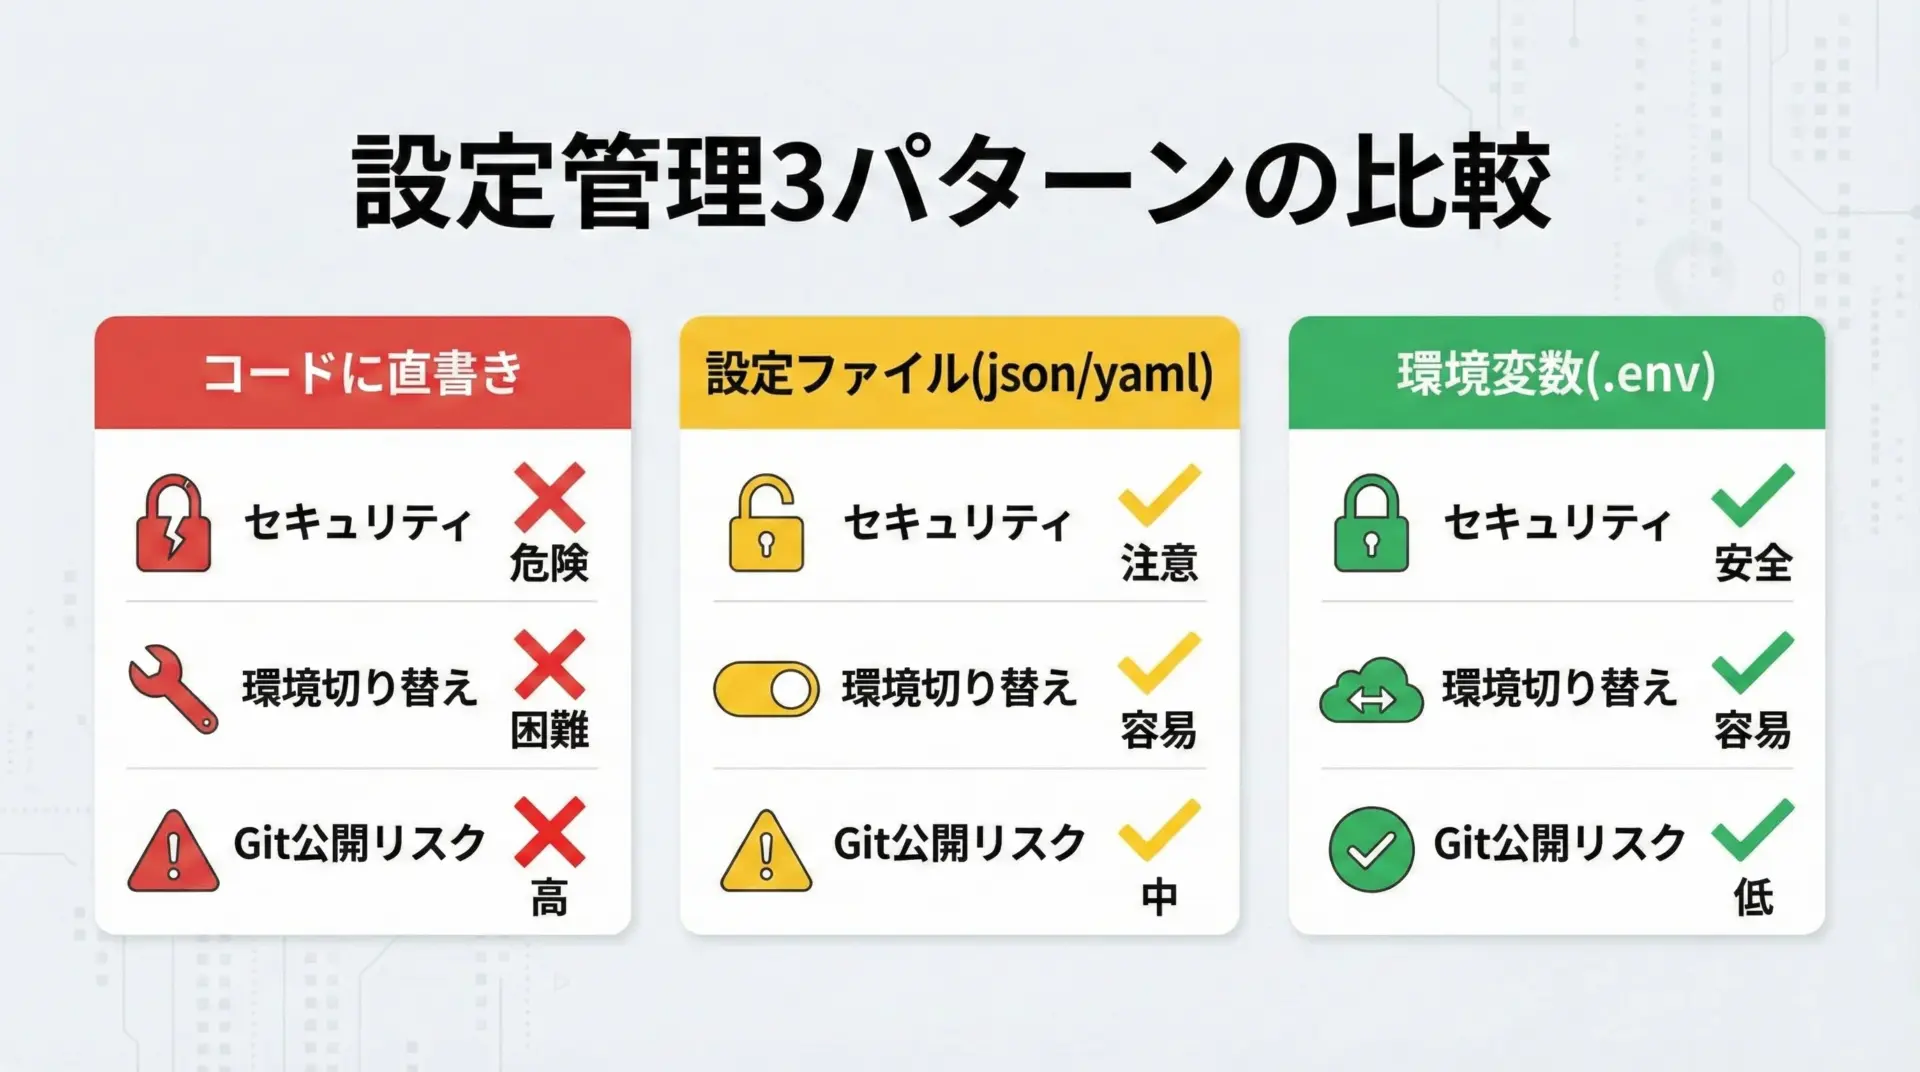
Pythonの設定管理には、おおまかに次の3パターンがあります。
1つ目は「ハードコーディング(コードに直書き)」です。
例えば次のように書く方法です。
API_KEY = "super-secret-key-123" # こんな書き方はNGこの方法は手軽ですが、次のようなリスクがあります。
- GitHubなどにリポジトリを公開した際、APIキーが世界に公開されてしまう
- 開発環境と本番環境で値を変えたい場合、その都度コードを修正・デプロイしなければならない
- どのキーがどこに使われているかの管理が難しくなる
2つ目は「設定ファイル(json/yaml/iniなど)」で管理する方法です。
これはソースコードから設定を分離できる点では有効ですが、次の点で注意が必要です。
- 設定ファイル自体をGitにコミットしてしまうと、機密情報が漏れる
- 実行環境ごとにファイルを分けると、ファイルが増え管理が煩雑になる
3つ目が「環境変数」で管理する方法です。
環境変数はOSレベルの仕組みを使いつつ、アプリケーション側は値の取得だけに専念できる特徴があります。
さらに、.envファイルとpython-dotenvを組み合わせることで、環境変数の管理をファイルベースで行いつつ、Gitに乗せる情報と乗せない情報をきれいに分けることができます。
python-dotenvと.envファイルの基本
python-dotenvとは
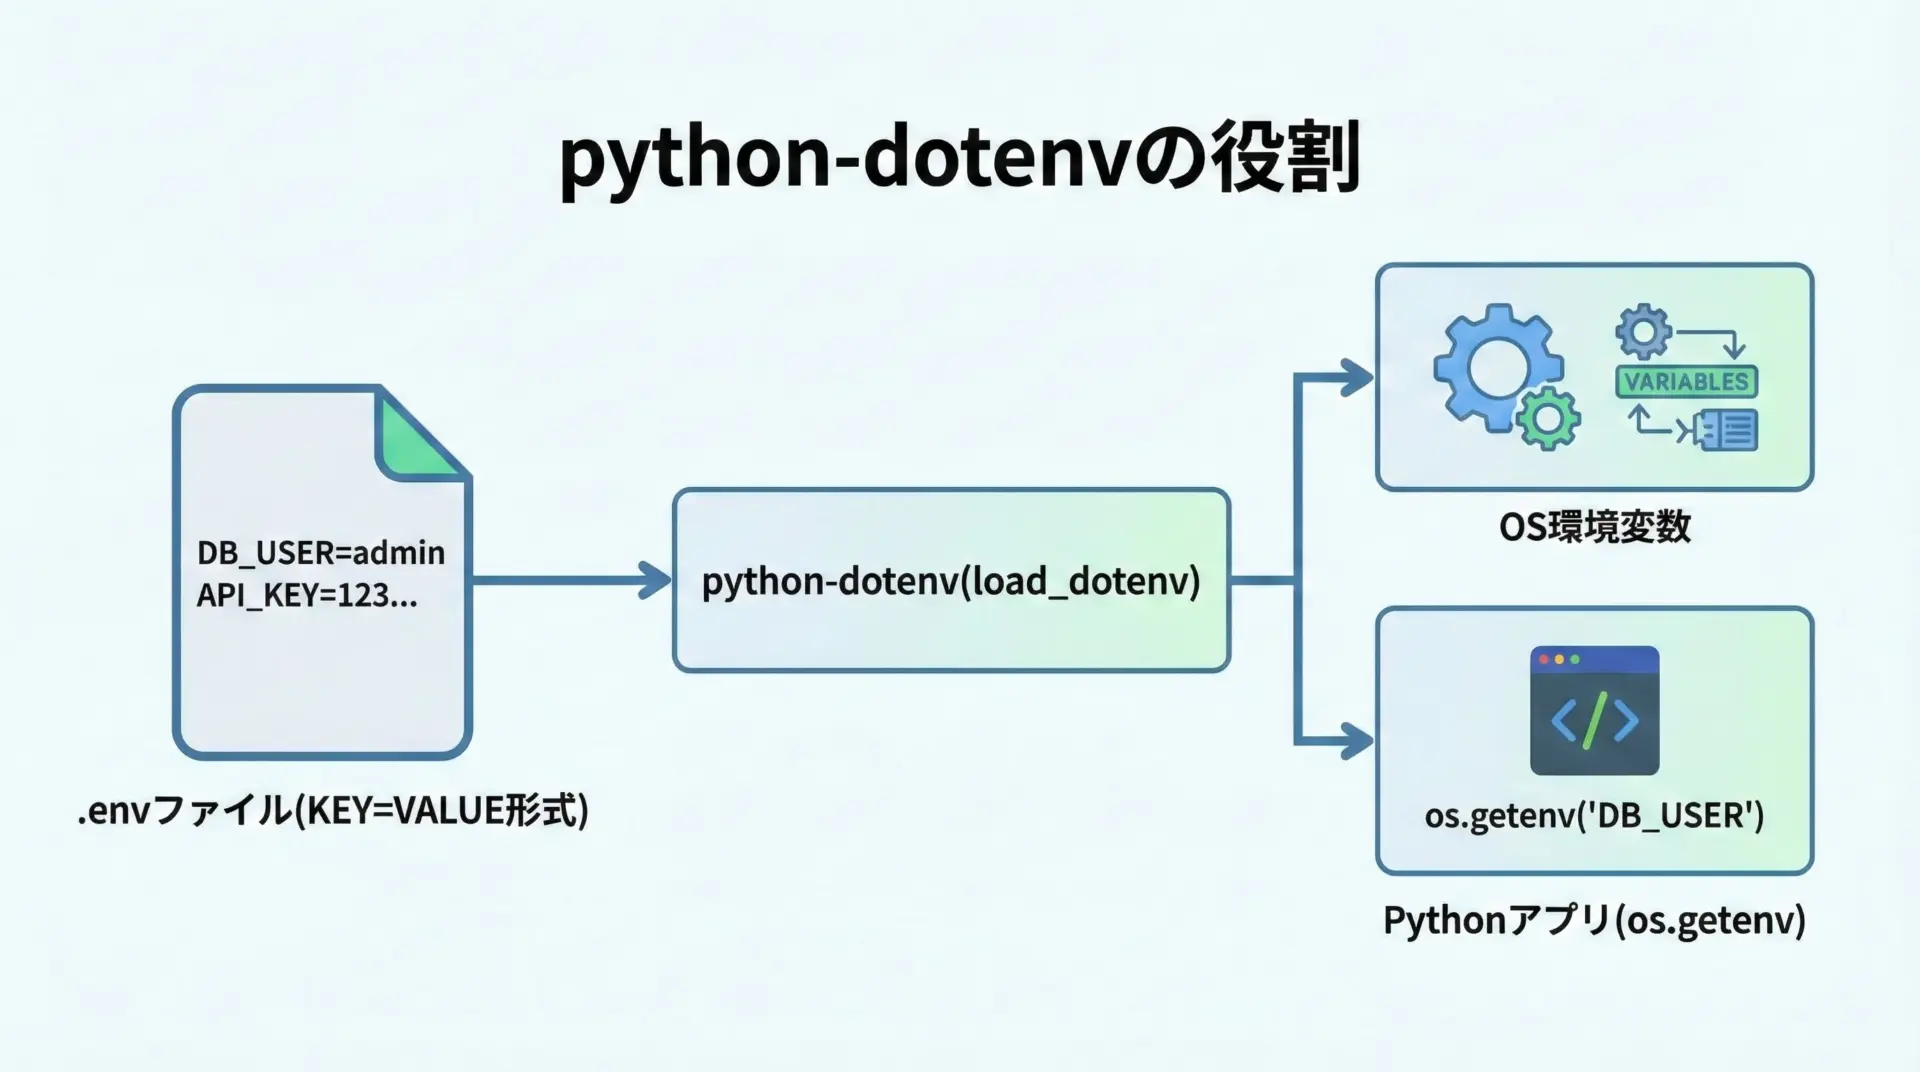
python-dotenvは、.envファイルに書かれた設定を、自動的に環境変数として読み込んでくれるPythonライブラリです。
通常、環境変数はシェルやOS側で設定しますが、python-dotenvを使うと、プロジェクトディレクトリに置いた.envファイルから簡単に環境変数を読み込めるようになります。
主な特徴としては次の通りです。
- .envファイルのKEY=VALUE形式をパースして環境変数に反映する
- Pythonコードからは
os.getenvなど標準ライブラリでアクセスできる - 必要に応じて、既存の環境変数を上書きするかどうかを制御できる
- .envのパスやファイル名も柔軟に指定できる
.envファイルの基本構造
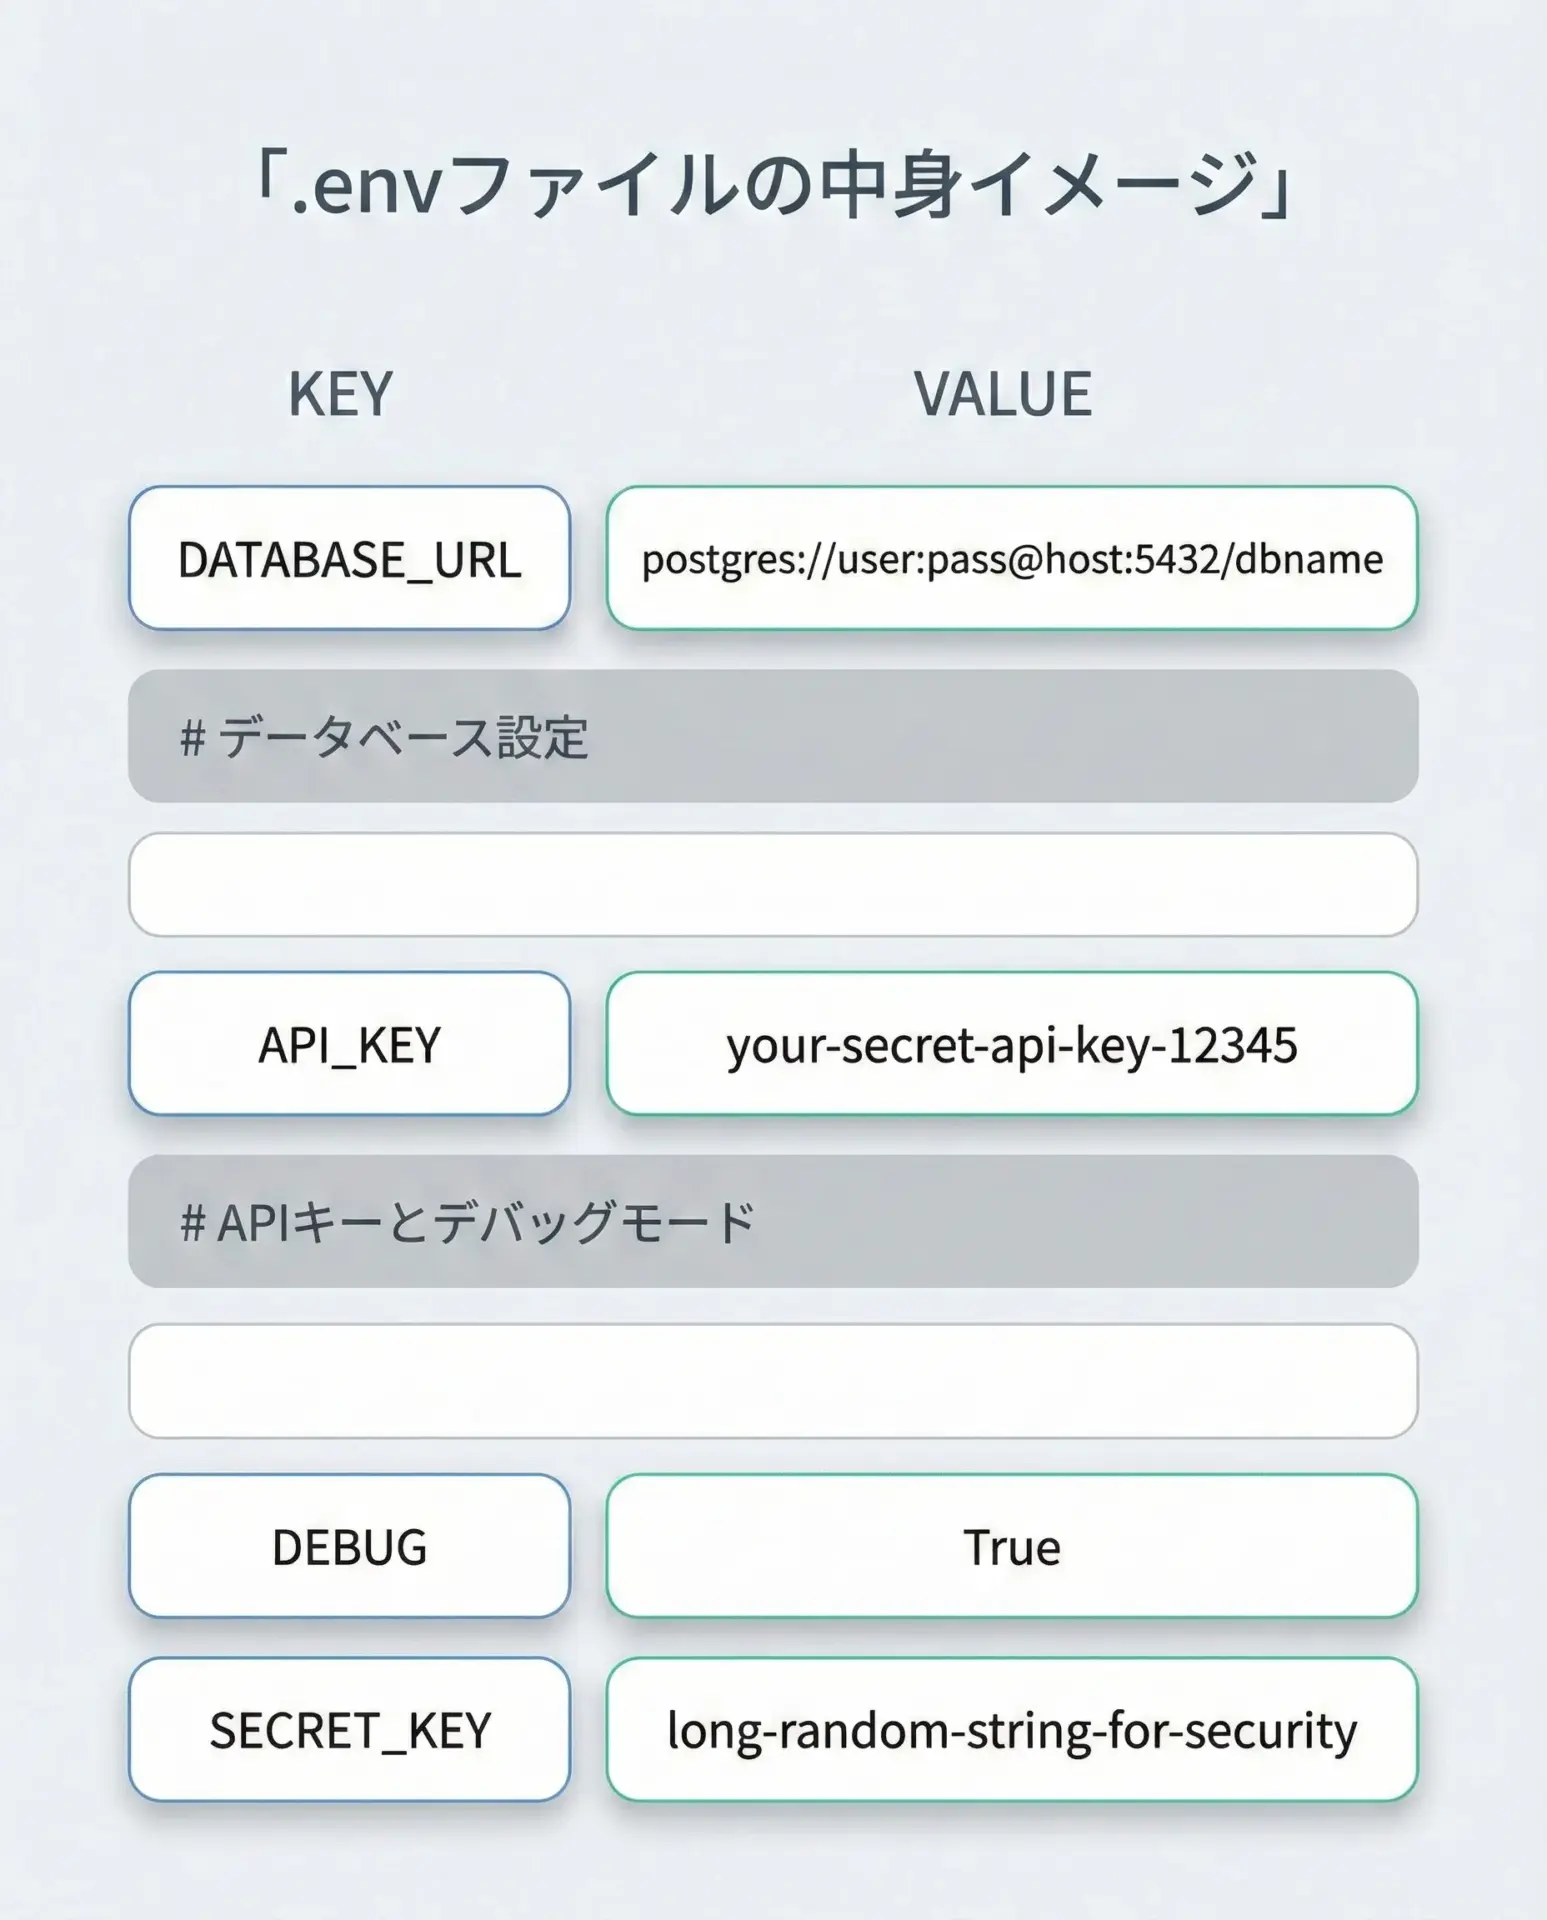
.envファイルは、「1行に1つの環境変数をKEY=VALUE形式で記述する」シンプルなテキストファイルです。
代表的な記述例は次のようになります。
# APIキーやトークン
API_KEY=your-api-key-here
API_SECRET=your-secret-here

# データベース接続情報
DB_HOST=localhost
DB_PORT=5432
DB_USER=myuser
DB_PASSWORD=mypassword
DB_NAME=myapp_db

# アプリケーション設定
DEBUG=true
LOG_LEVEL=INFO
ポイントを整理すると次の通りです。
- コメントは
#で始めると、その行全体がコメント扱いになります - KEYは英大文字と数字、アンダースコアの組み合わせが一般的です
- VALUEに空白や特殊文字を含めたい場合は
"value with space"のようにダブルクォートで囲みます - 値は文字列として扱われるため、
DEBUG=trueとしてもPython側では"true"の文字列になります
.envファイルの作成場所と命名ルール
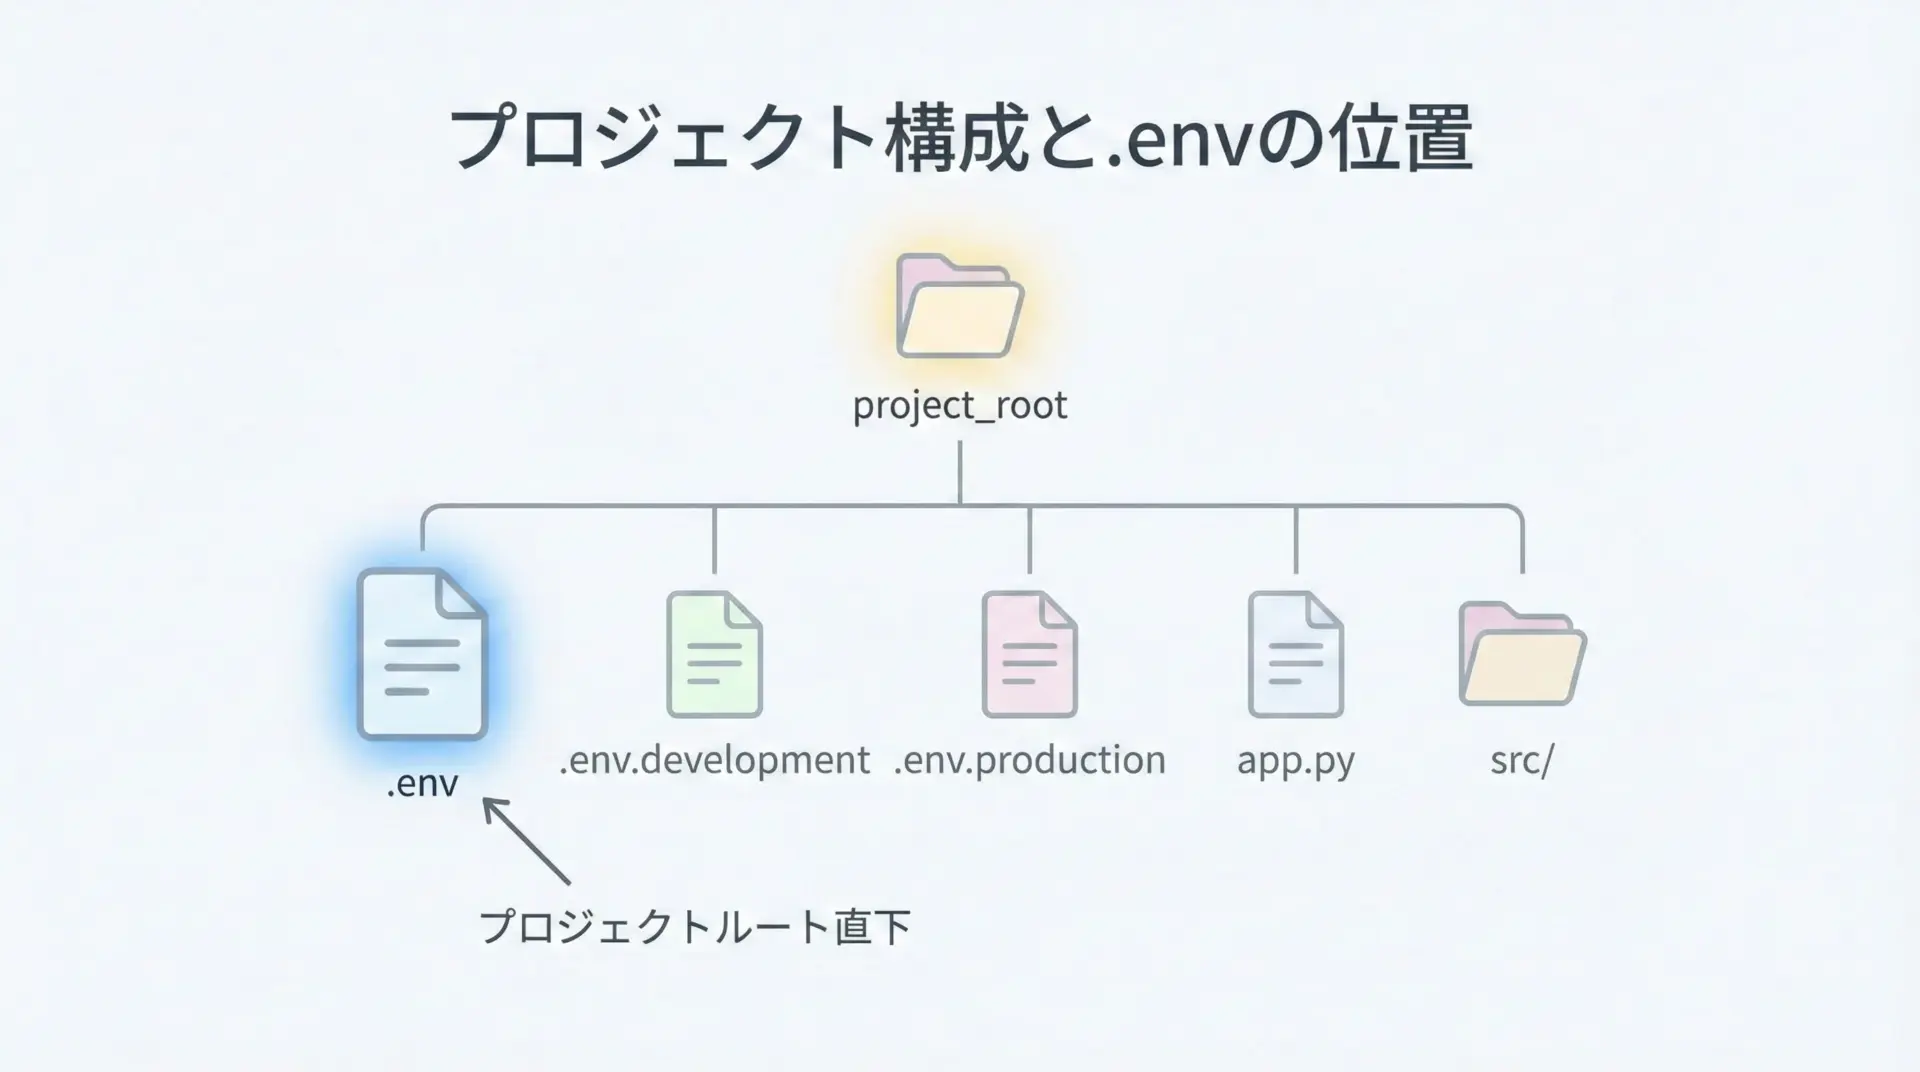
多くのケースでは、.envファイルはプロジェクトのルートディレクトリに配置します。
例えば、次のような構成が典型的です。
my-project/
  ├─ .env
  ├─ app.py
  ├─ requirements.txt
  └─ src/
└─ main.pypython-dotenvのload_dotenv()は、実行中のスクリプトから見たカレントディレクトリや、その親ディレクトリをたどって.envファイルを探す仕様になっています。
そのため、プロジェクトのトップレベルに配置しておくと扱いやすくなります。
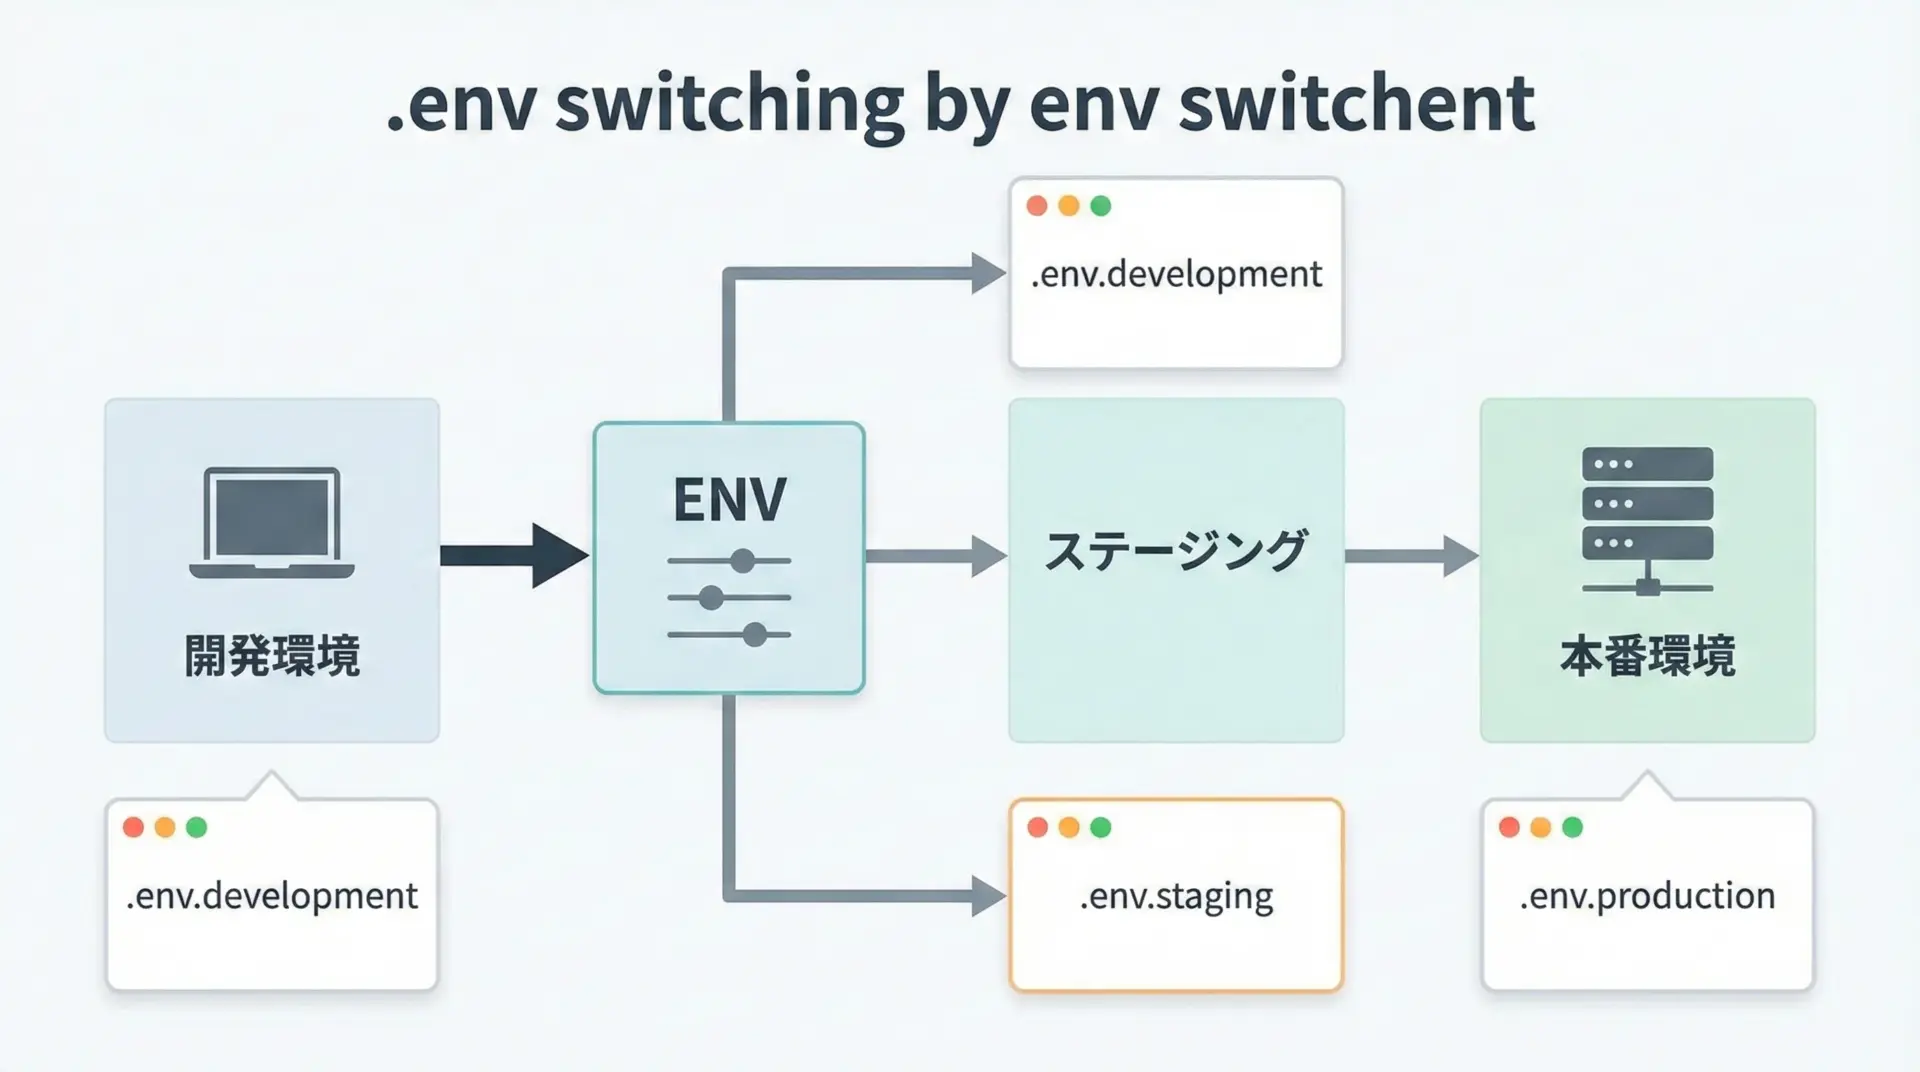
命名については、基本は.envですが、環境ごとに分けたい場合は次のように複数用意することもあります。
.env.development(開発用).env.staging(ステージング用).env.production(本番用)
この場合、後で説明するようにload_dotenv(".env.production")などとパスを指定して読み込むことで、用途に応じて切り替えられます。
.envファイルをGit管理から除外する
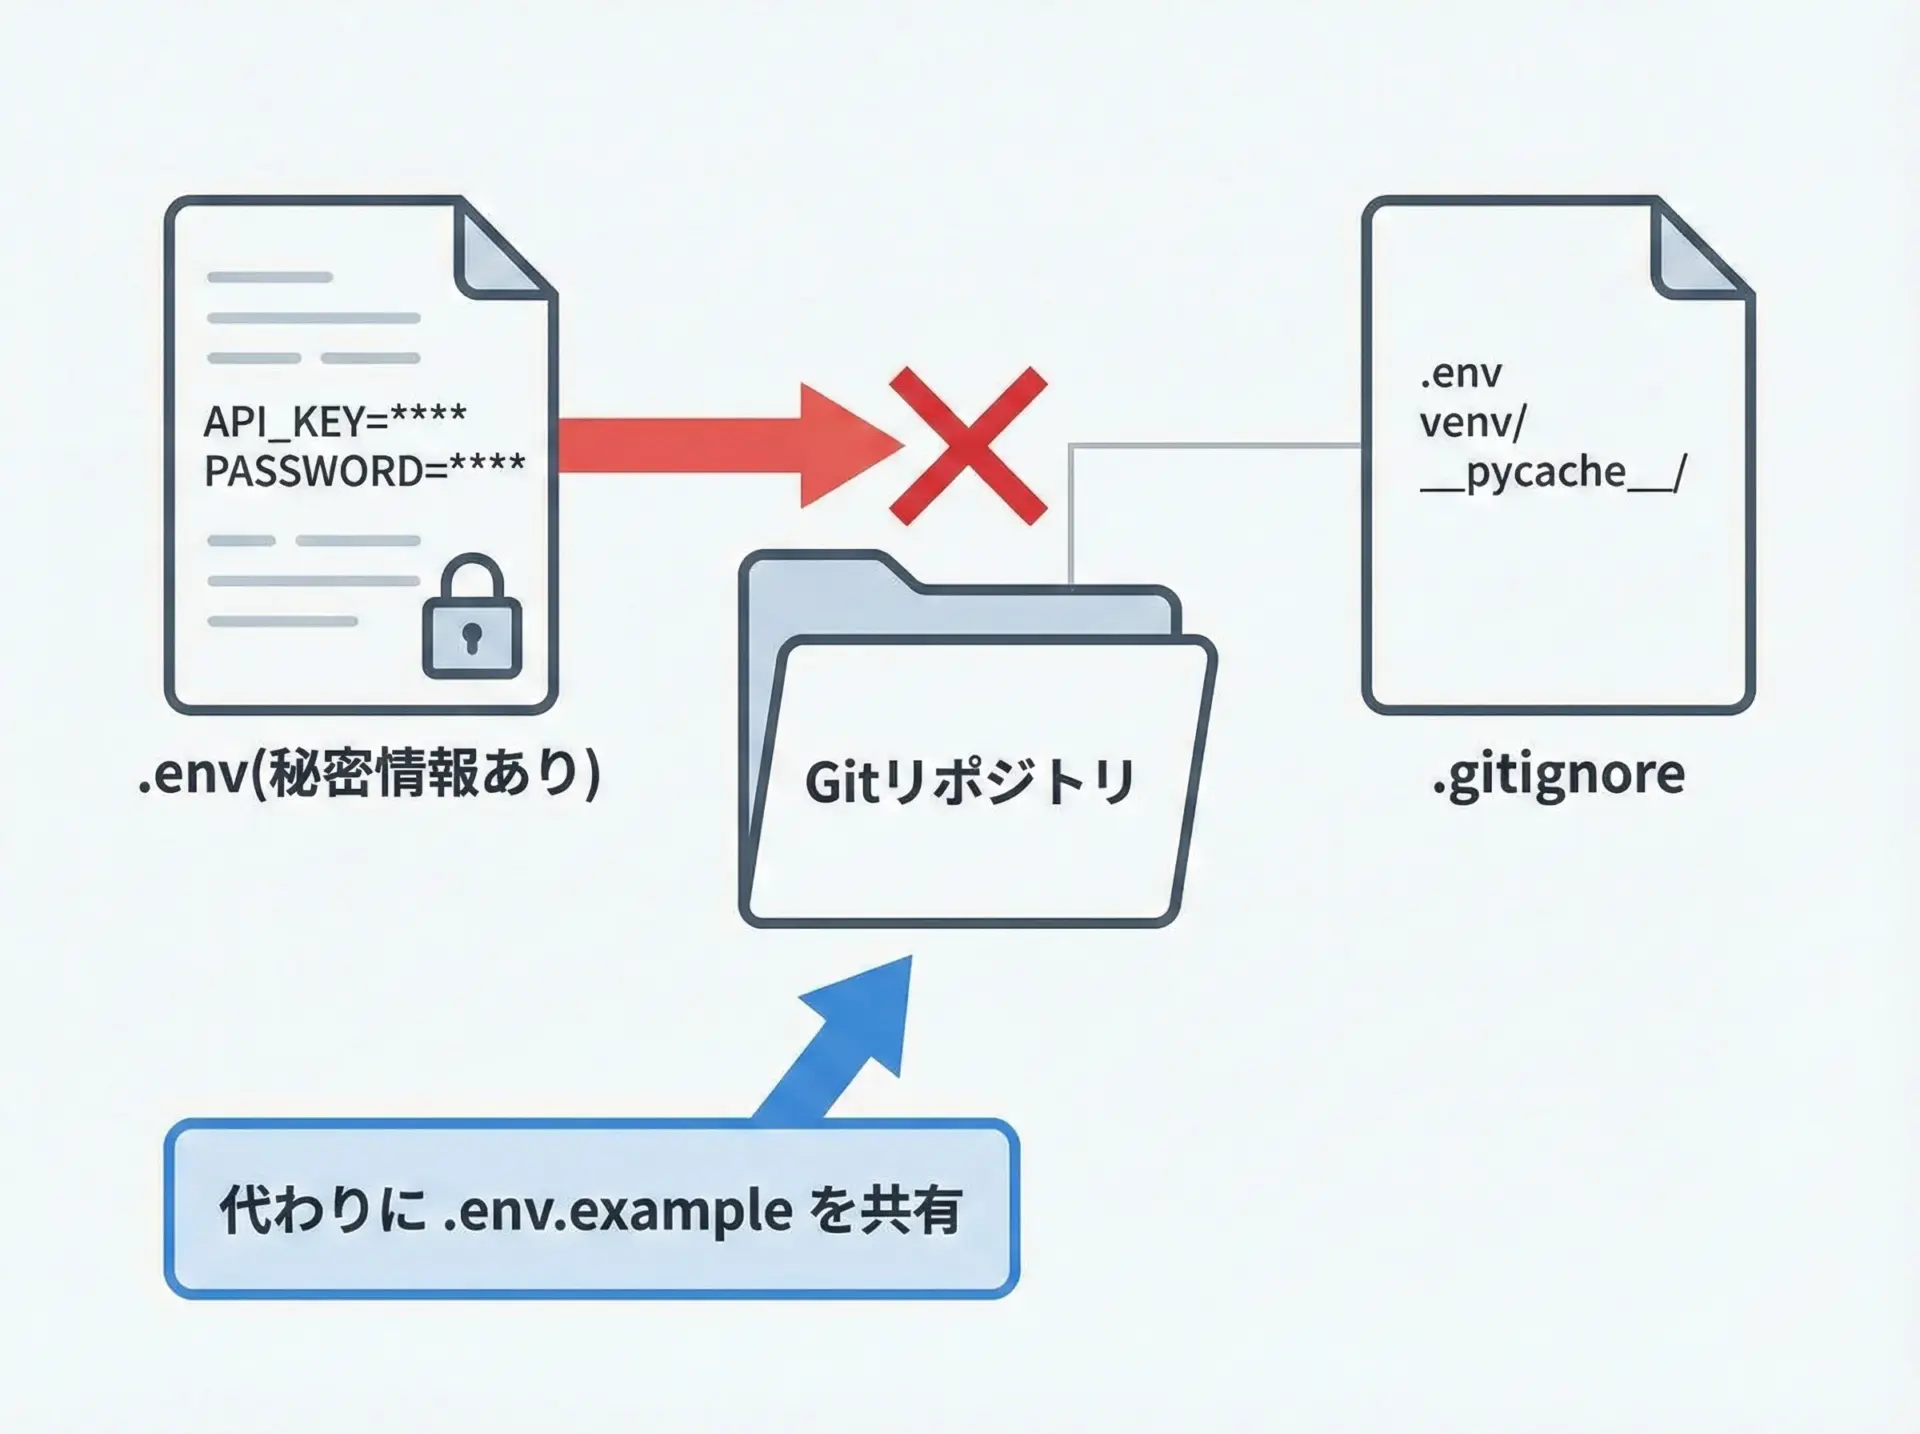
.envファイルにはAPIキーやパスワードなど機密情報が含まれるため、絶対にGitリポジトリにコミットしてはいけません。
そのために、.gitignoreに.envを追加しておくのが基本です。
プロジェクトルートにある.gitignoreに、次のように記述します。
# .envファイルをGit管理から除外
.env
.env.*このように書くと、.envだけでなく.env.developmentや.env.productionも自動的に除外されます。
機密情報の漏洩を防ぐためにも、プロジェクトを作成したら最初に.gitignoreで.envを除外する習慣をつけると安全です。
python-dotenvで環境変数を読み込む方法
python-dotenvのインストール手順
python-dotenvはPyPIで配布されているため、pipで簡単にインストールできます。
pip install python-dotenv複数のプロジェクトでPythonを利用する場合は、venvやPoetryなどの仮想環境の中でインストールすることをおすすめします。
これにより、プロジェクトごとに依存関係を分離できます。
load_dotenvで.envを読み込む基本コード例
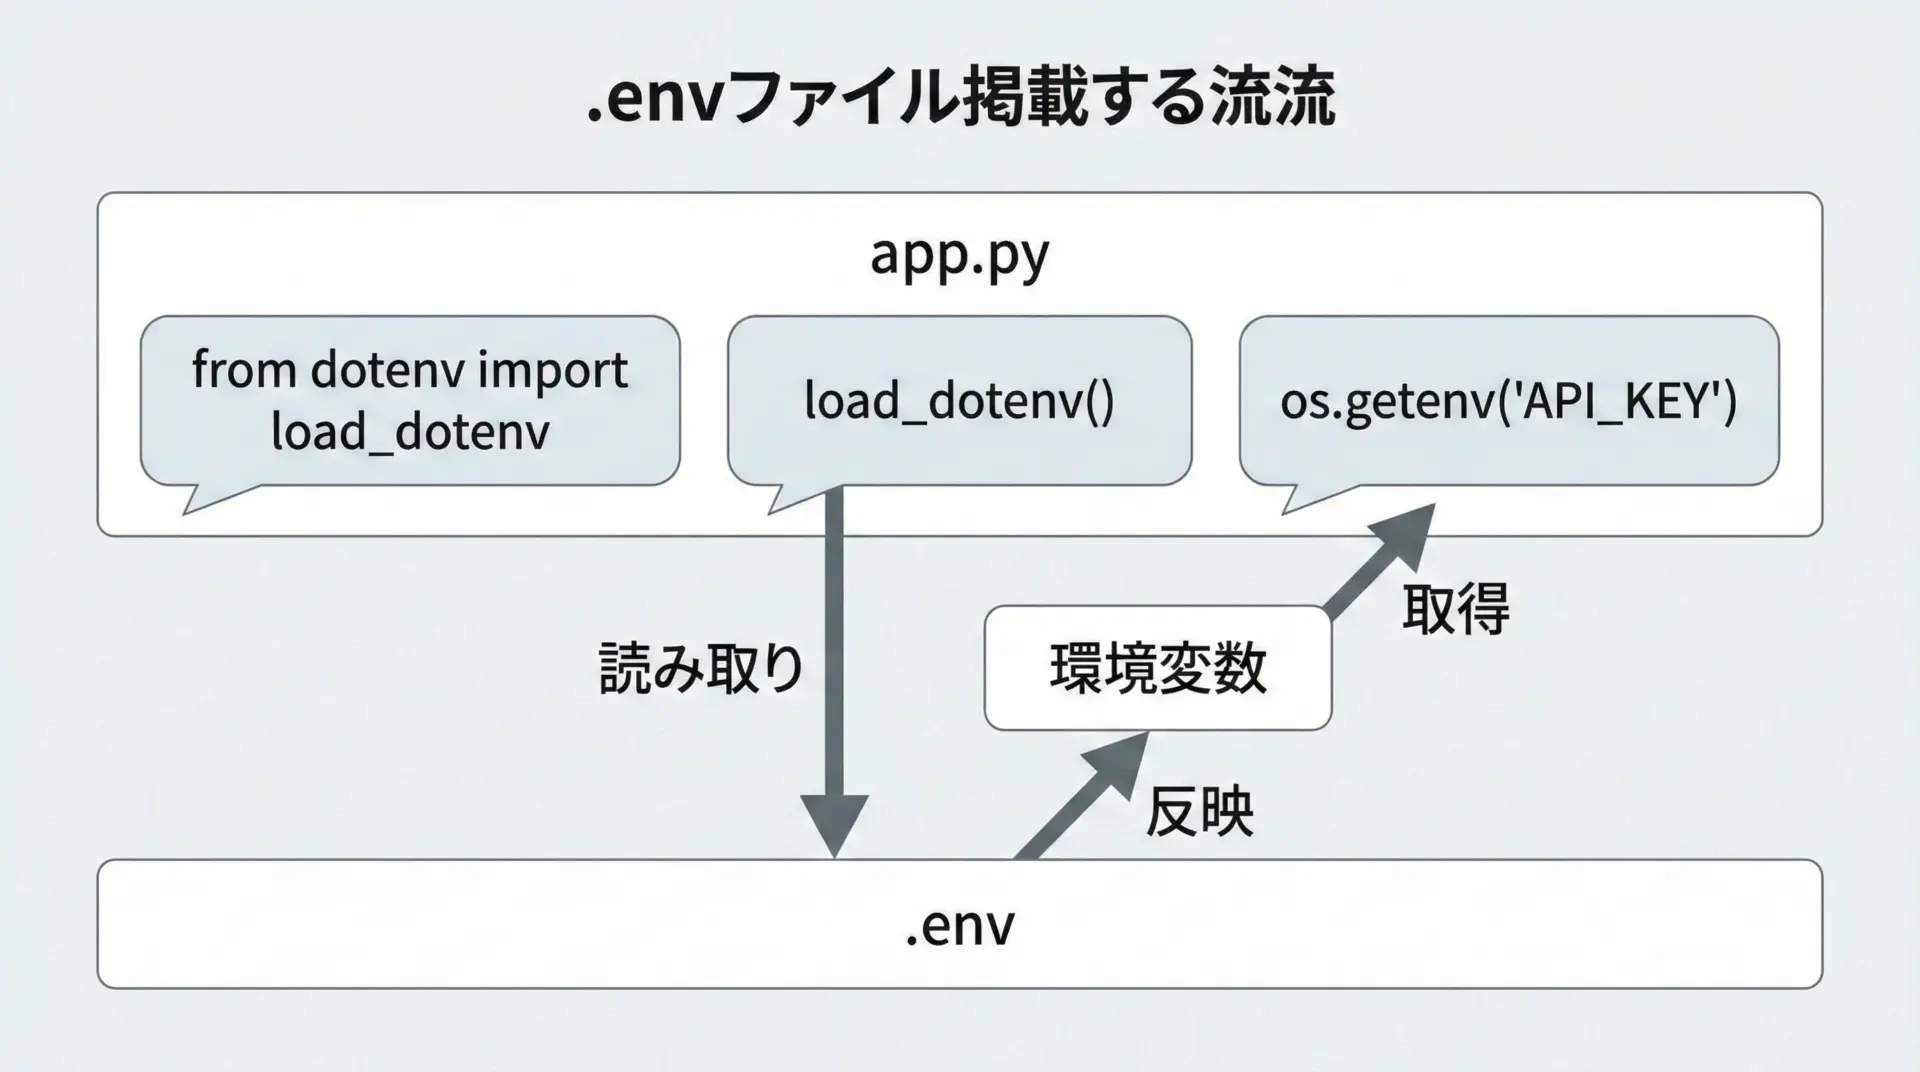
もっとも基本的な使い方は、次の3ステップです。
- .envファイルを用意する
- Pythonコードで
load_dotenv()を呼ぶ os.getenv()などで値を取得する
サンプルコード例
まず、プロジェクトルートに次のような.envファイルを作成します。
# .env
API_KEY=sample-api-key-123
DEBUG=true
次に、Pythonスクリプトからこれを読み込むコードを書きます。
# app.py
from dotenv import load_dotenv  # python-dotenvからload_dotenv関数をインポート
import os                      # 環境変数を扱う標準ライブラリ

# .envファイルを読み込んで環境変数として設定
# 引数なしの場合は、カレントディレクトリや親ディレクトリから.envを探索します
load_dotenv()

# os.getenvで環境変数を取得
api_key = os.getenv("API_KEY")
debug = os.getenv("DEBUG")

print(f"API_KEY: {api_key}")
print(f"DEBUG: {debug} (type: {type(debug)})")
実行すると、次のような出力になります。
API_KEY: sample-api-key-123
DEBUG: true (type: <class 'str'>)ここで確認しておきたいのは、.envの値はすべて文字列として取得されるという点です。
論理値として使いたい場合は、自分で"true"をTrueに変換する処理を追加する必要があります。
os.getenvで環境変数を取得する方法とデフォルト値
環境変数の取得にはos.getenvを使います。
基本的な使い方はos.getenv("KEY")ですが、環境変数が定義されていないときはNoneが返る点に注意が必要です。
デフォルト値付きで取得する
存在しない可能性のあるキーに対しては、os.getenv("KEY", "default")のように、第2引数にデフォルト値を指定するのが安全です。
from dotenv import load_dotenv
import os

load_dotenv()

# 2番目の引数にデフォルト値を指定
db_host = os.getenv("DB_HOST", "localhost")
db_port = int(os.getenv("DB_PORT", "5432"))  # 文字列をintに変換

print(f"DB_HOST: {db_host}")
print(f"DB_PORT: {db_port} (type: {type(db_port)})")DB_HOST: localhost
DB_PORT: 5432 (type: <class 'int'>)このようにデフォルト値をうまく活用すると、.envに未定義の値があっても安全にアプリを動かしやすくなります。
開発・本番で.envを切り替える方法
本番環境では開発とは異なる設定を使うのが一般的です。
例えば、デバッグはオフ、ログ出力先は別のサービス、DBも本番用、といった具合です。
python-dotenvでは、読み込む.envファイルのパスを明示的に指定することで、環境ごとに設定を切り替えられます。
環境ごとに.envを分ける例
プロジェクト構成の例:
my-project/
  ├─ .env.development
  ├─ .env.production
  ├─ app.py
  └─ ...
各.envの中身のイメージ:
# .env.development
DEBUG=true
DB_HOST=localhost
DB_NAME=myapp_dev# .env.production
DEBUG=false
DB_HOST=prod-db.example.com
DB_NAME=myapp_prodPythonコード側では、例えば次のように「どの環境で動かすか」を決めてから該当の.envを読み込みます。
# app.py
from dotenv import load_dotenv
import os
from pathlib import Path

# 実行環境をENV変数から取得(なければdevelopment)
APP_ENV = os.getenv("APP_ENV", "development")

# 環境ごとに読み込む.envファイルを切り替え
env_file_map = {
    "development": ".env.development",
    "production": ".env.production",
}

env_file = env_file_map.get(APP_ENV, ".env.development")

# カレントディレクトリにあるenv_fileを読み込む
env_path = Path(__file__).parent / env_file
load_dotenv(dotenv_path=env_path)

print(f"Loaded env file: {env_path}")

# 以降は通常どおりos.getenvで取得
debug = os.getenv("DEBUG", "false")
db_host = os.getenv("DB_HOST")

print(f"DEBUG: {debug}")
print(f"DB_HOST: {db_host}")# 開発環境として実行
APP_ENV=development python app.py
# 本番設定として実行
APP_ENV=production python app.pyこのように、事前にAPP_ENVなどの環境識別用変数を設定しておき、対応する.envを読み込むことで、開発・本番での設定切り替えをシンプルに実現できます。
エラー時の挙動と動作確認方法
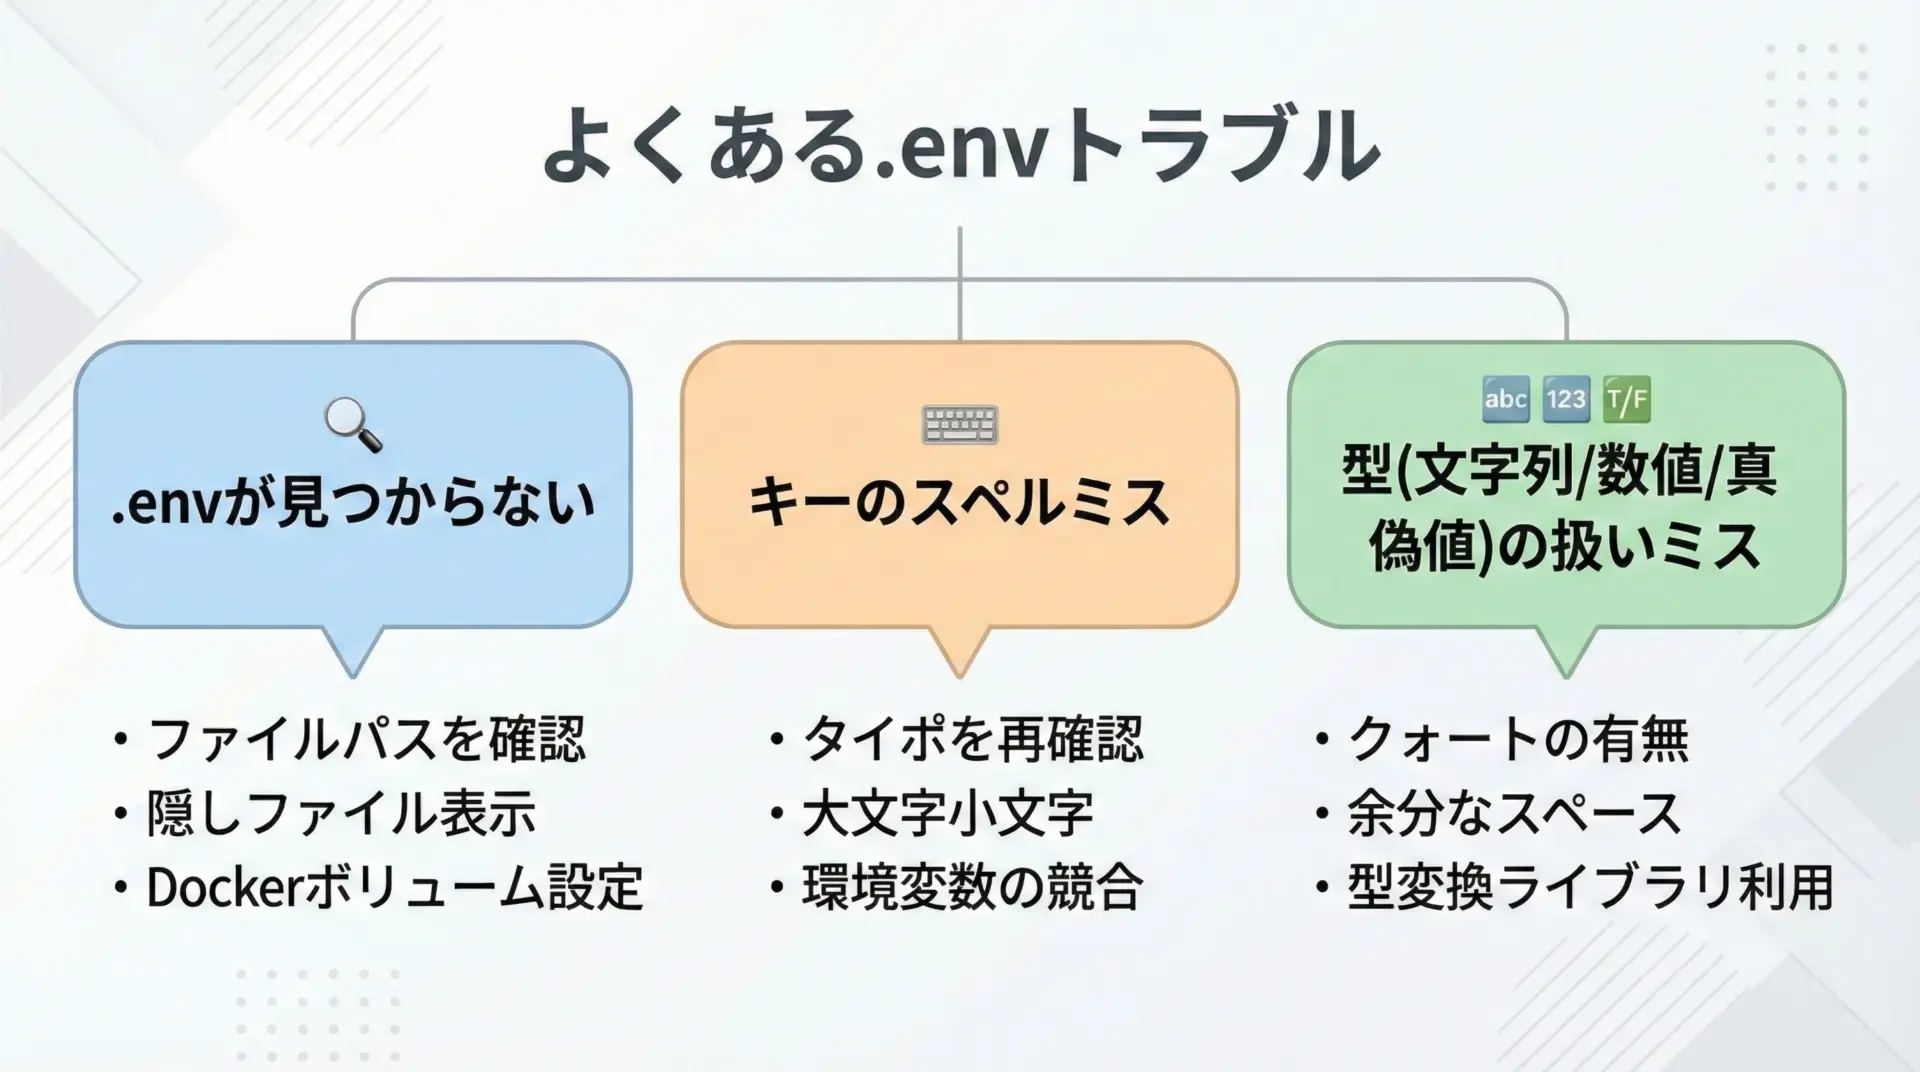
python-dotenvと環境変数の利用でよくあるトラブルと、その確認方法を整理します。
.envが読み込まれていない場合
load_dotenv()を呼び忘れている、または.envのパスが正しくない場合、期待した環境変数が取得できません。
動作確認として、os.environの中身を一部出力してみると状況を把握しやすくなります。
from dotenv import load_dotenv
import os

loaded = load_dotenv()  # 戻り値はboolで、.envが見つかり読み込めたかを表す
print(f".env loaded: {loaded}")

# デバッグ用に特定のキーをダンプ
for key in ["API_KEY", "DB_HOST", "DEBUG"]:
print(f"{key} = {os.getenv(key)}").env loaded: False
API_KEY = None
DB_HOST = None
DEBUG = Noneこのような出力になった場合は、.envファイルの場所とload_dotenvの呼び出し位置を確認します。
dotenv_path引数で絶対パスを指定してみるのも有効です。
キーのスペルミスや未定義キー
スペルミスは環境変数トラブルの定番です。
os.getenv("API_KEY")と書いたつもりが、.envではAPI-KEYになっていた、というようなケースです。
未定義キーを参照するとNoneが返ってきますので、重要なキーについては取得時にチェックしてエラーを出す実装にしておくと安全です。
import os

def get_required_env(key: str) -> str:
    """必須の環境変数を取得し、存在しなければ例外を投げる"""
    value = os.getenv(key)
    if value is None:
        raise RuntimeError(f"Required environment variable '{key}' is not set")
    return value

api_key = get_required_env("API_KEY")  # 未定義だとRuntimeErrorを送出
print(f"API_KEY: {api_key}")
型の扱いミス
環境変数は文字列として扱われるため、intやboolとして使う場合は必ず変換が必要です。
とくにDEBUG=trueのような値は、そのままでは"true"という文字列なので注意が必要です。
簡単な変換関数を用意しておくと便利です。
import os

def to_bool(value: str, default: bool = False) -> bool:
    """環境変数の文字列をboolに変換する小さなユーティリティ"""
    if value is None:
        return default
    return value.lower() in ("1", "true", "yes", "on")

debug = to_bool(os.getenv("DEBUG"), default=False)
print(f"DEBUG: {debug} (type: {type(debug)})")DEBUG: True (type: <class 'bool'>)環境変数管理のベストプラクティス
.envテンプレート(.env.example)の作り方
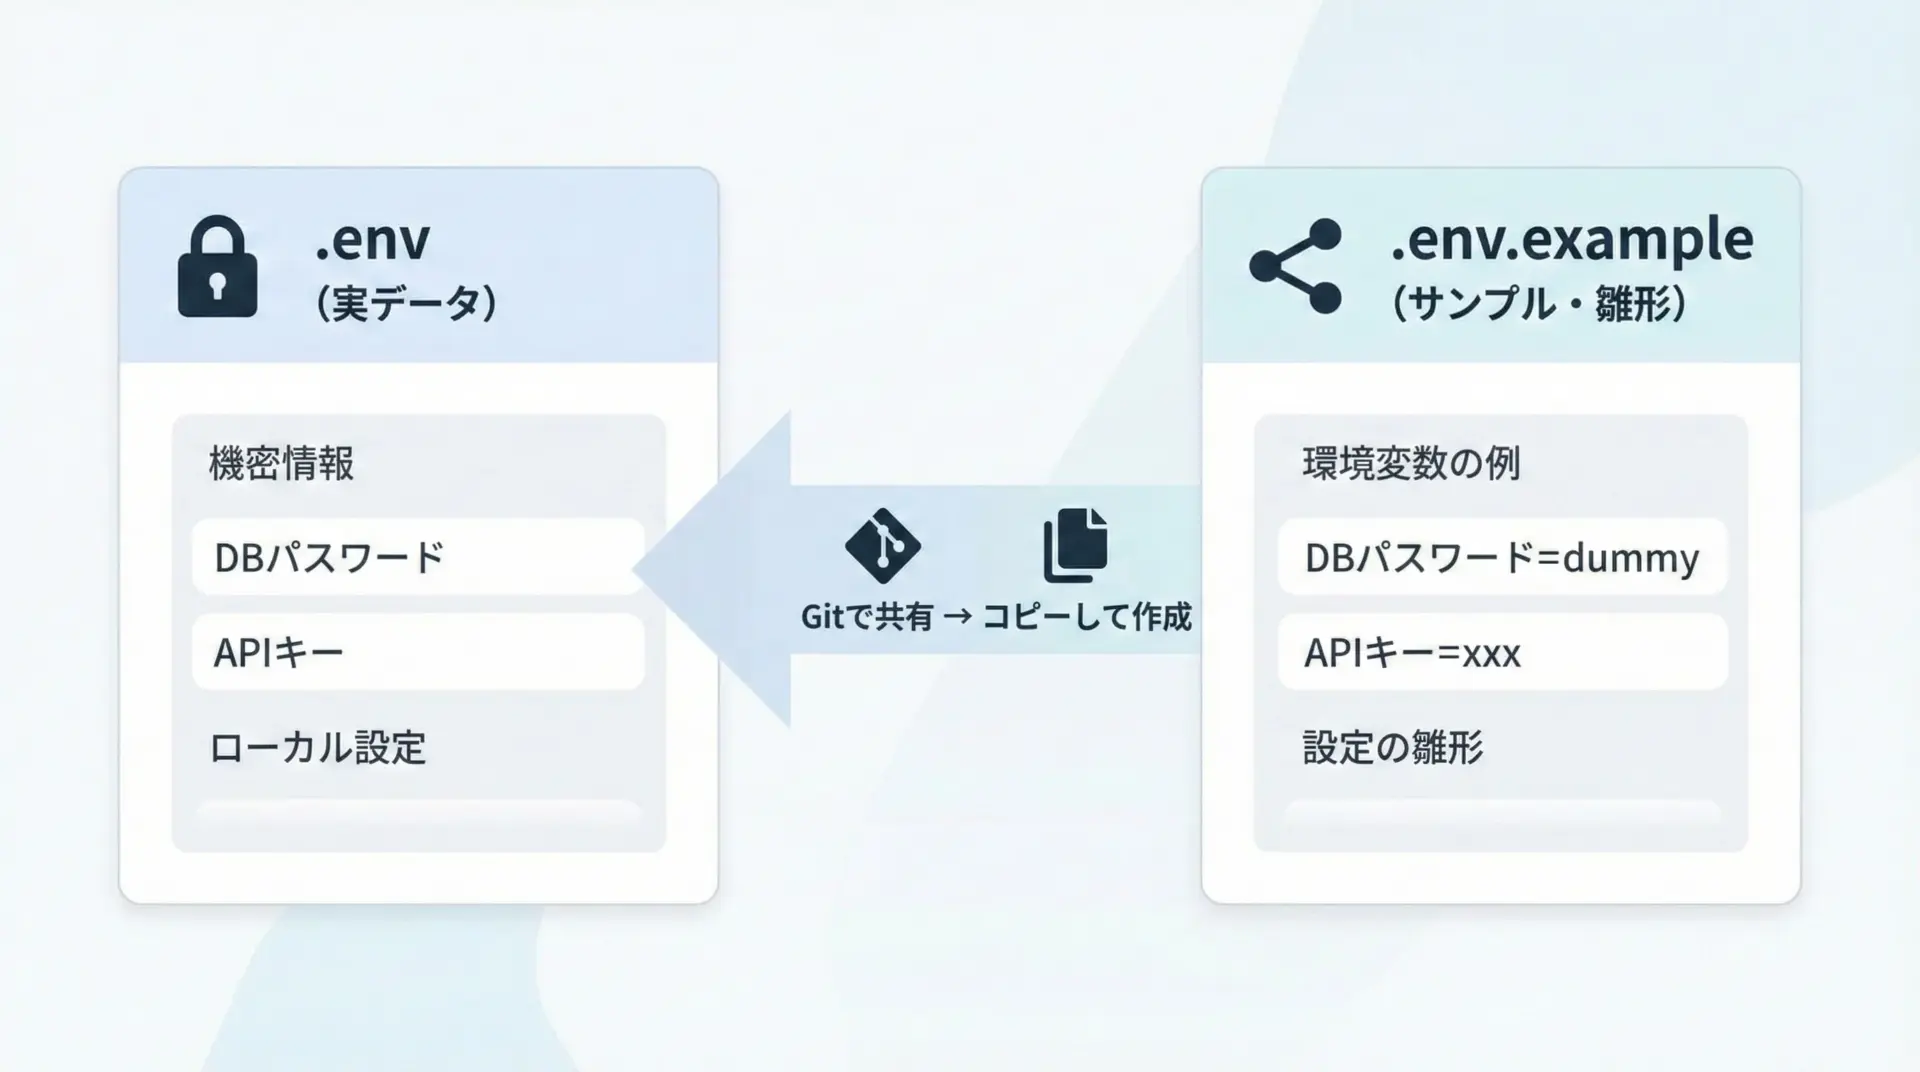
チーム開発では、「どんな環境変数を設定すべきか」を共有しつつ、実際の秘密の値は共有しない、というバランスが重要になります。
そのために使われるのが.env.exampleです。
.env.exampleの役割
- 必要な環境変数名を一覧できる
- デフォルト値やサンプル値を示せる
- 新しいメンバーが素早く環境構築できる
典型的な例としては、次のように値の部分を空、またはダミーの値で記述します。
# .env.example

# APIキー類(必ず自分のキーに置き換えてください)
API_KEY=your-api-key-here
API_SECRET=your-secret-here

# データベース接続設定
DB_HOST=localhost
DB_PORT=5432
DB_USER=your-db-user
DB_PASSWORD=your-db-password
DB_NAME=your-db-name

# アプリ設定
DEBUG=true
LOG_LEVEL=INFO
開発者はこのファイルを元に、次のようにして自分専用の.envファイルを作成します。
cp .env.example .env
# そのあと .env をエディタで開いて自分用の値に編集この運用により、.env自体はGit管理から外しつつ、必要な変数リストだけを安全に共有できます。
セキュリティを高める.env運用ルール
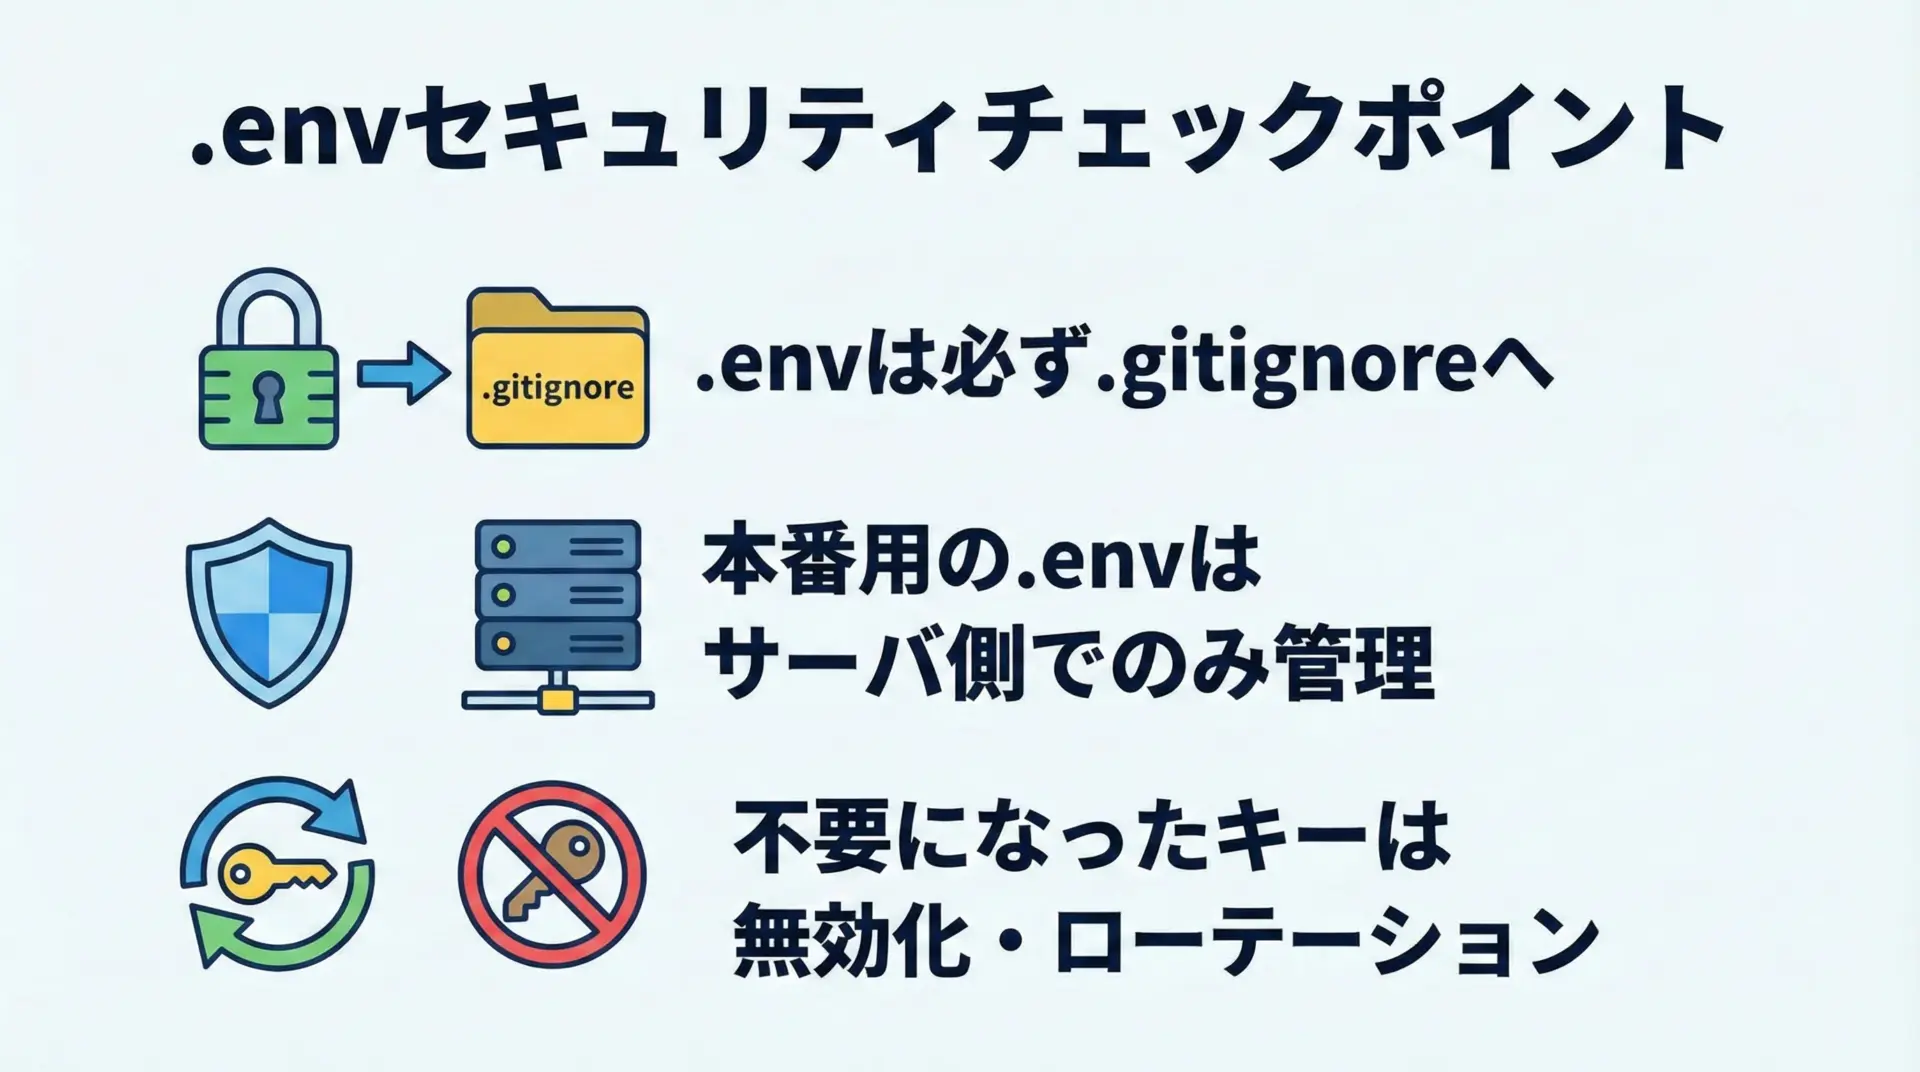
.envファイルを安全に運用するためには、いくつかのルールを決めておくと安心です。
まず.envは必ず.gitignoreに追加し、リポジトリにコミットしないことが大前提です。
これは個人開発でも同じです。
一度公開してしまったAPIキーは、たとえ削除してもキャッシュなどに残る可能性があるため、即座に無効化・再発行が必要になります。
次に、本番環境の.envは、サーバやCI/CDのシークレットストアなど、限られた場所でのみ管理し、ローカル開発マシンには置かない運用が望ましいです。
本番用キーをローカルにコピーすると、端末紛失などのリスクが増大します。
さらに、次のような運用ルールも有効です。
- 不要になった環境変数は.envから削除する
- 古いキーやトークンは定期的にローテーション(再発行)する
- .envファイルのアクセス権限(パーミッション)を最小限にする
これらのルールを文書化し、チーム全員で共有しておくことがセキュリティ向上の第一歩となります。
チーム開発での.env共有と管理方法
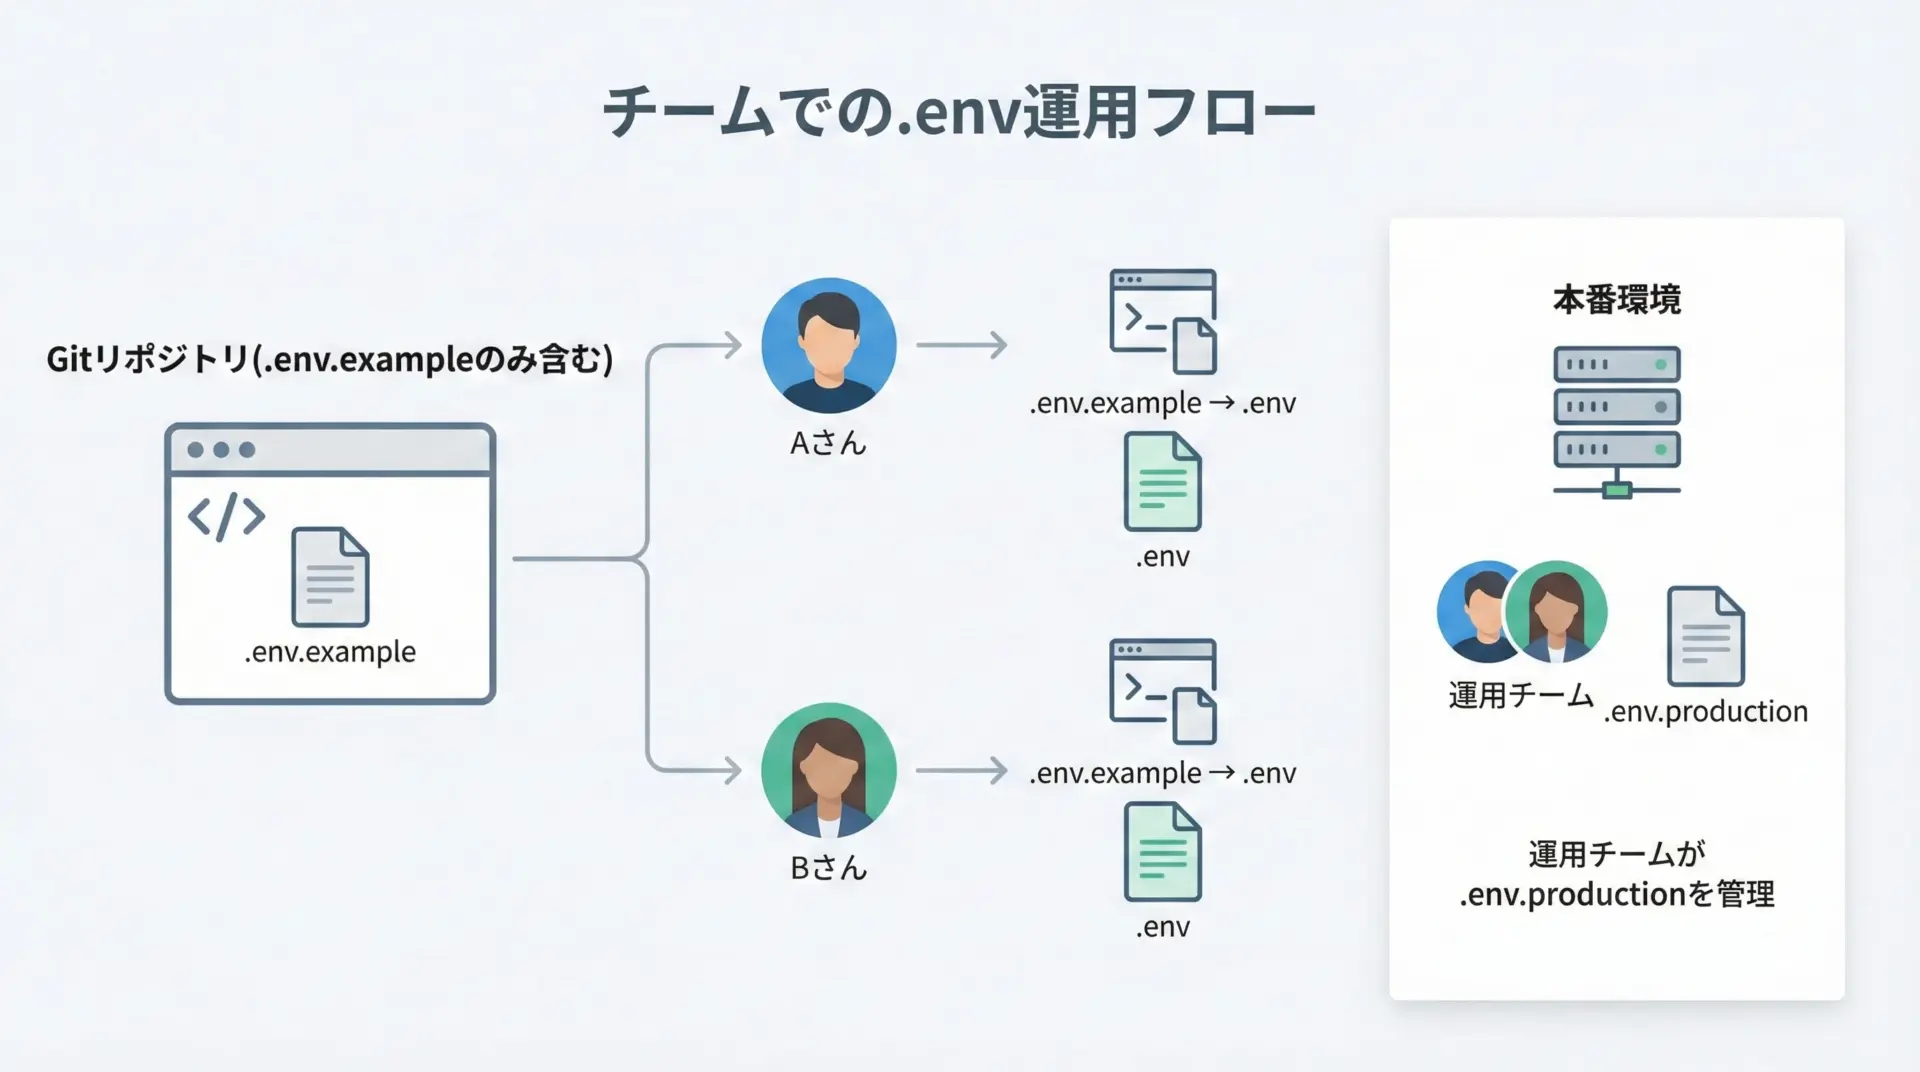
チーム開発では、環境変数まわりで混乱が起きやすいため、以下のような運用フローを作るとスムーズです。
まず、リポジトリには.env.exampleだけをコミットし、必要なキー名と簡単な説明コメントを記載します。
各開発者は、リポジトリをクローンしたあと、次のように環境を構築します。
cp .env.example .envで個人用.envを作成- .envをエディタで開き、自分の環境にあった値に書き換える
- .envは絶対にコミットしない(誤ってコミットしないように注意)
設定項目が増えたり変わったりした場合は、まず.env.exampleを更新し、その変更内容をチーム全員に周知します。
各メンバーは、自分の.envと.env.exampleを比較して必要な箇所を更新します。
変更の連絡をコードで補助する
場合によっては、アプリ起動時に必須の環境変数が揃っているかチェックするコードを追加すると、設定漏れに早く気付けます。
import os

REQUIRED_KEYS = [
    "API_KEY",
    "DB_HOST",
    "DB_USER",
    "DB_PASSWORD",
]

missing = [key for key in REQUIRED_KEYS if os.getenv(key) is None]

if missing:
    # チームメンバーが気づきやすいようにわかりやすいメッセージを表示
    missing_str = ", ".join(missing)
    raise RuntimeError(
        f"Missing required environment variables: {missing_str}. "
        "Please check your .env against .env.example."
)このような仕組みを入れておくと、新しく参加したメンバーが.envの設定漏れでつまずくリスクを減らせます。
Dockerや仮想環境と.envの組み合わせ方
Pythonの開発では、仮想環境(venv)やDockerと一緒に.envを使うことが多くなります。
それぞれの組み合わせ方を簡単に整理します。
venv(仮想環境)と.env
venvはPythonパッケージのインストール先を分離する仕組みで、環境変数とは役割が異なります。
一般的には次のような構成になります。
my-project/
  ├─ venv/           # 仮想環境(ライブラリが入る)
  ├─ .env            # 環境変数の実体
  ├─ .env.example
  ├─ app.py
└─ requirements.txt仮想環境を有効化してからpython app.pyを実行すると、python-dotenvが.envを読み込み、その内容が仮想環境内のPythonプロセスに反映される、という流れになります。
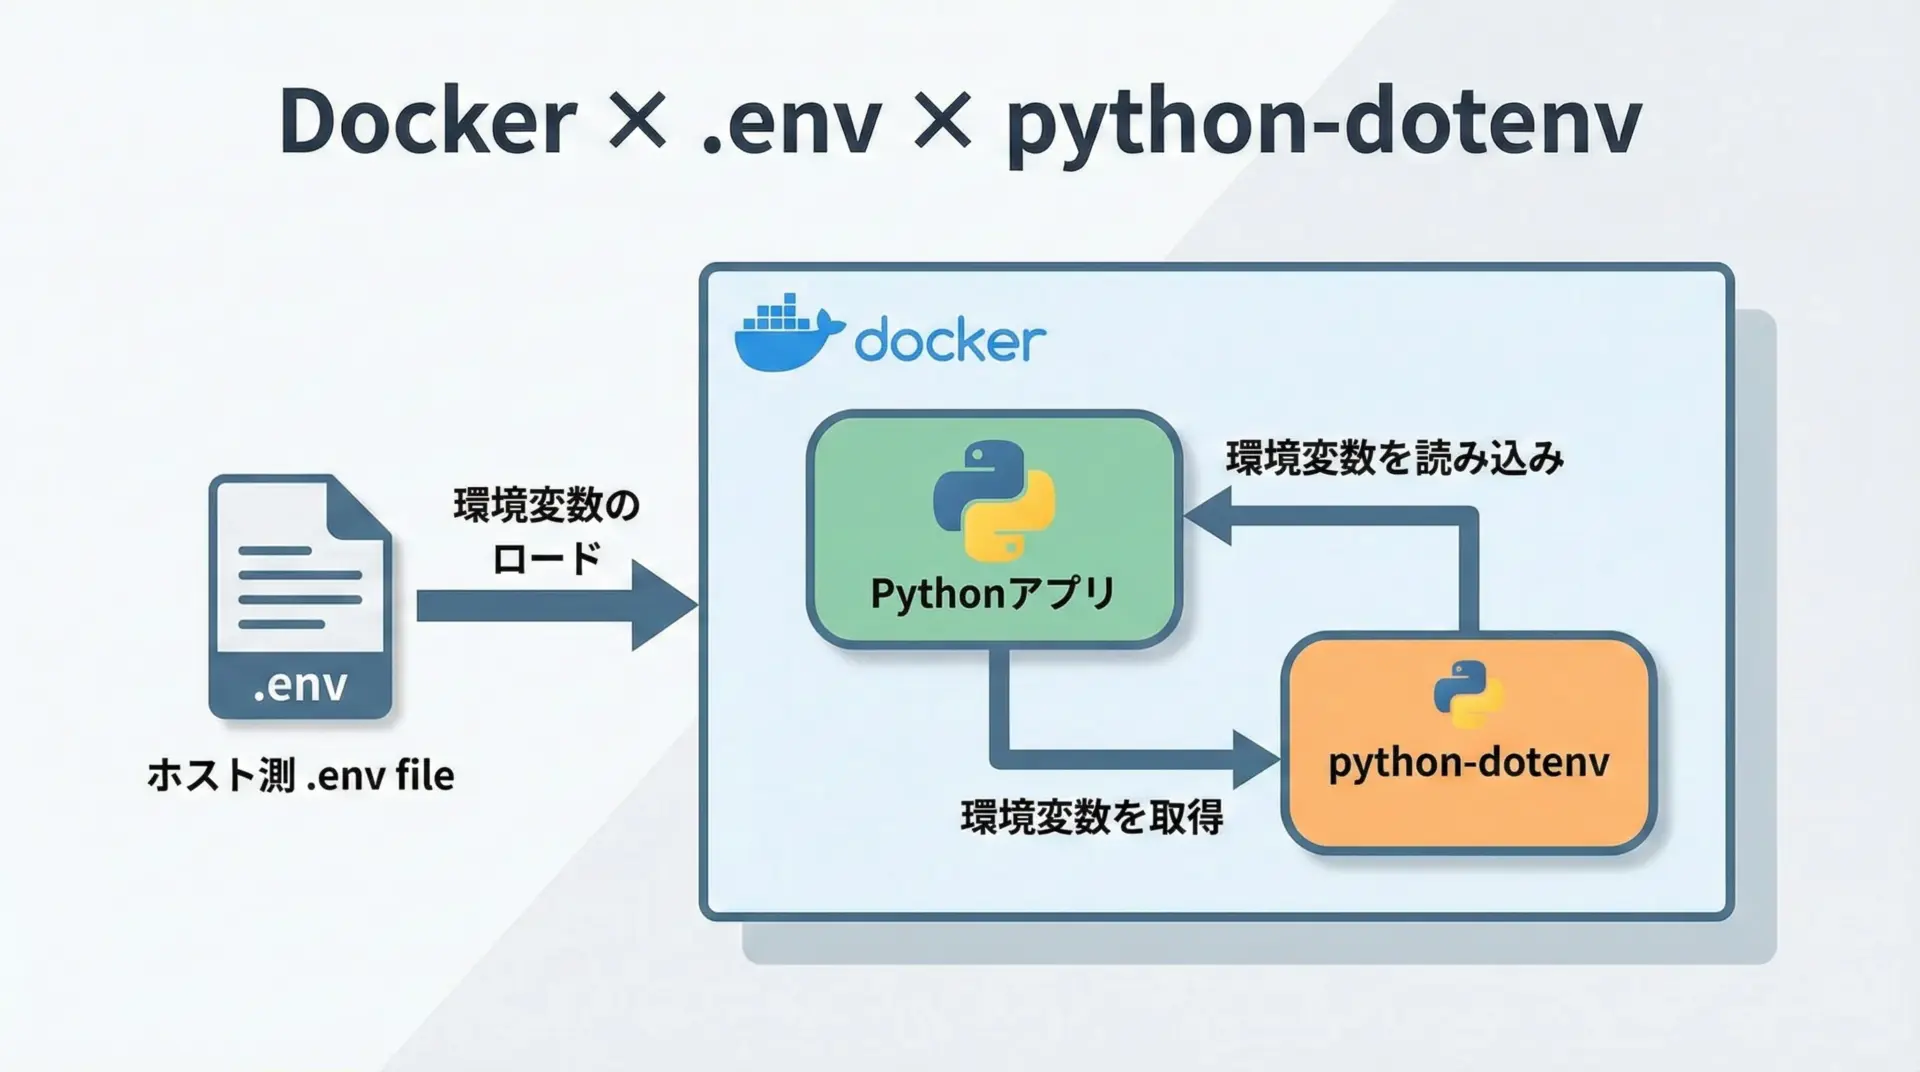
Dockerと.env
Dockerを使う場合、環境変数の扱いには2つのパターンがあります。
- Dockerコンテナに直接環境変数を渡す
- コンテナ内でpython-dotenvに.envを読ませる
代表的なのは1つ目で、ホスト側の.envをdocker-composeやdocker run経由でコンテナに流す方法です。
docker-compose.ymlの例:
version: "3.9"

services:
  web:
    build: .
    env_file:
      - .env   # ホスト側の.envをコンテナに注入する
command: python app.pyこの場合、コンテナ内のPythonアプリは、os.getenvで環境変数を取得できるので、python-dotenvを使わなくても動作します。
ただし、ローカル開発ではpython-dotenv、本番ではDockerのenv_fileというように併用するケースもよくあります。
コンテナ内でもpython-dotenvを使いたい場合は、.envファイル自体をコンテナにCOPYする、あるいはenv_fileと併用して柔軟に運用します。
重要なのは、本番用の.envをイメージに焼き込まない(コンテナイメージに含めない)ことです。
常に、本番向けの秘密情報は実行時に注入するようにしてください。
まとめ
Pythonで安全かつ柔軟に設定値を扱うには、環境変数と.env、そしてpython-dotenvの組み合わせが非常に有効です。
APIキーやパスワードをコードから切り離し、開発・本番で異なる設定を簡単に切り替えられるようになります。
.envは.gitignoreで必ず除外し、代わりに.env.exampleでテンプレートを共有することで、チーム全体のセキュリティと生産性を両立できます。
この記事を参考に、自分のプロジェクトにあった.env運用ルールを整え、安全でスケーラブルなPython開発環境を構築してみてください。
