PythonでモダンなWeb APIを作るなら、FastAPIは非常に有力な選択肢です。
高速で、型ヒントに基づいた自動バリデーションやドキュメント生成が可能なため、小規模な検証から本番運用まで幅広く活用できます。
本記事では、FastAPIの基本概念から、非同期処理・認証・DB連携・テストまで、一通りの開発フローを入門者向けに体系的に解説します。
FastAPIとは何か
PythonでFastAPIを選ぶ理由
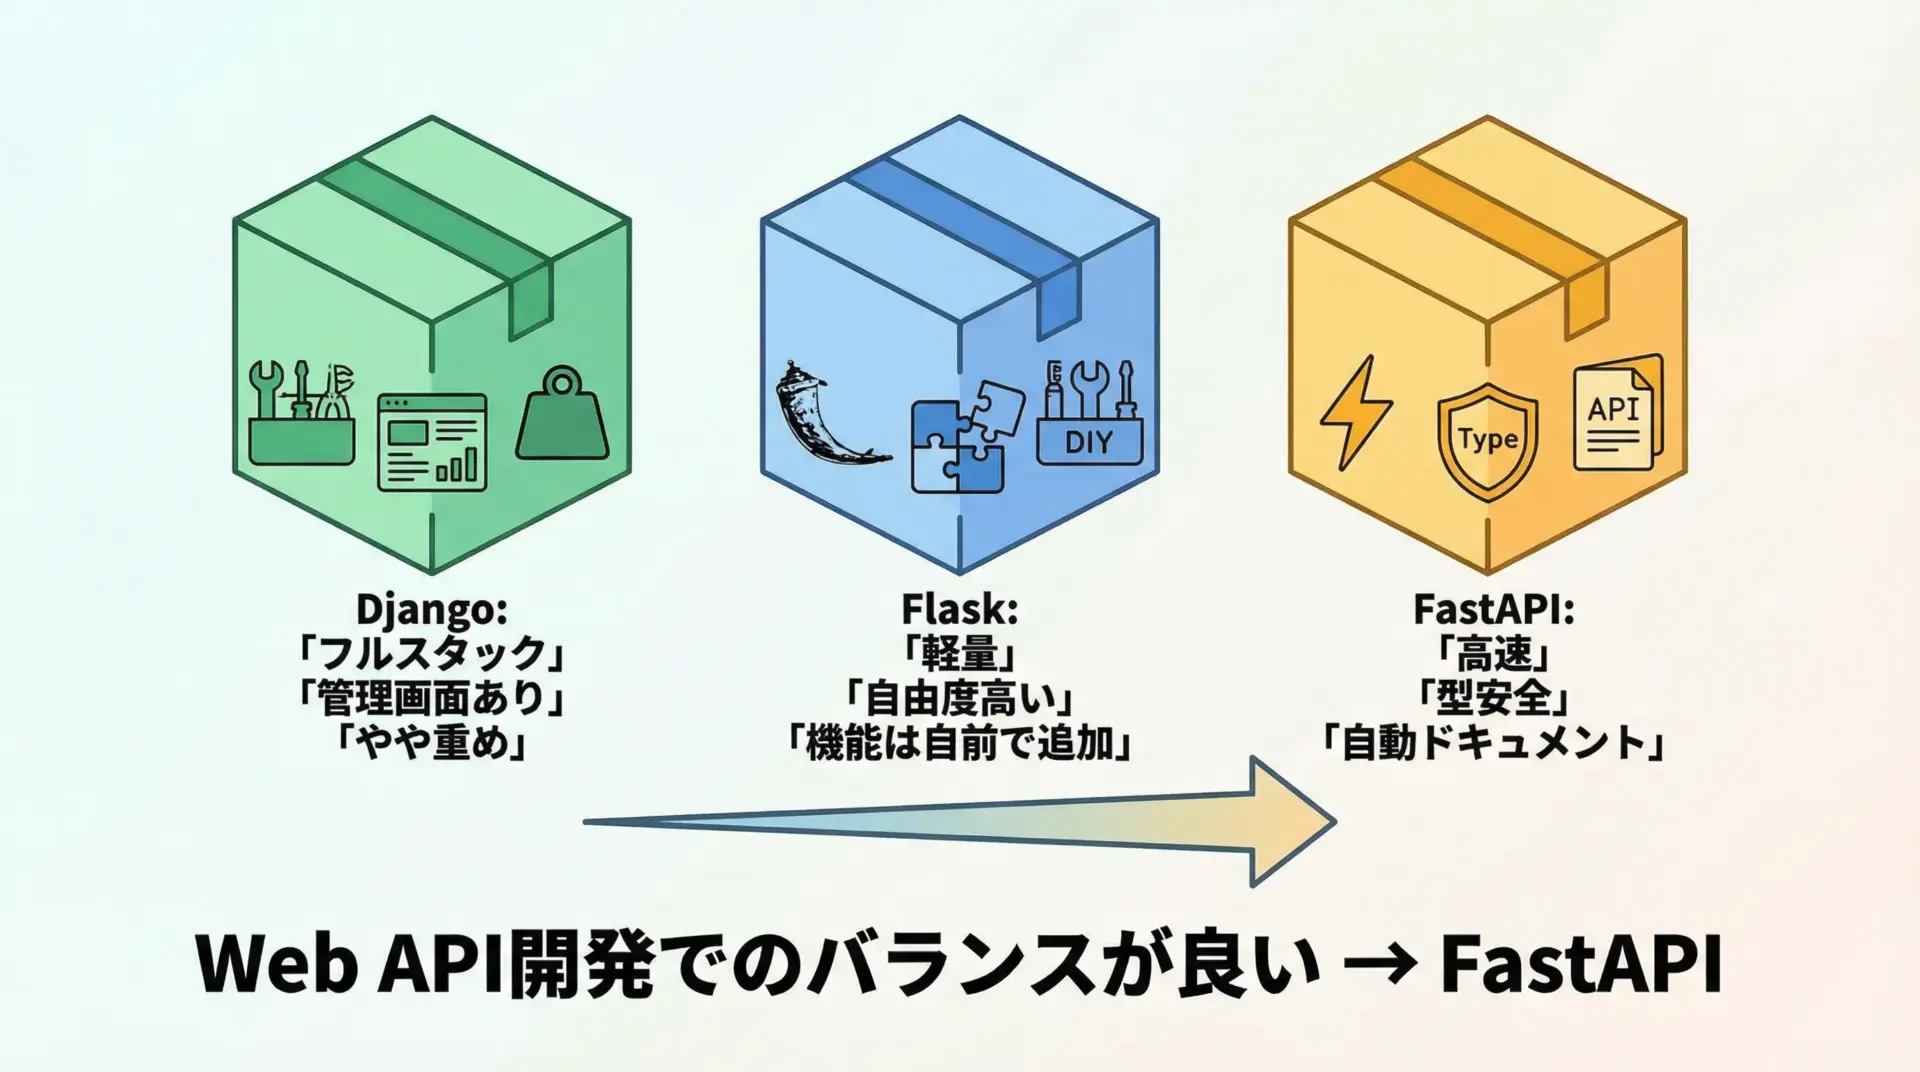
PythonでWeb APIといえば、以前はFlaskやDjango REST Frameworkが主流でした。
しかし近年、高速性と型ヒントの活用という2つの特徴を兼ね備えたFastAPIが急速に普及しています。
FastAPIを選ぶ主な理由は次のような点にあります。
まず、FastAPIはStarletteとPydanticという2つのライブラリを土台にしており、ASGI準拠の非同期サーバーフレームワークとして非常に高いパフォーマンスを発揮します。
また、Pythonの型ヒントを前提に設計されているため、エディタ補完が効きやすく、実装段階からバグを減らせる点が魅力です。
さらに、OpenAPI仕様に基づいた自動ドキュメント生成機能が標準搭載されており、ブラウザからインタラクティブにAPIを試せるため、バックエンドとフロントエンドの連携や、チーム開発において大きなメリットがあります。
少ないコード量で、堅牢かつメンテナンスしやすいAPIを素早く構築できるという点が、FastAPIを選ぶ最大の理由だといえます。
高速・型安全なWeb APIの特徴
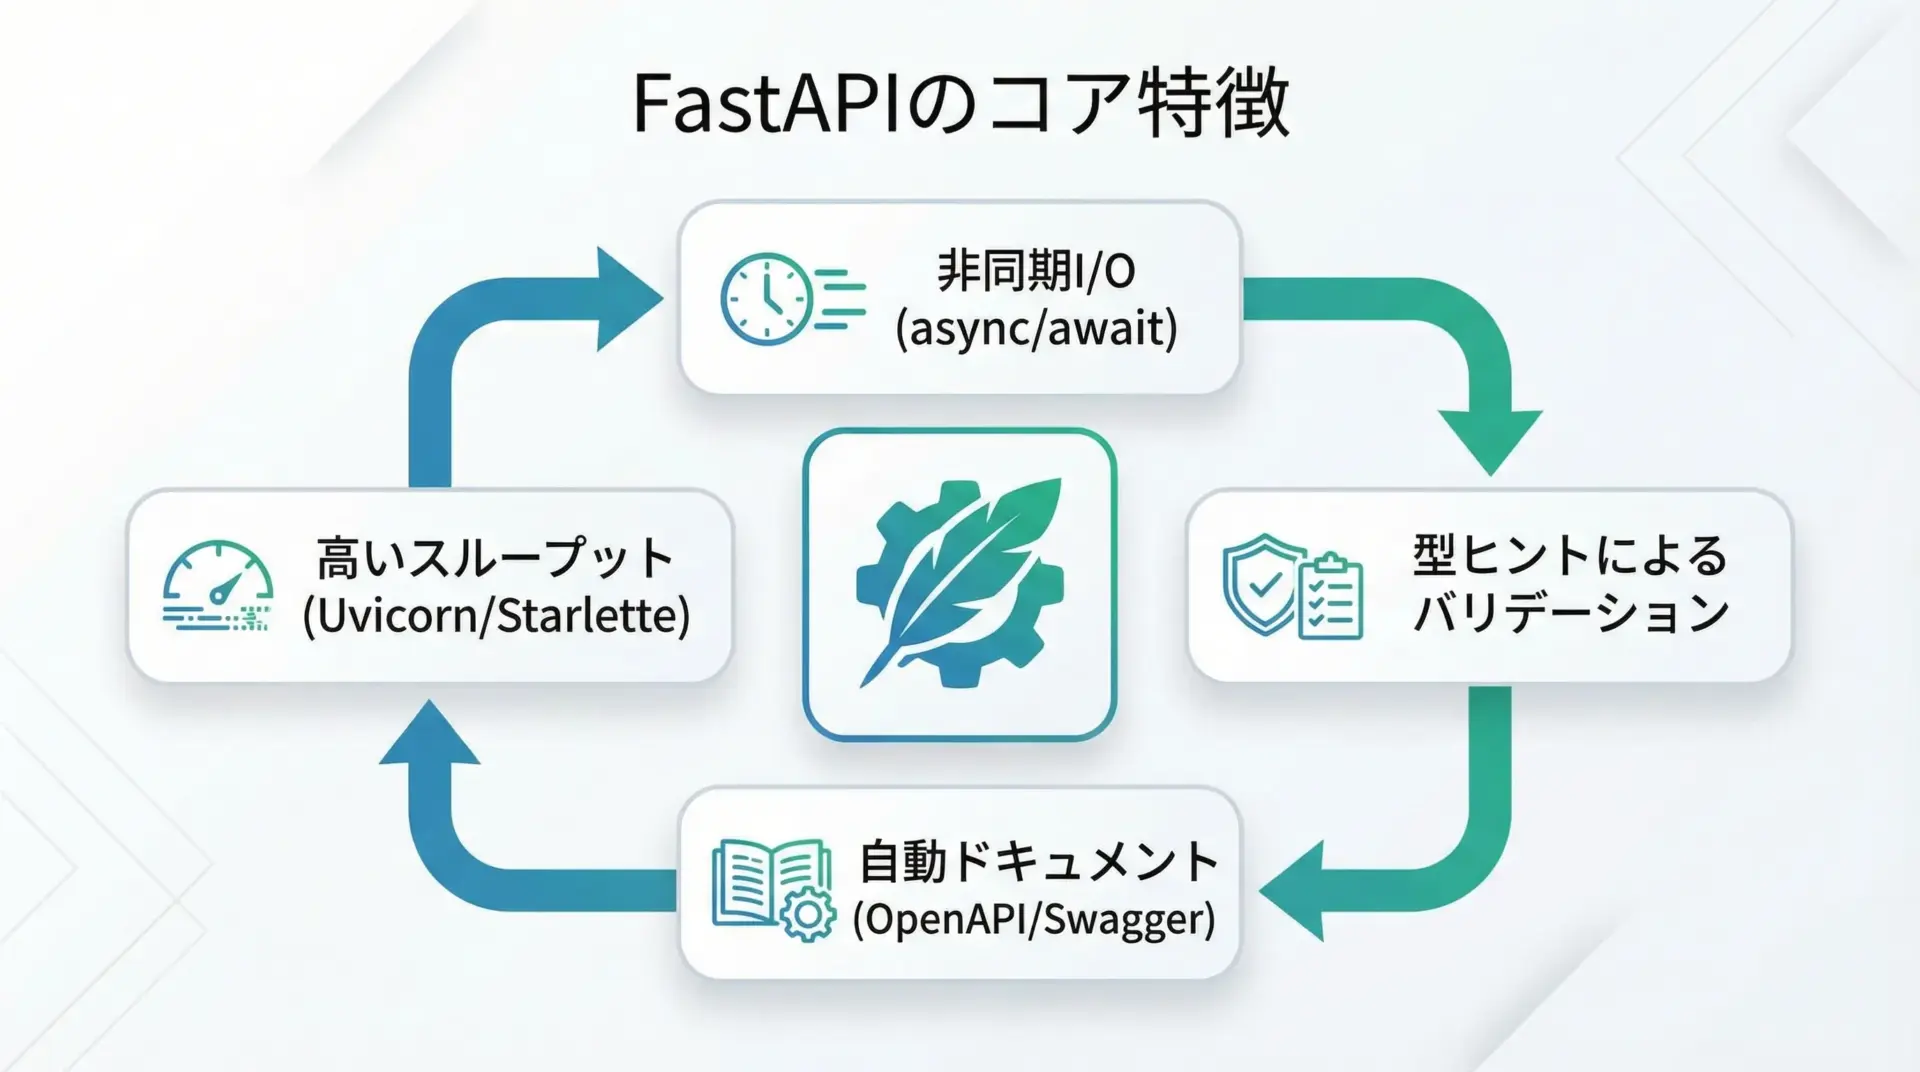
FastAPIは高速性と型安全性を両立させるための仕組みをフレームワークレベルで備えています。
高速性については、ASGI対応サーバであるUvicornやHypercorn上で動作し、非同期I/Oを活用できるよう設計されています。
そのため、外部APIやデータベースとの通信が多いアプリケーションでも、高いスループットを実現できます。
型安全性の面では、Pythonの型ヒント情報を利用して、Pydanticによる自動バリデーションとシリアライズ・デシリアライズが行われます。
これにより、開発者はstrやintなどの型を関数シグネチャに記述するだけで、FastAPIが入力値を検証し、不正なリクエストに対しては自動的に400系のエラーを返してくれます。
このように、実行時の安全性と開発効率を同時に高められる点が、FastAPIを用いたWeb API開発の大きな強みです。
開発環境の準備
PythonとFastAPIのインストール手順
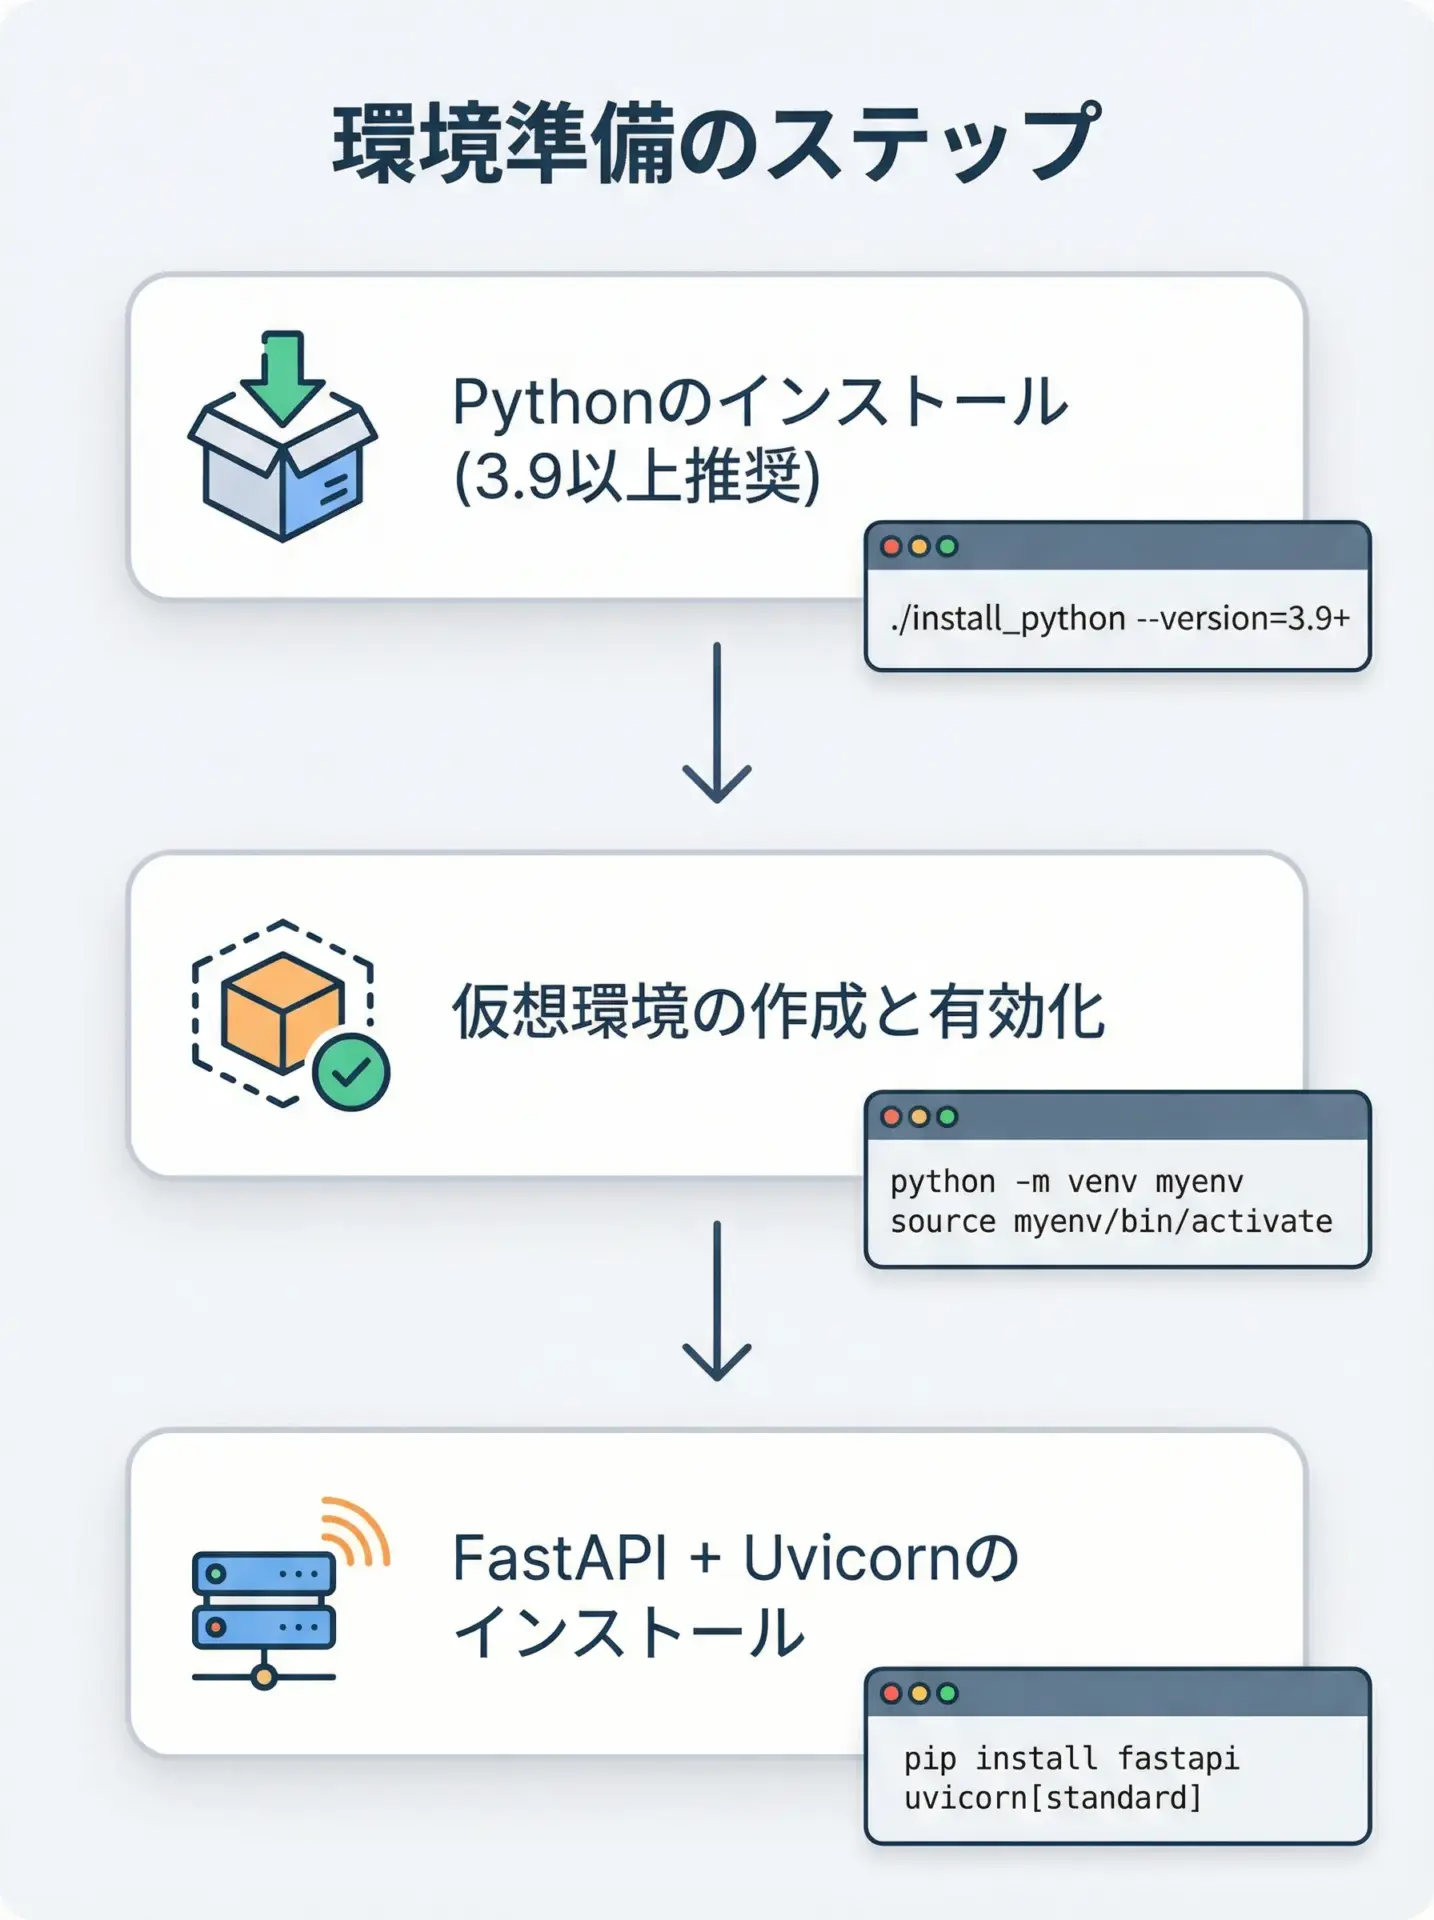
FastAPIを始める前に、Python本体と仮想環境、そして必要なライブラリを準備します。
まず、Pythonは3.9以上を推奨します。
公式サイトからインストールしておきます。
次に、プロジェクトごとに依存関係を分離するため、仮想環境を作成します。
以下は、仮想環境を利用してFastAPIとUvicornをインストールする例です。
# プロジェクト用ディレクトリを作成
mkdir fastapi-intro
cd fastapi-intro

# 仮想環境を作成(venvという名前)
python -m venv venv

# 仮想環境を有効化
# Windows
venv\Scripts\activate

# macOS / Linux
source venv/bin/activate

# FastAPIとUvicorn(開発サーバ)をインストール
pip install fastapi "uvicorn[standard]"インストールが完了したら、pip listコマンドでfastapiとuvicornが含まれていることを確認しておくと安心です。
Uvicornによる開発サーバーの起動方法
FastAPIアプリケーションは、主にUvicornを使って起動します。
UvicornはASGIサーバであり、FastAPIの非同期処理の性能を引き出す役割を担っています。
最低限必要なのは、FastAPIアプリ本体(例えばmain.py)と、Uvicornの起動コマンドです。
起動の構文はuvicorn モジュール名:app変数名という形になります。
# main.py内のapp(FastAPIインスタンス)を起動
uvicorn main:app --reload--reloadオプションを付けると、ソースコード変更時に自動で再起動されるため、開発中はこのオプションを付けるのがおすすめです。
最小構成のFastAPIアプリ
FastAPIでHello World APIを実装
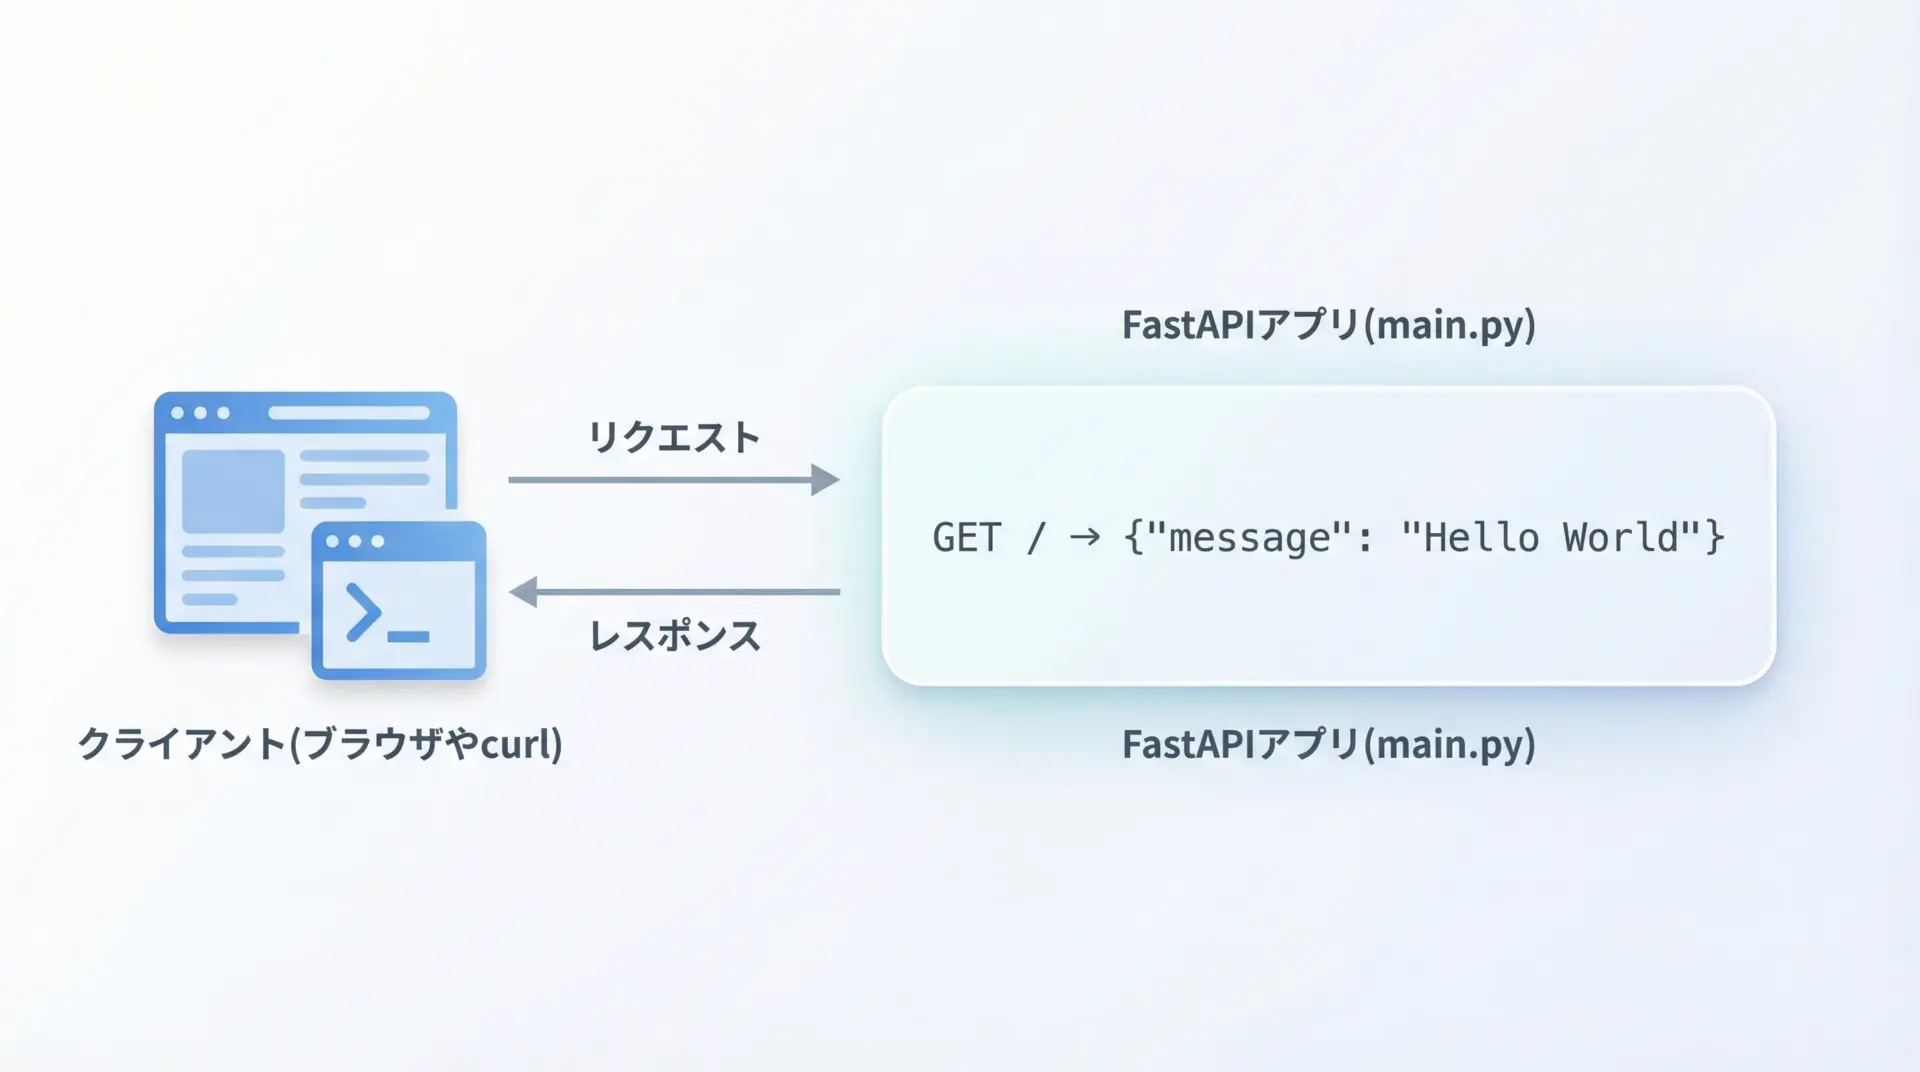
FastAPIの感覚をつかむために、もっとも小さな「Hello World」APIを作成します。
以下のmain.pyを用意してください。
# main.py
from fastapi import FastAPI

# FastAPIアプリケーションのインスタンスを生成
app = FastAPI()

# ルートパス("/")に対するGETリクエストのエンドポイントを定義
@app.get("/")
def read_root():
    # クライアントに返すレスポンス(JSONとして返される)
    return {"message": "Hello World"}
この状態で、次のコマンドを実行してサーバを起動します。
uvicorn main:app --reloadブラウザでhttp://127.0.0.1:8000/にアクセスすると、次のようなJSONレスポンスが表示されます。
{"message": "Hello World"}エンドポイントとパスオペレーションの基本
FastAPIでは、URLパスとHTTPメソッドの組み合わせをパスオペレーションと呼びます。
たとえば、先ほどの例では"/"というパスに対してGETメソッドのパスオペレーションを定義していました。
パスオペレーションは、デコレータとPython関数の組み合わせで表現されます。
次のように、メソッドごとに対応するデコレータを使います。
@app.get()@app.post()@app.put()@app.delete()- など
簡単な例として、2つ目のエンドポイントを追加してみます。
# main.py
from fastapi import FastAPI

app = FastAPI()

@app.get("/")
def read_root():
    return {"message": "Hello World"}

# /items というパスにGETでアクセスした場合のパスオペレーション
@app.get("/items")
def list_items():
    # 本来はDBから取得する想定だが、ここでは固定値を返す
return [{"id": 1, "name": "Apple"}, {"id": 2, "name": "Orange"}]このように、URLとHTTPメソッドごとに関数を割り当てる形でAPIを増やしていけるのがFastAPIの基本構造です。
型ヒントとリクエストバリデーション
Pydanticモデルでリクエストボディを定義
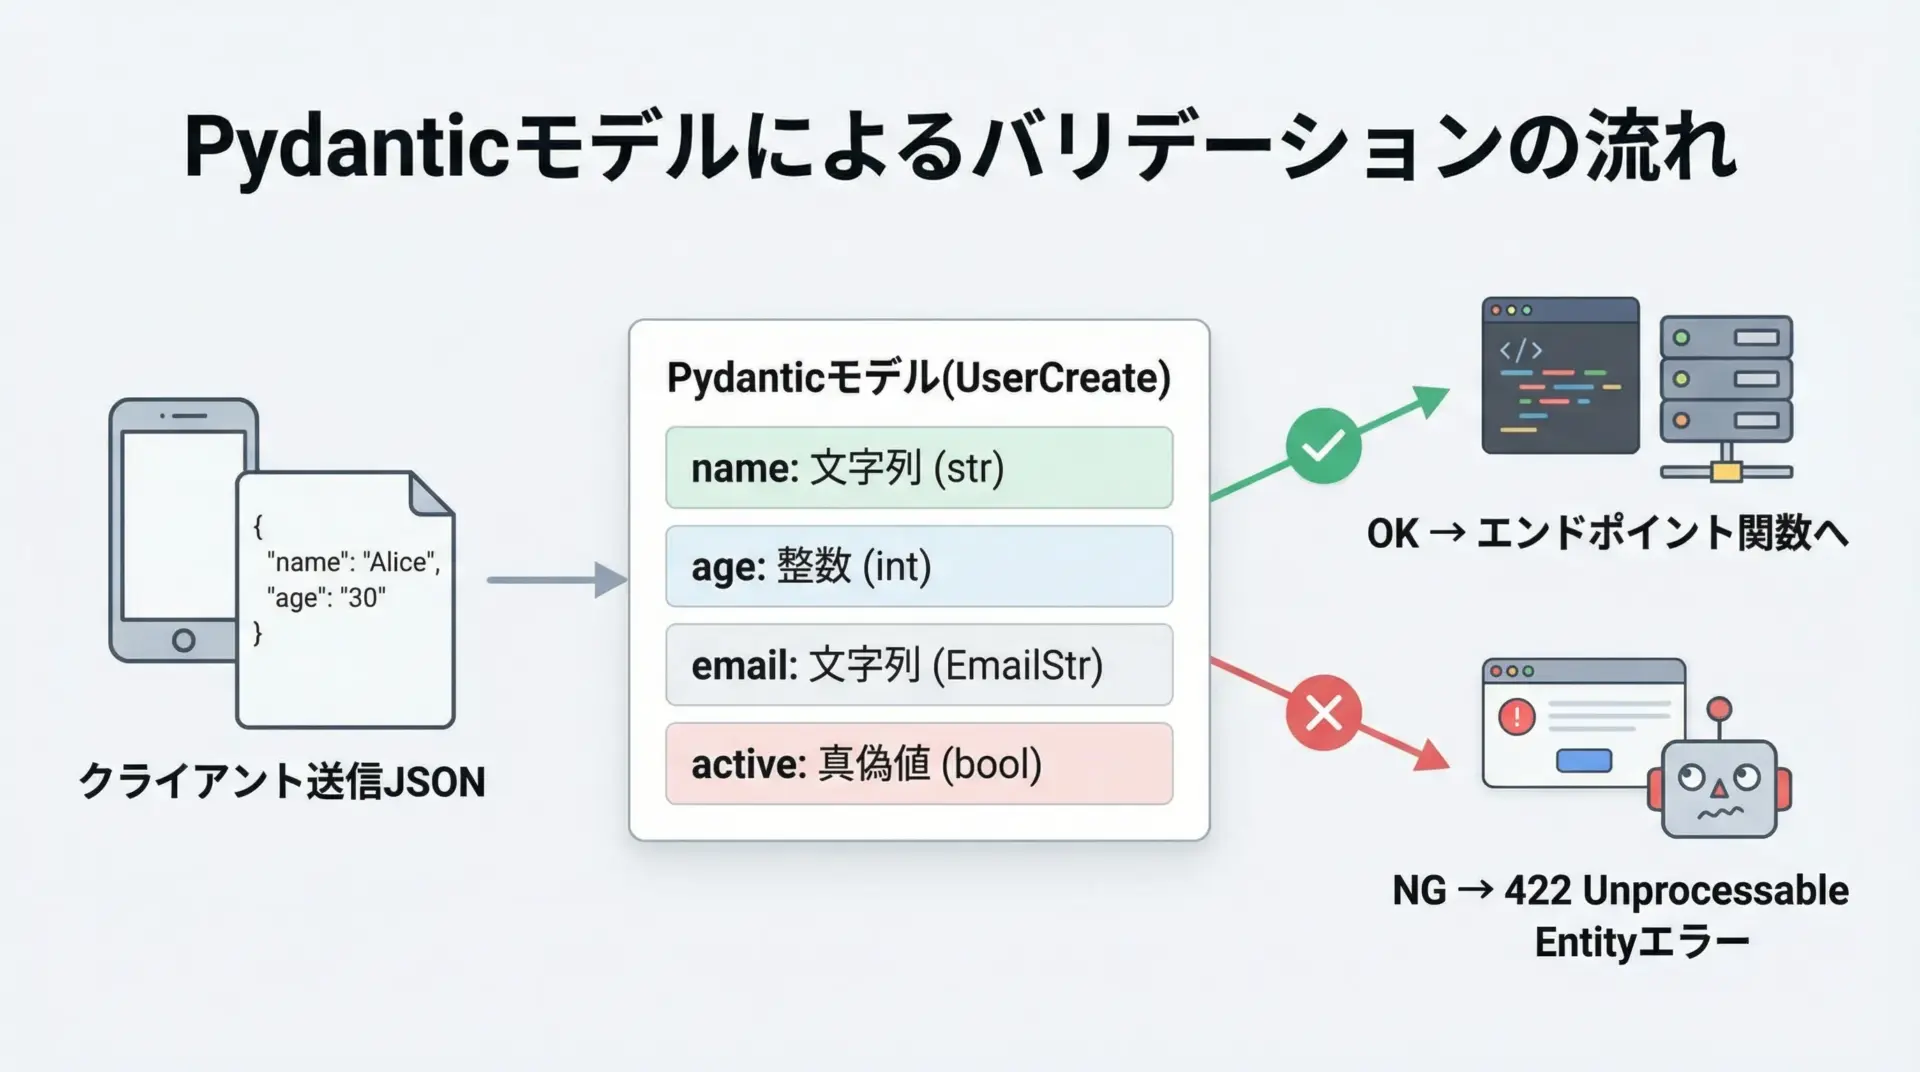
FastAPIでは、リクエストボディ(JSON)を扱う際に、Pydanticモデルを定義することが基本になります。
Pydanticモデルは、Pythonのクラスとしてフィールドの型や制約を記述でき、FastAPIはこれを使って自動的にバリデーションを行います。
次は、ユーザー登録APIのリクエストボディをPydanticモデルで定義する例です。
# main.py
from fastapi import FastAPI
from pydantic import BaseModel

app = FastAPI()

# ユーザー作成時のリクエストボディのスキーマを定義
class UserCreate(BaseModel):
    name: str        # 必須の文字列項目
    age: int         # 必須の整数項目
    is_active: bool = True  # デフォルト値を持つ項目(省略可能)

@app.post("/users")
def create_user(user: UserCreate):
    # user は UserCreate 型のインスタンスとして受け取れる
    # ここでは受け取った内容をそのまま返すだけ
    return {"message": "user created", "user": user}
このAPIに、例えば次のようなJSONをPOSTすると、正常に受け付けられます。
{
  "name": "Taro",
  "age": 30
}一方、"age": "thirty"のように型が合わない値を送った場合、FastAPIは自動的に422エラーを返し、どのフィールドが不正か詳細なエラー情報をレスポンスに含めます。
型ヒントによる自動バリデーションの仕組み
FastAPIの最大の特徴の1つは、関数の引数に付けた型ヒントをそのままバリデーションに利用する点です。
先ほどの例では、エンドポイント関数create_user(user: UserCreate)の引数userにPydanticモデル型を指定していました。
この定義に基づいて、FastAPIは次のような処理を行います。
- リクエストボディ(JSON)を受け取る
- JSONを
UserCreateクラスのインスタンスとして生成しようとする - Pydanticによる型チェックと制約チェックを実行
- 成功した場合は
user引数として関数に渡す - 失敗した場合は422エラーとしてエラー内容を返却
この仕組みにより、開発者はビジネスロジックに専念しつつ、入力チェックを漏れなく実装できるようになります。
ルーティングとパスパラメータ
PathとQueryパラメータの使い方
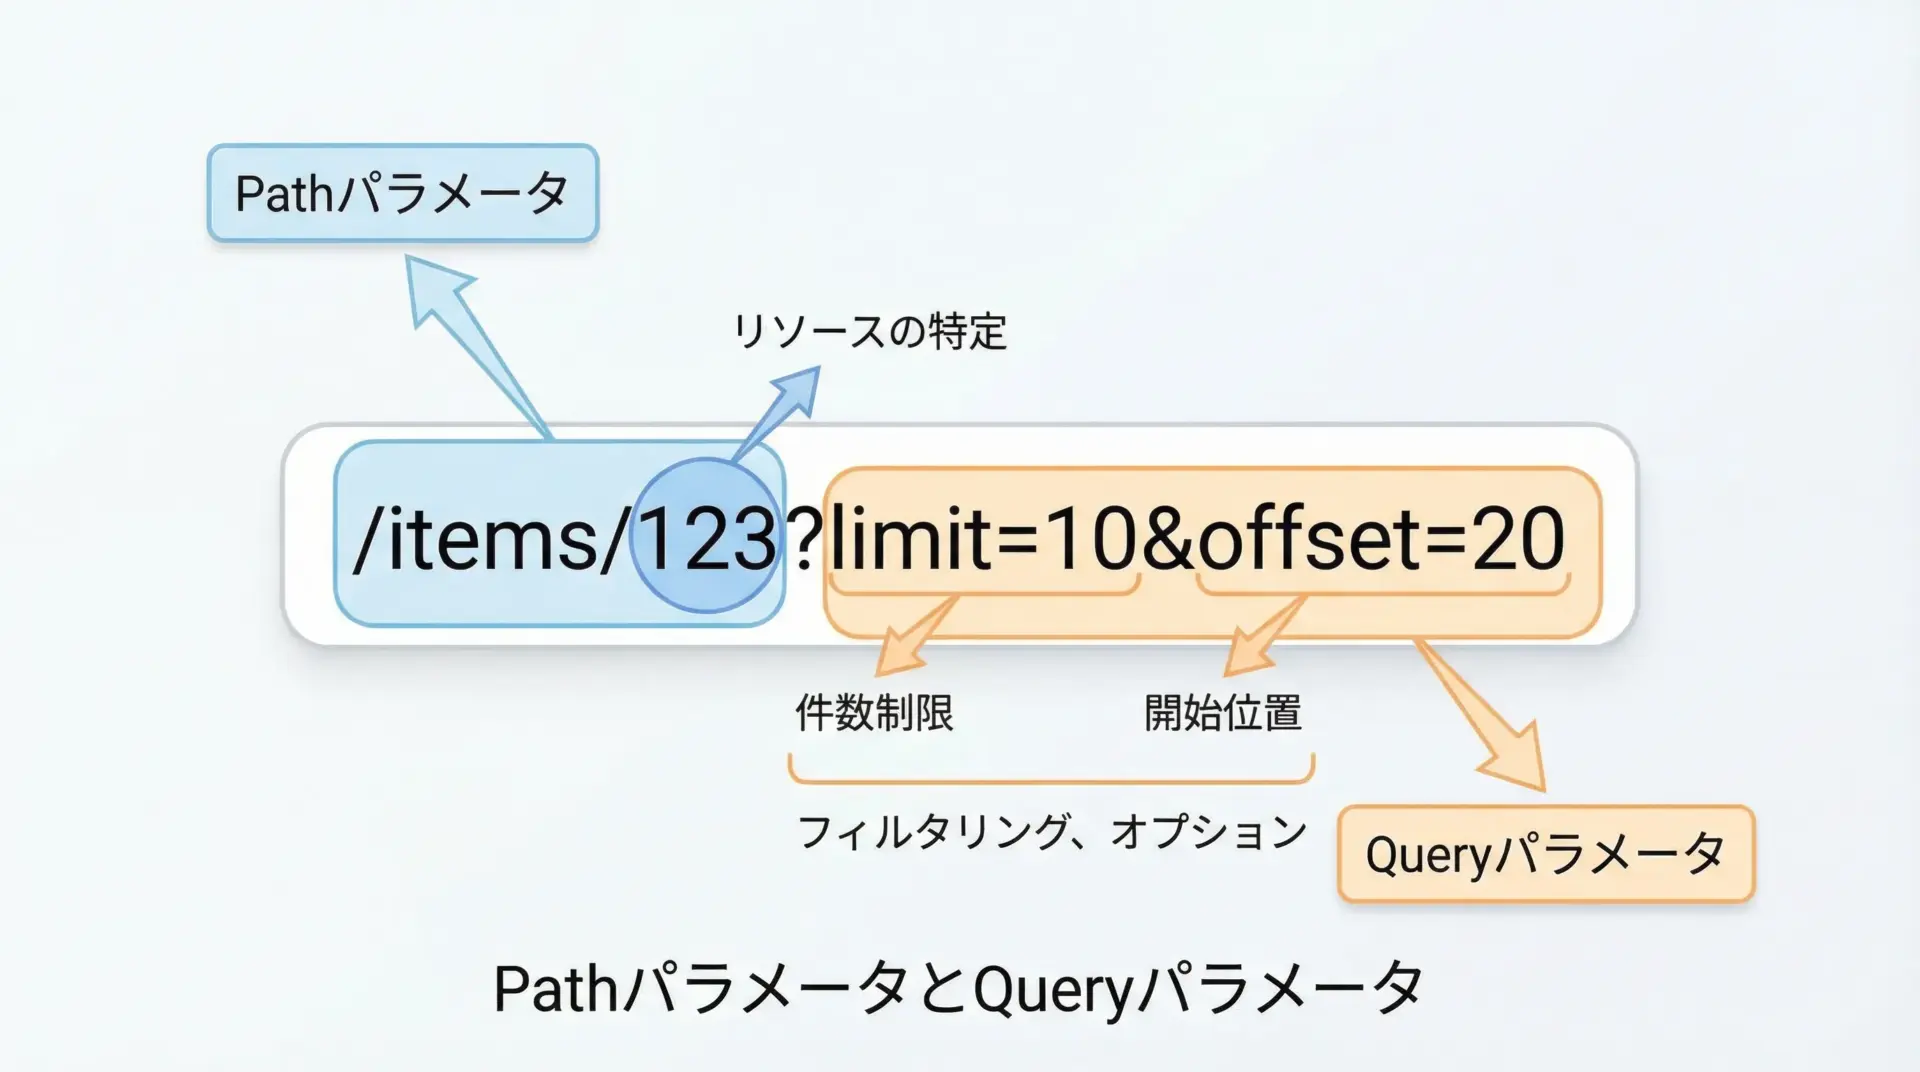
FastAPIでは、URLパスの一部を変数として扱うPathパラメータと、URLの?以降に付与するQueryパラメータを簡潔に定義できます。
Pathパラメータの例です。
from fastapi import FastAPI

app = FastAPI()

# {item_id} の部分がPathパラメータとして扱われる
@app.get("/items/{item_id}")
def read_item(item_id: int):
    # item_id は int 型として受け取れる
return {"item_id": item_id}このエンドポイントに/items/100のようにアクセスすると、item_id=100として関数に渡されます。
文字列ではなくint型と指定しているため、/items/abcのような不正な値は自動的にエラー扱いになります。
Queryパラメータは、関数引数を通常の形で追加するだけで利用できます。
from typing import Optional
from fastapi import FastAPI

app = FastAPI()

# /search?q=apple&limit=10 のようにアクセス
@app.get("/search")
def search_items(q: str, limit: int = 10, offset: int = 0):
    # q は必須のクエリ文字列
    # limit と offset はデフォルト値を持つため省略可能
    return {
        "query": q,
        "limit": limit,
        "offset": offset
    }
さらに、Optional型やデフォルト値を駆使することで、柔軟なAPIインターフェースを自然なPythonコードとして記述できます。
ルーター(APIRouter)でエンドポイントを分割管理
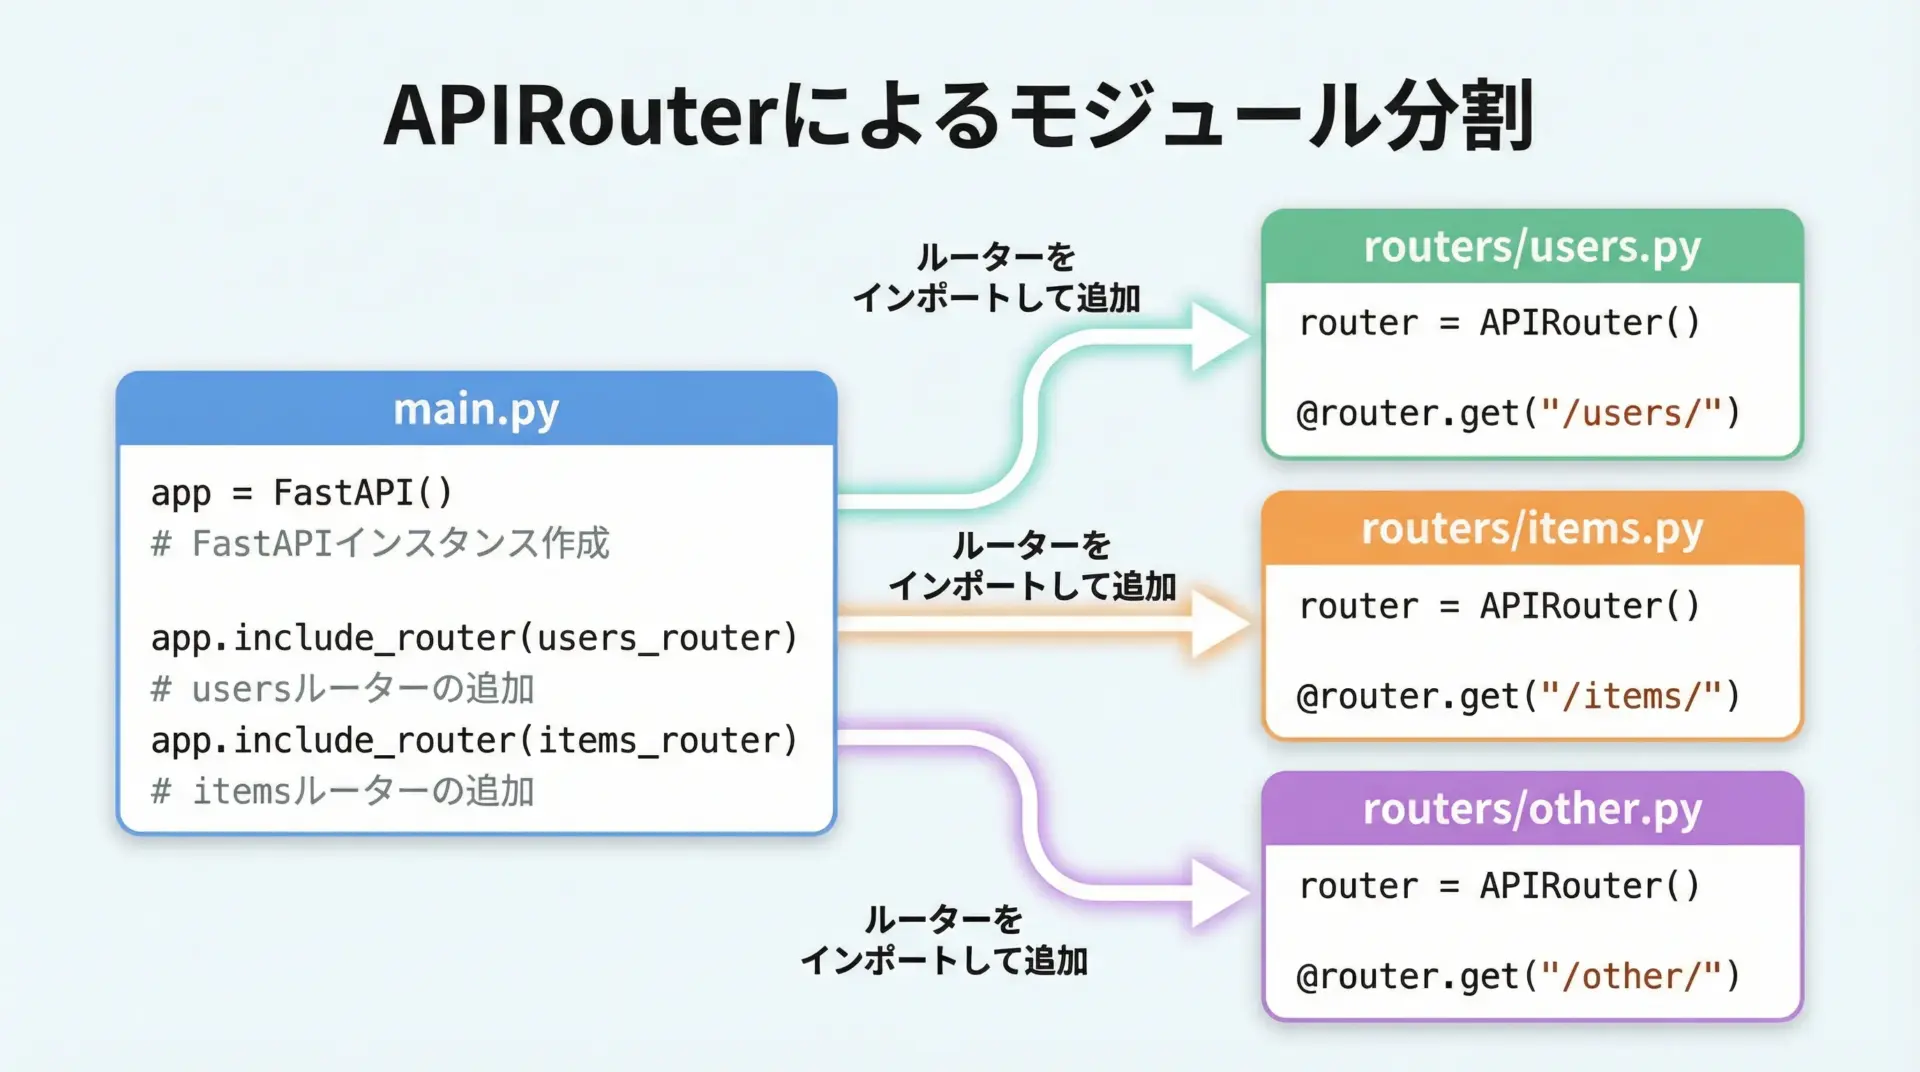
アプリケーションが大きくなると、1つのmain.pyに全エンドポイントを詰め込むのは管理が難しくなります。
FastAPIではAPIRouterを使うことで、エンドポイントをファイル単位・機能単位に分割できます。
以下は、ユーザー関連のルーターを定義する例です。
# routers/users.py
from fastapi import APIRouter
from pydantic import BaseModel

router = APIRouter(prefix="/users", tags=["users"])

class User(BaseModel):
    id: int
    name: str

# GET /users
@router.get("/")
def list_users():
    return [
        User(id=1, name="Taro"),
        User(id=2, name="Hanako")
    ]

# GET /users/{user_id}
@router.get("/{user_id}")
def get_user(user_id: int):
return User(id=user_id, name=f"User{user_id}")これをmain.pyから読み込んで利用します。
# main.py
from fastapi import FastAPI
from routers import users  # routers/users.py を import

app = FastAPI()

# users.router をアプリケーションに登録
app.include_router(users.router)こうすることで、ドメインごとにファイルを分割しつつ、メインアプリから一元管理できるようになります。
レスポンスモデルとエラーハンドリング
レスポンスモデルで型安全なレスポンスを定義
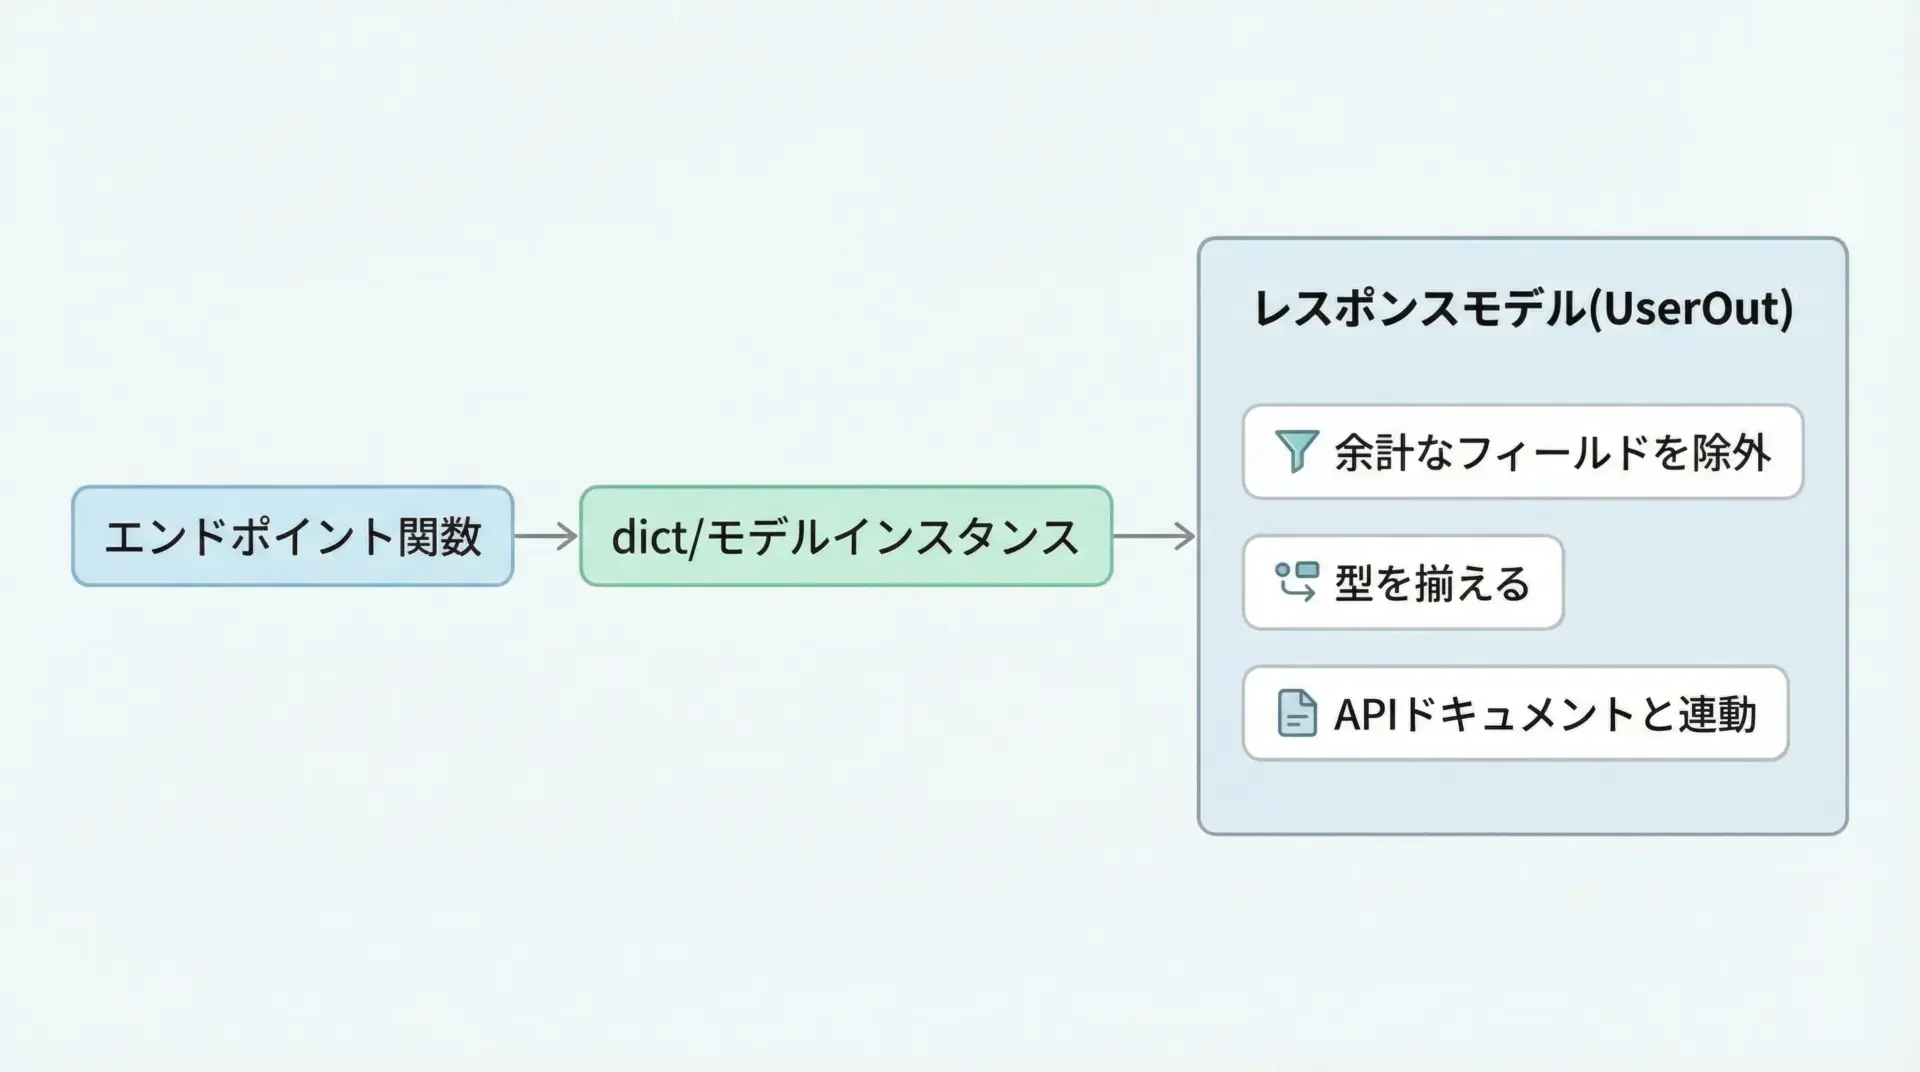
FastAPIでは、レスポンスの型も明示的に定義できます。
これをレスポンスモデルと呼びます。
レスポンスモデルを指定すると、不要なフィールドの除外や型変換が自動で行われるほか、ドキュメントのレスポンス定義にも反映されます。
from fastapi import FastAPI
from pydantic import BaseModel

app = FastAPI()

# 内部的なユーザーモデル(実際にはDBモデルなど)
class UserDB(BaseModel):
    id: int
    name: str
    email: str
    hashed_password: str  # クライアントには返したくない情報

# クライアントに返すレスポンスモデル
class UserOut(BaseModel):
    id: int
    name: str
    email: str

@app.get("/users/{user_id}", response_model=UserOut)
def get_user(user_id: int):
    # 実際にはDBから取得する想定
    user_db = UserDB(
        id=user_id,
        name="Taro",
        email="taro@example.com",
        hashed_password="***hashed***"
    )
    # UserDB を返しても、response_model=UserOut により
    # id, name, email だけがレスポンスに含まれる
return user_dbこのように、内部モデルと外部公開モデルを分けつつも、安全にレスポンスを制御できるため、セキュリティと保守性が向上します。
HTTPExceptionでエラーを返す方法
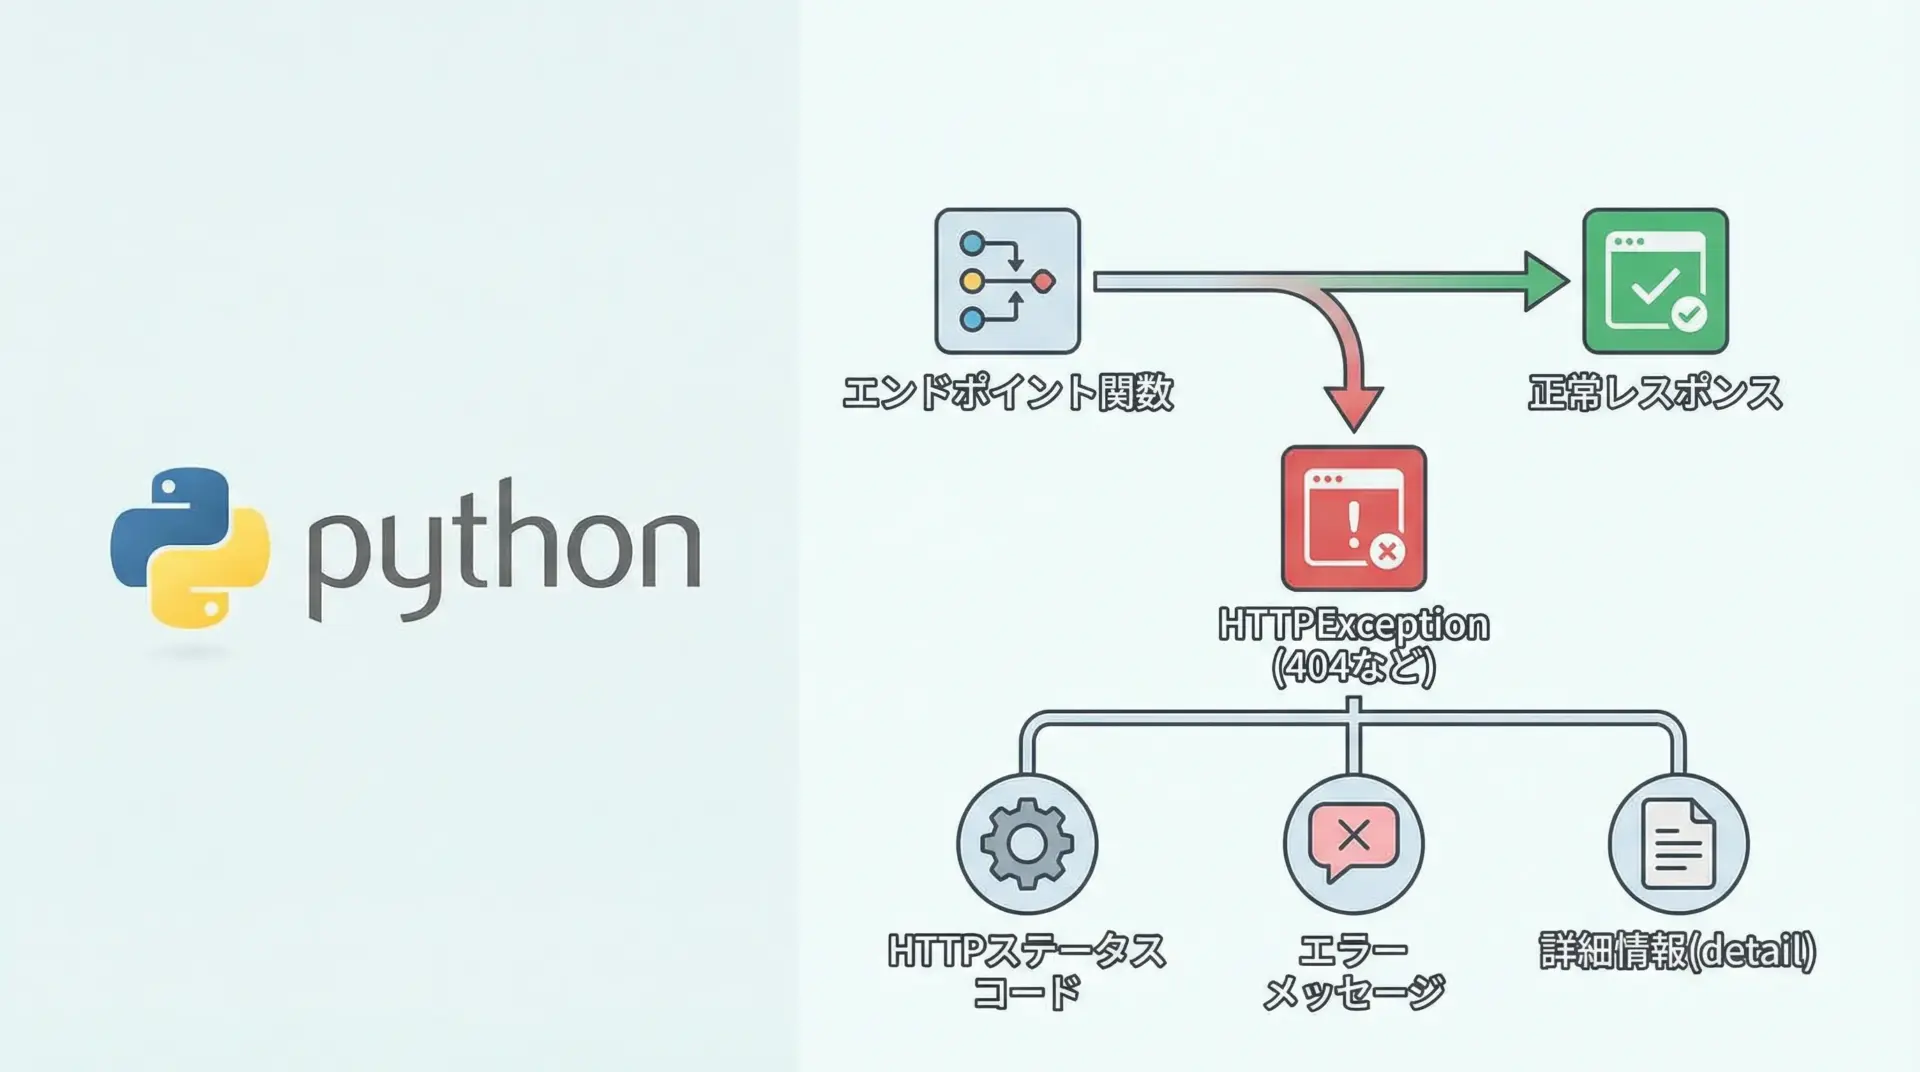
FastAPIでは、エラー発生時にHTTPExceptionを送出することで、HTTPステータスコードやエラーメッセージを簡単にクライアントへ返すことができます。
from fastapi import FastAPI, HTTPException

app = FastAPI()

items = {
    1: "Apple",
    2: "Orange"
}

@app.get("/items/{item_id}")
def read_item(item_id: int):
    if item_id not in items:
        # 404 Not Found エラーを返す
        raise HTTPException(
            status_code=404,
            detail=f"Item {item_id} not found"
        )
return {"id": item_id, "name": items[item_id]}HTTPExceptionを利用すると、例外処理とHTTPレスポンスを自然な形で統合できるため、コードの見通しが良くなります。
必要に応じて、カスタムエラーハンドラを登録することも可能です。
認証・認可の基礎
FastAPIの依存性注入と認証の仕組み
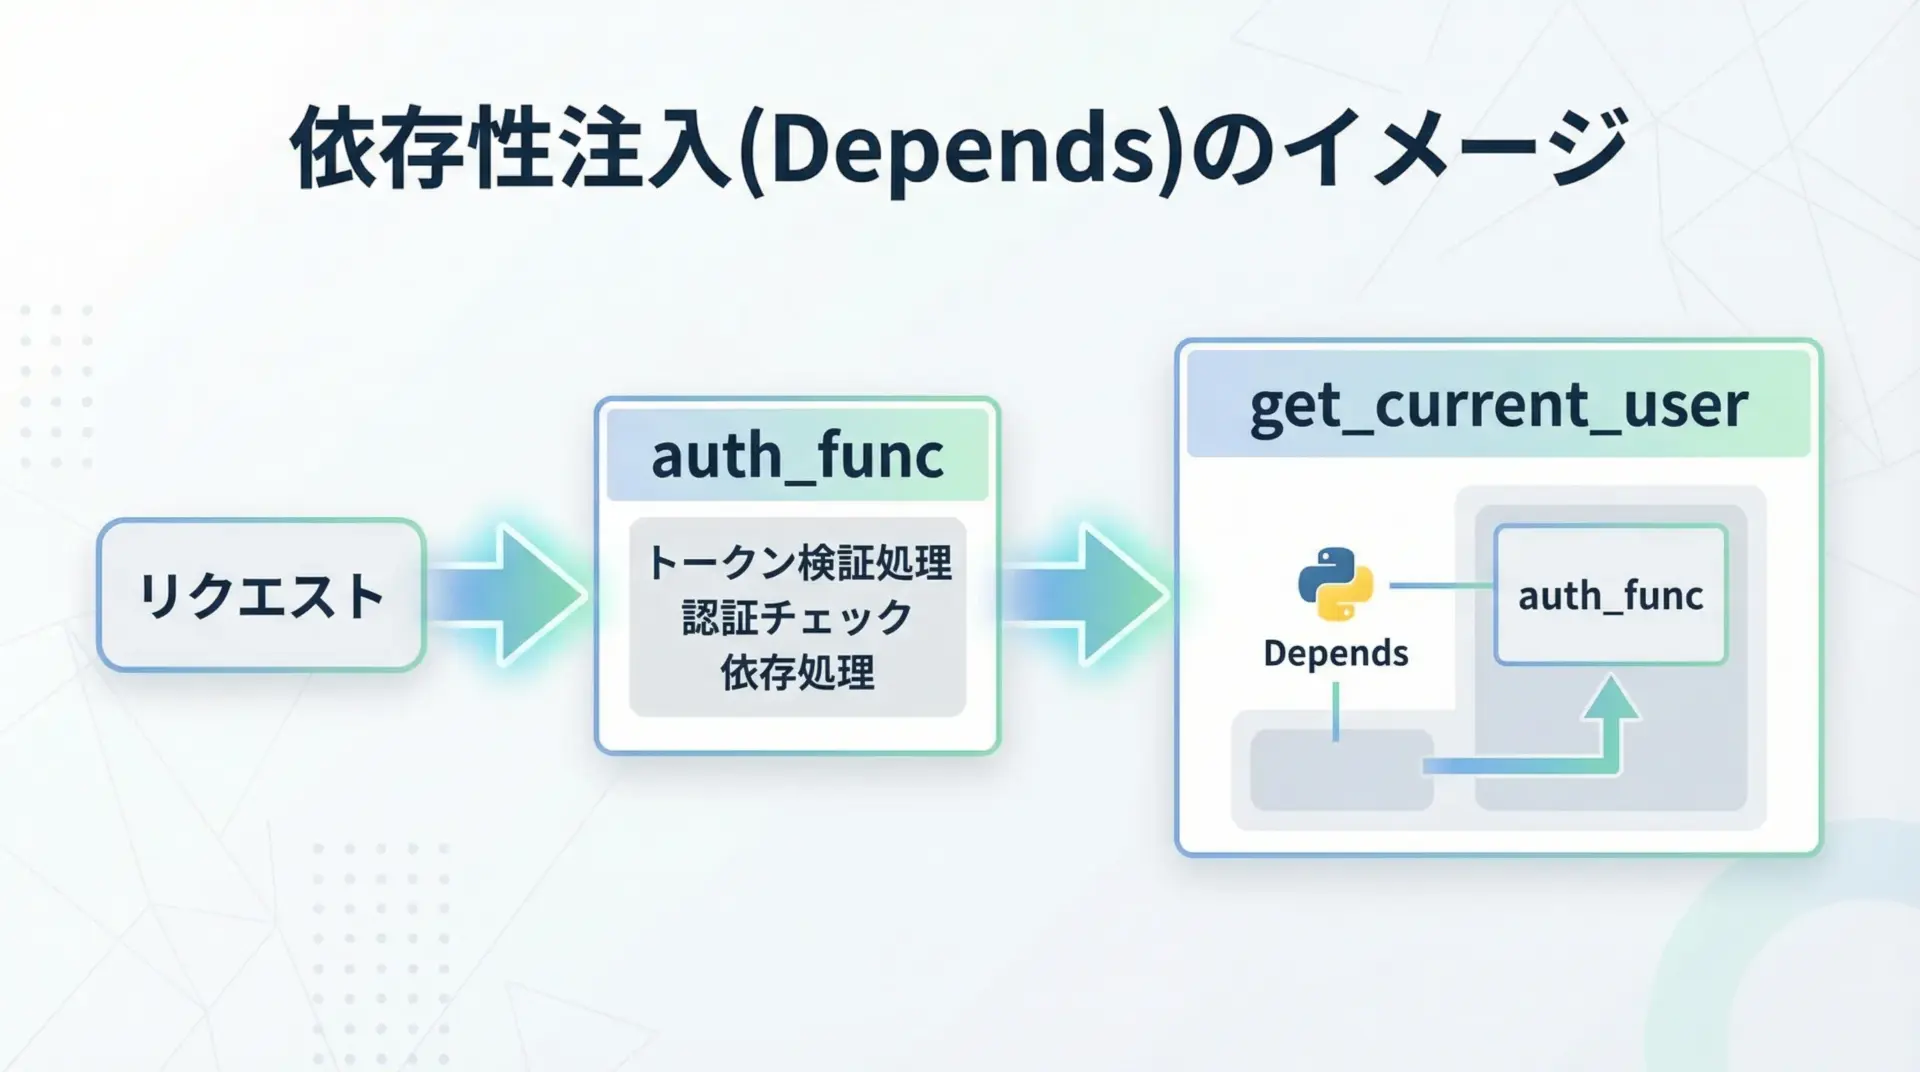
FastAPIには依存性注入(Dependency Injection)の仕組みがあり、認証や共通処理を切り出して再利用しやすくなっています。
代表的なのがDependsを用いたパターンです。
from fastapi import Depends, FastAPI, HTTPException, status

app = FastAPI()

# 認証済みユーザー情報を取得する依存関数の例
def get_current_user(token: str = "dummy-token"):
    # 実際にはヘッダーからトークンを取得して検証する
    if token != "dummy-token":
        raise HTTPException(
            status_code=status.HTTP_401_UNAUTHORIZED,
            detail="Invalid token"
        )
    # 擬似的なユーザー情報を返す
    return {"user_id": 1, "name": "Taro"}

@app.get("/me")
def read_me(current_user: dict = Depends(get_current_user)):
    # get_current_user の戻り値が current_user に渡される
return current_userここでは簡略化していますが、本来はAuthorizationヘッダーからトークンを読み取り、検証する処理をget_current_userにまとめます。
Dependsを使うことで、各エンドポイントに共通する認証ロジックを一箇所に集約できるのがポイントです。
OAuth2とJWTトークンを使った認可の概要
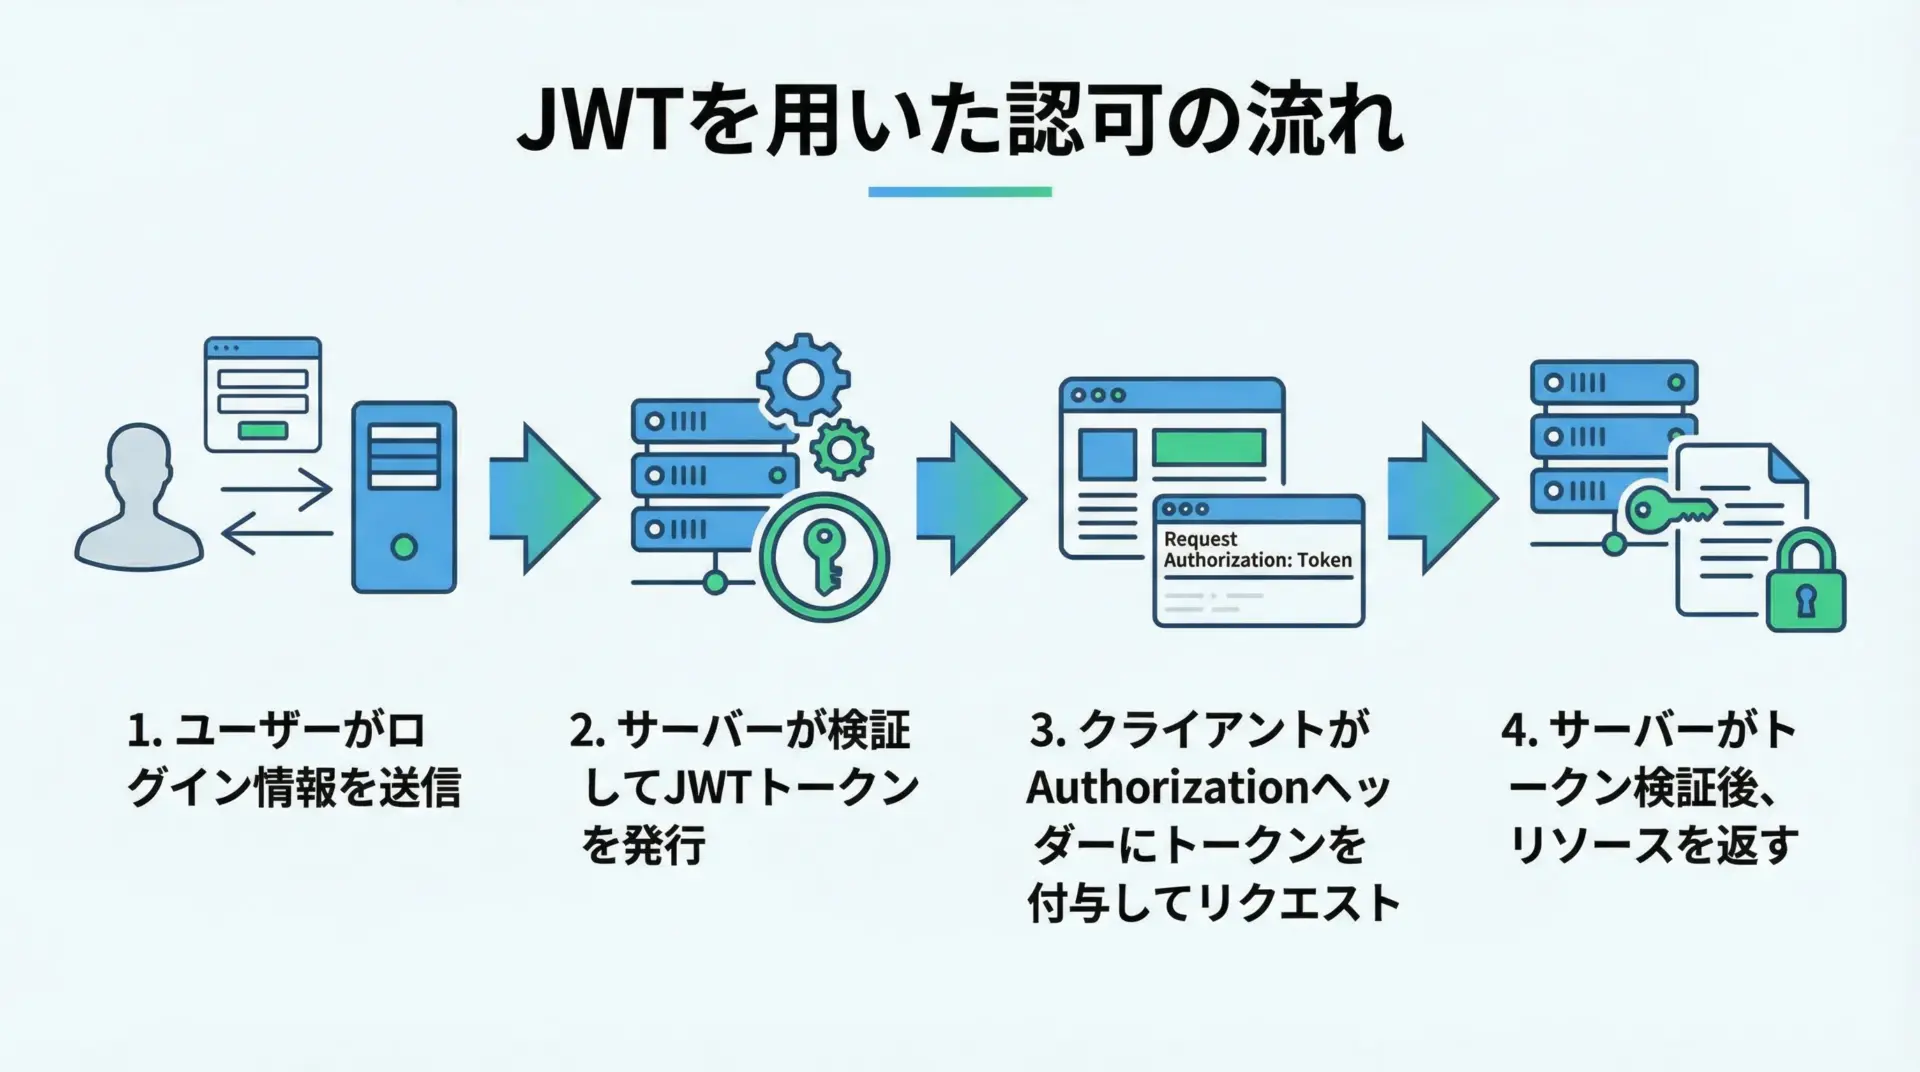
FastAPIは、OAuth2やJWT(JSON Web Token)ベースの認証・認可との相性が非常に良いです。
典型的なパターンでは、ログイン時にJWTトークンを発行し、以降のリクエストでAuthorization: Bearer <token>ヘッダーとして送信します。
FastAPIにはOAuth2PasswordBearerなどのユーティリティが用意されており、トークンの取得やスキーマ定義が簡単に行えます。
JWTの署名検証にはpython-joseなどのライブラリを組み合わせます。
実装の細部はやや長くなるためここでは概要のみですが、FastAPI公式ドキュメントにはOAuth2とJWTを使った実装例が丁寧に掲載されているため、実プロジェクトではそれをベースに必要箇所を調整していくと効率的です。
自動ドキュメントとOpenAPI
FastAPIの自動APIドキュメント(Swagger UI)の使い方
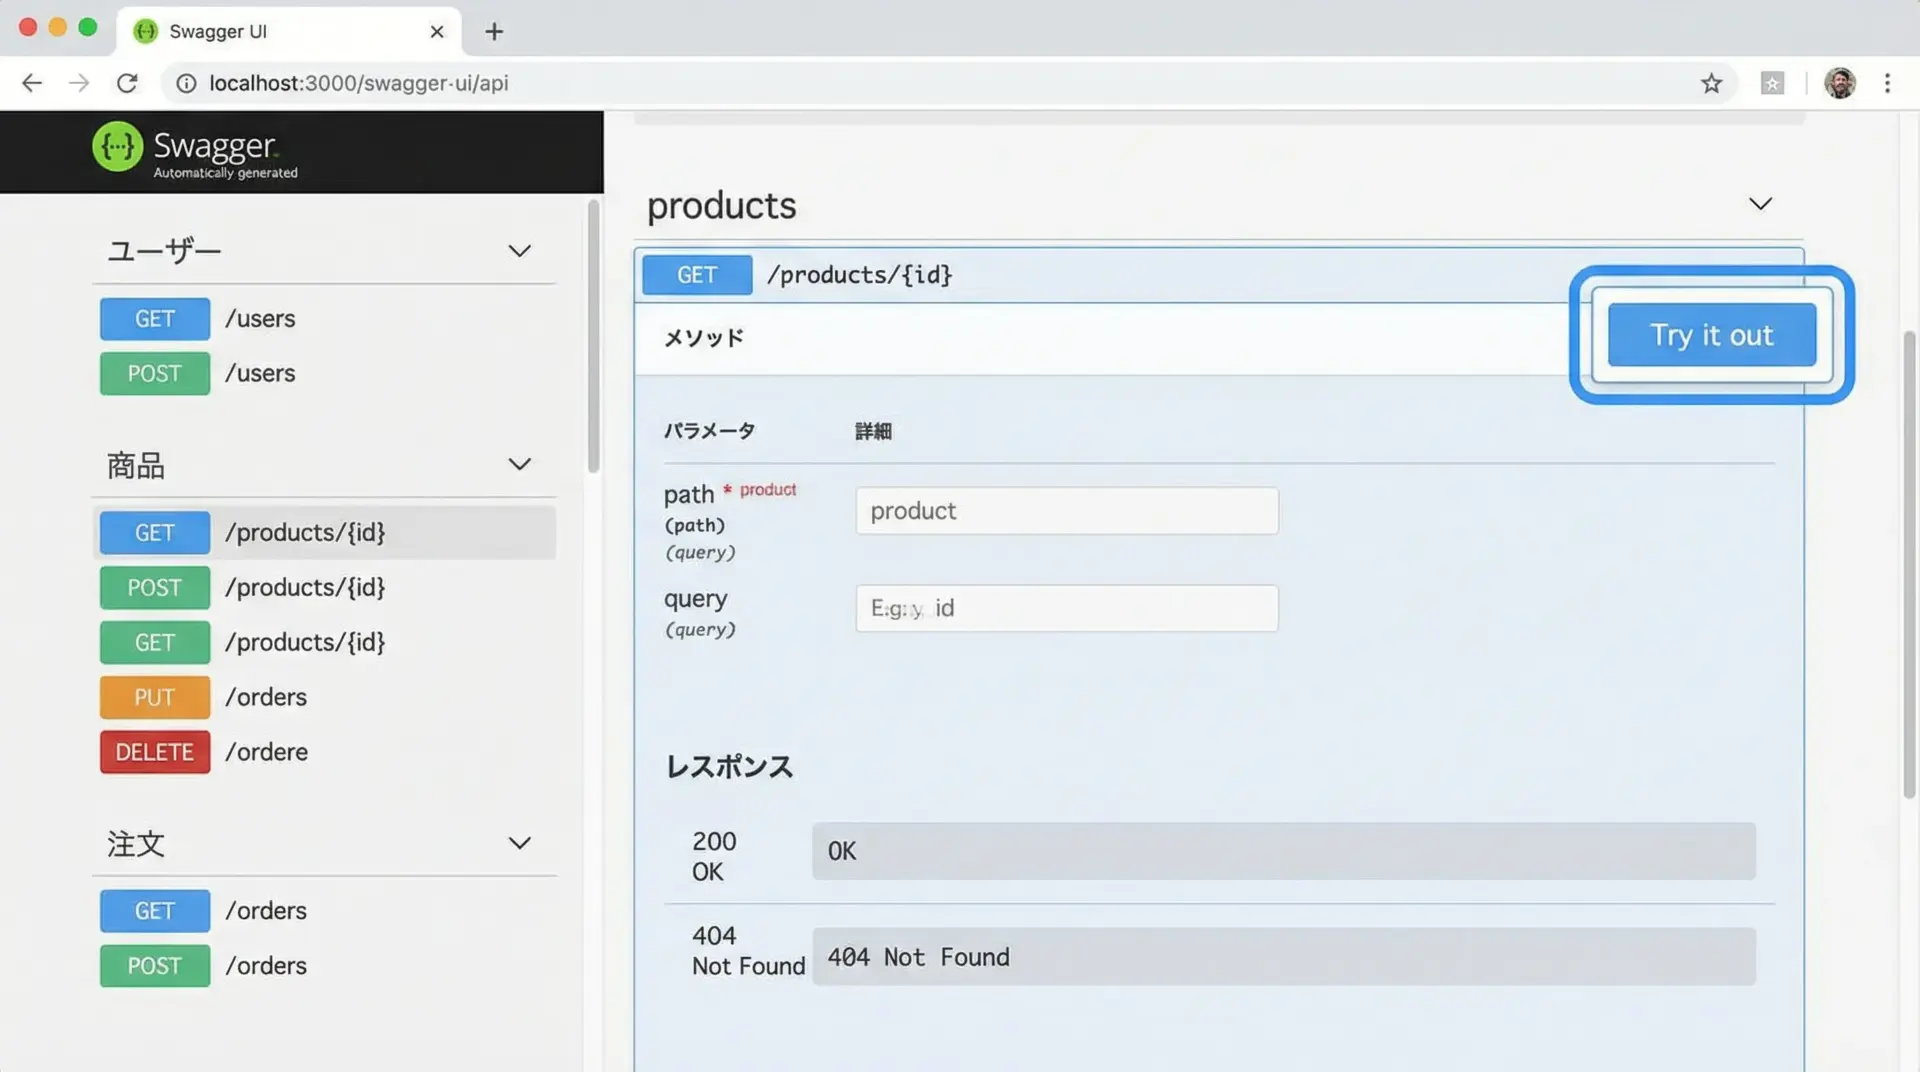
FastAPIは、定義したエンドポイントから自動的にAPIドキュメントを生成します。
サーバー起動後、次のURLにアクセスしてみてください。
- Swagger UI:
http://127.0.0.1:8000/docs - ReDoc:
http://127.0.0.1:8000/redoc
Swagger UIでは、各エンドポイントをクリックすると、リクエストパラメータやレスポンスモデルの情報が表示されます。
また、「Try it out」ボタンからブラウザ上で実際にリクエストを送信し、レスポンスを確認することもできます。
このドキュメントは、関数のシグネチャやPydanticモデルから自動生成されるため、コードとドキュメントの乖離が起きにくく、チーム開発や外部公開APIにおいて非常に有用です。
OpenAPIスキーマを活用したAPI設計
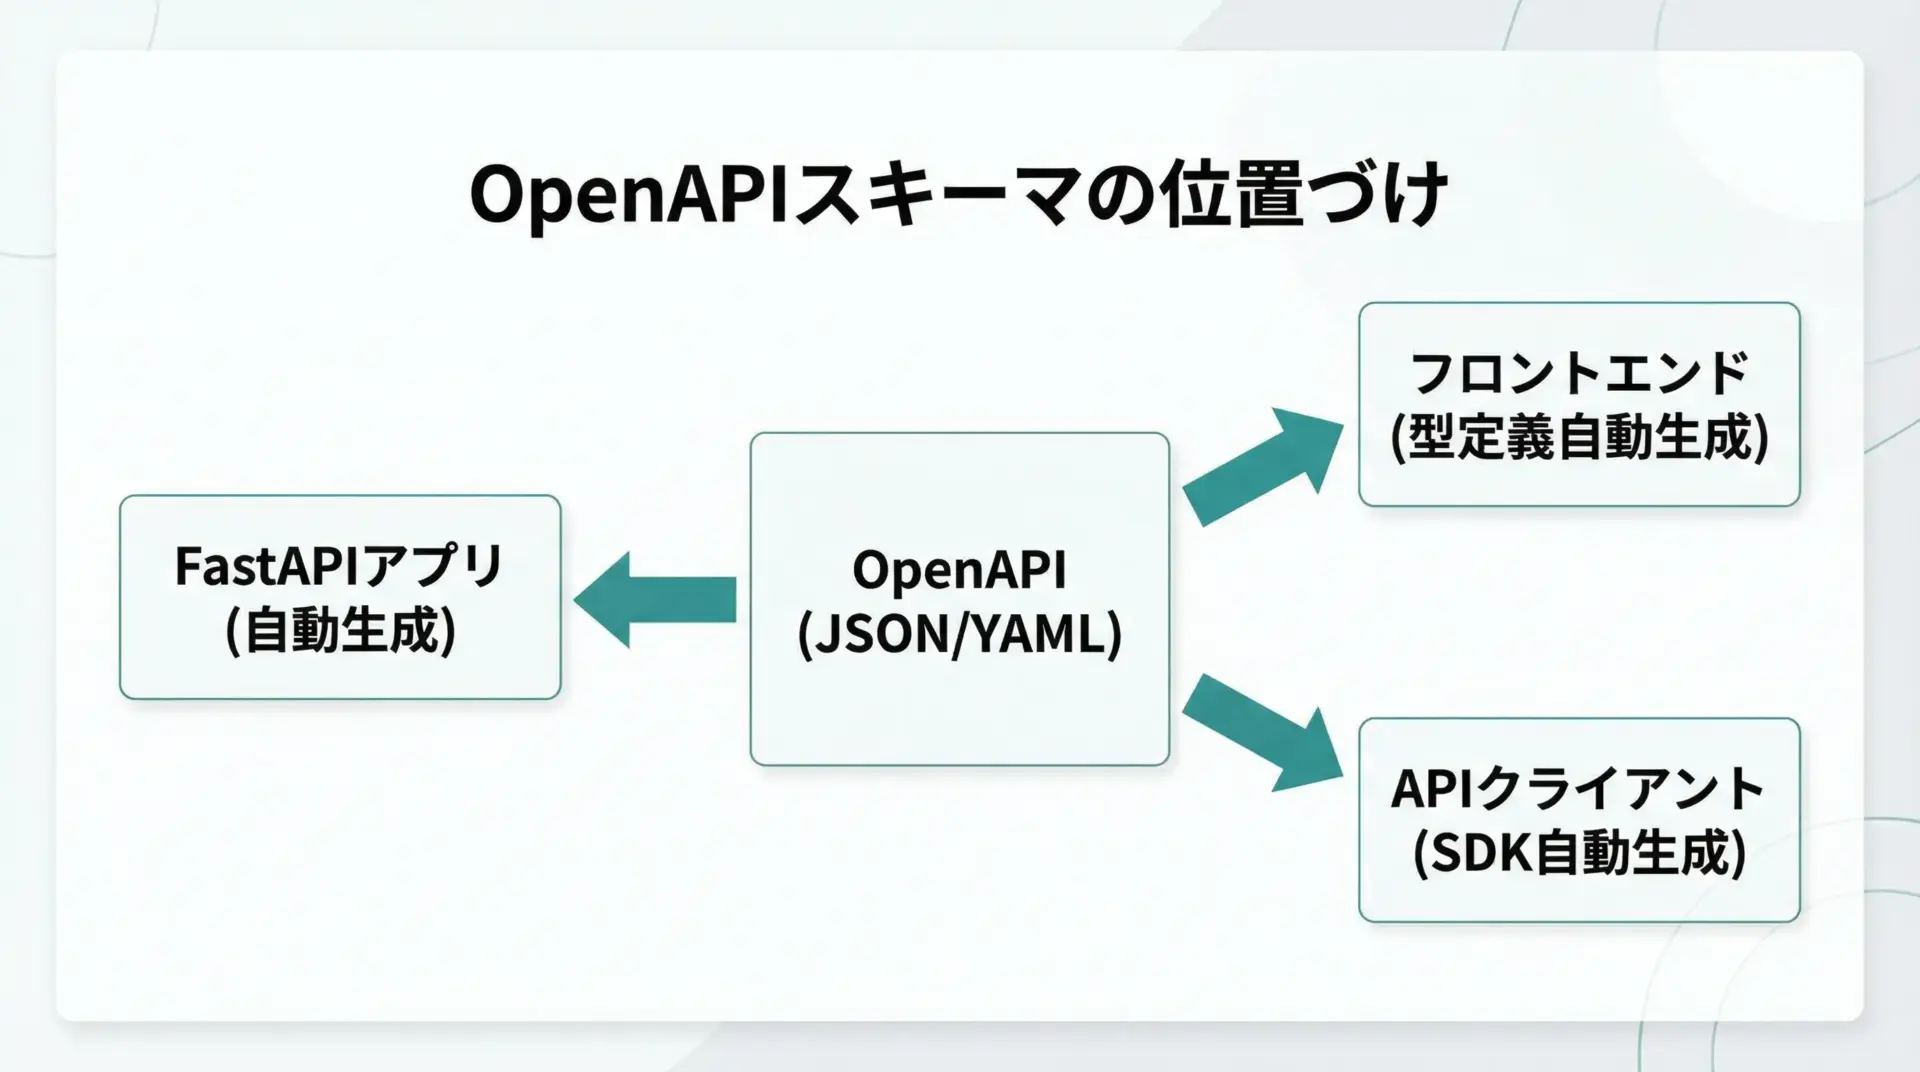
FastAPIは内部的にOpenAPI仕様を用いてAPIスキーマを表現しています。
/openapi.jsonにアクセスすると、現在のアプリのスキーマ定義をJSON形式で取得できます。
取得したOpenAPIスキーマは、次のような用途に活用できます。
- フロントエンド(TypeScriptなど)の型定義ファイルを自動生成
- 各種言語向けのAPIクライアントSDKを自動生成
- APIゲートウェイやAPI管理ツールとの連携
このように、FastAPIアプリからOpenAPIスキーマを起点として、周辺ツールとの連携を自動化・効率化できるため、APIファーストな設計スタイルとも非常に相性が良いです。
非同期処理とパフォーマンス
asyncとawaitで非同期Web APIを実装

FastAPIはasync/await構文をネイティブにサポートしており、非同期関数としてエンドポイントを定義できます。
I/Oバウンドな処理を多く含むAPIでは、非同期化によりスループットが向上します。
import asyncio
from fastapi import FastAPI

app = FastAPI()

# 非同期関数として定義
@app.get("/async-wait")
async def async_wait():
    # 疑似的な非同期間隔(外部APIやDBアクセスの代わり)
    await asyncio.sleep(1)
    return {"message": "done after 1 second"}

# 同じ処理を同期的に書いた場合(あくまで比較用)
@app.get("/sync-wait")
def sync_wait():
    import time
    time.sleep(1)
return {"message": "done after 1 second (sync)"}非同期版では、awaitで待機している間に、同じプロセスで別のリクエストを処理できるため、サーバー1台あたりの処理能力を高められます。
FastAPIで高パフォーマンスを出すためのポイント
FastAPIでパフォーマンスを引き出すには、以下のような点を意識すると効果的です。
まず、外部I/Oを非同期対応のライブラリに統一することが重要です。
データベースアクセスやHTTPクライアントを非同期版にすることで、async/awaitのメリットを最大化できます。
次に、UvicornやGunicorn(Uvicorn Workers)のワーカープロセス数やスレッド数を適切に設定します。
CPUコア数やメモリ量に応じて調整することで、過負荷やリソースの無駄遣いを防げます。
さらに、CPUバウンドな重い処理をエンドポイントで直接実行しないことも大切です。
そのような処理はバックグラウンドタスクや別プロセス(ワーカー)に委譲し、APIのレスポンスは迅速に返すよう設計すると、ユーザー体験とサーバの安定性が向上します。
実践的なFastAPIアプリ構成
設定ファイルと環境変数の管理方法

本番運用を視野に入れると、APIのURLやDB接続情報などの設定値をコードに直書きせず、環境ごとに切り替えられるようにしておくことが重要です。
FastAPI自体は特定の方法を強制しませんが、Pydanticの設定モデル + .envファイルという組み合わせがよく使われます。
# config.py
from pydantic import BaseSettings

class Settings(BaseSettings):
    app_name: str = "My FastAPI App"
    debug: bool = False
    database_url: str

    class Config:
        env_file = ".env"  # .envファイルからも読み込む設定

# シングルトン的に使う設定インスタンスを生成
settings = Settings().envには次のような内容を書いておきます。
APP_NAME="My FastAPI App (Dev)"
DEBUG=true
DATABASE_URL="postgresql://user:pass@localhost:5432/mydb"FastAPIアプリからはfrom config import settingsとして読み込み、settings.database_urlのように利用します。
環境変数で上書きできるため、ステージングや本番でも同じコードを使い回しやすい構成になります。
ディレクトリ構成とモジュール分割のベストプラクティス
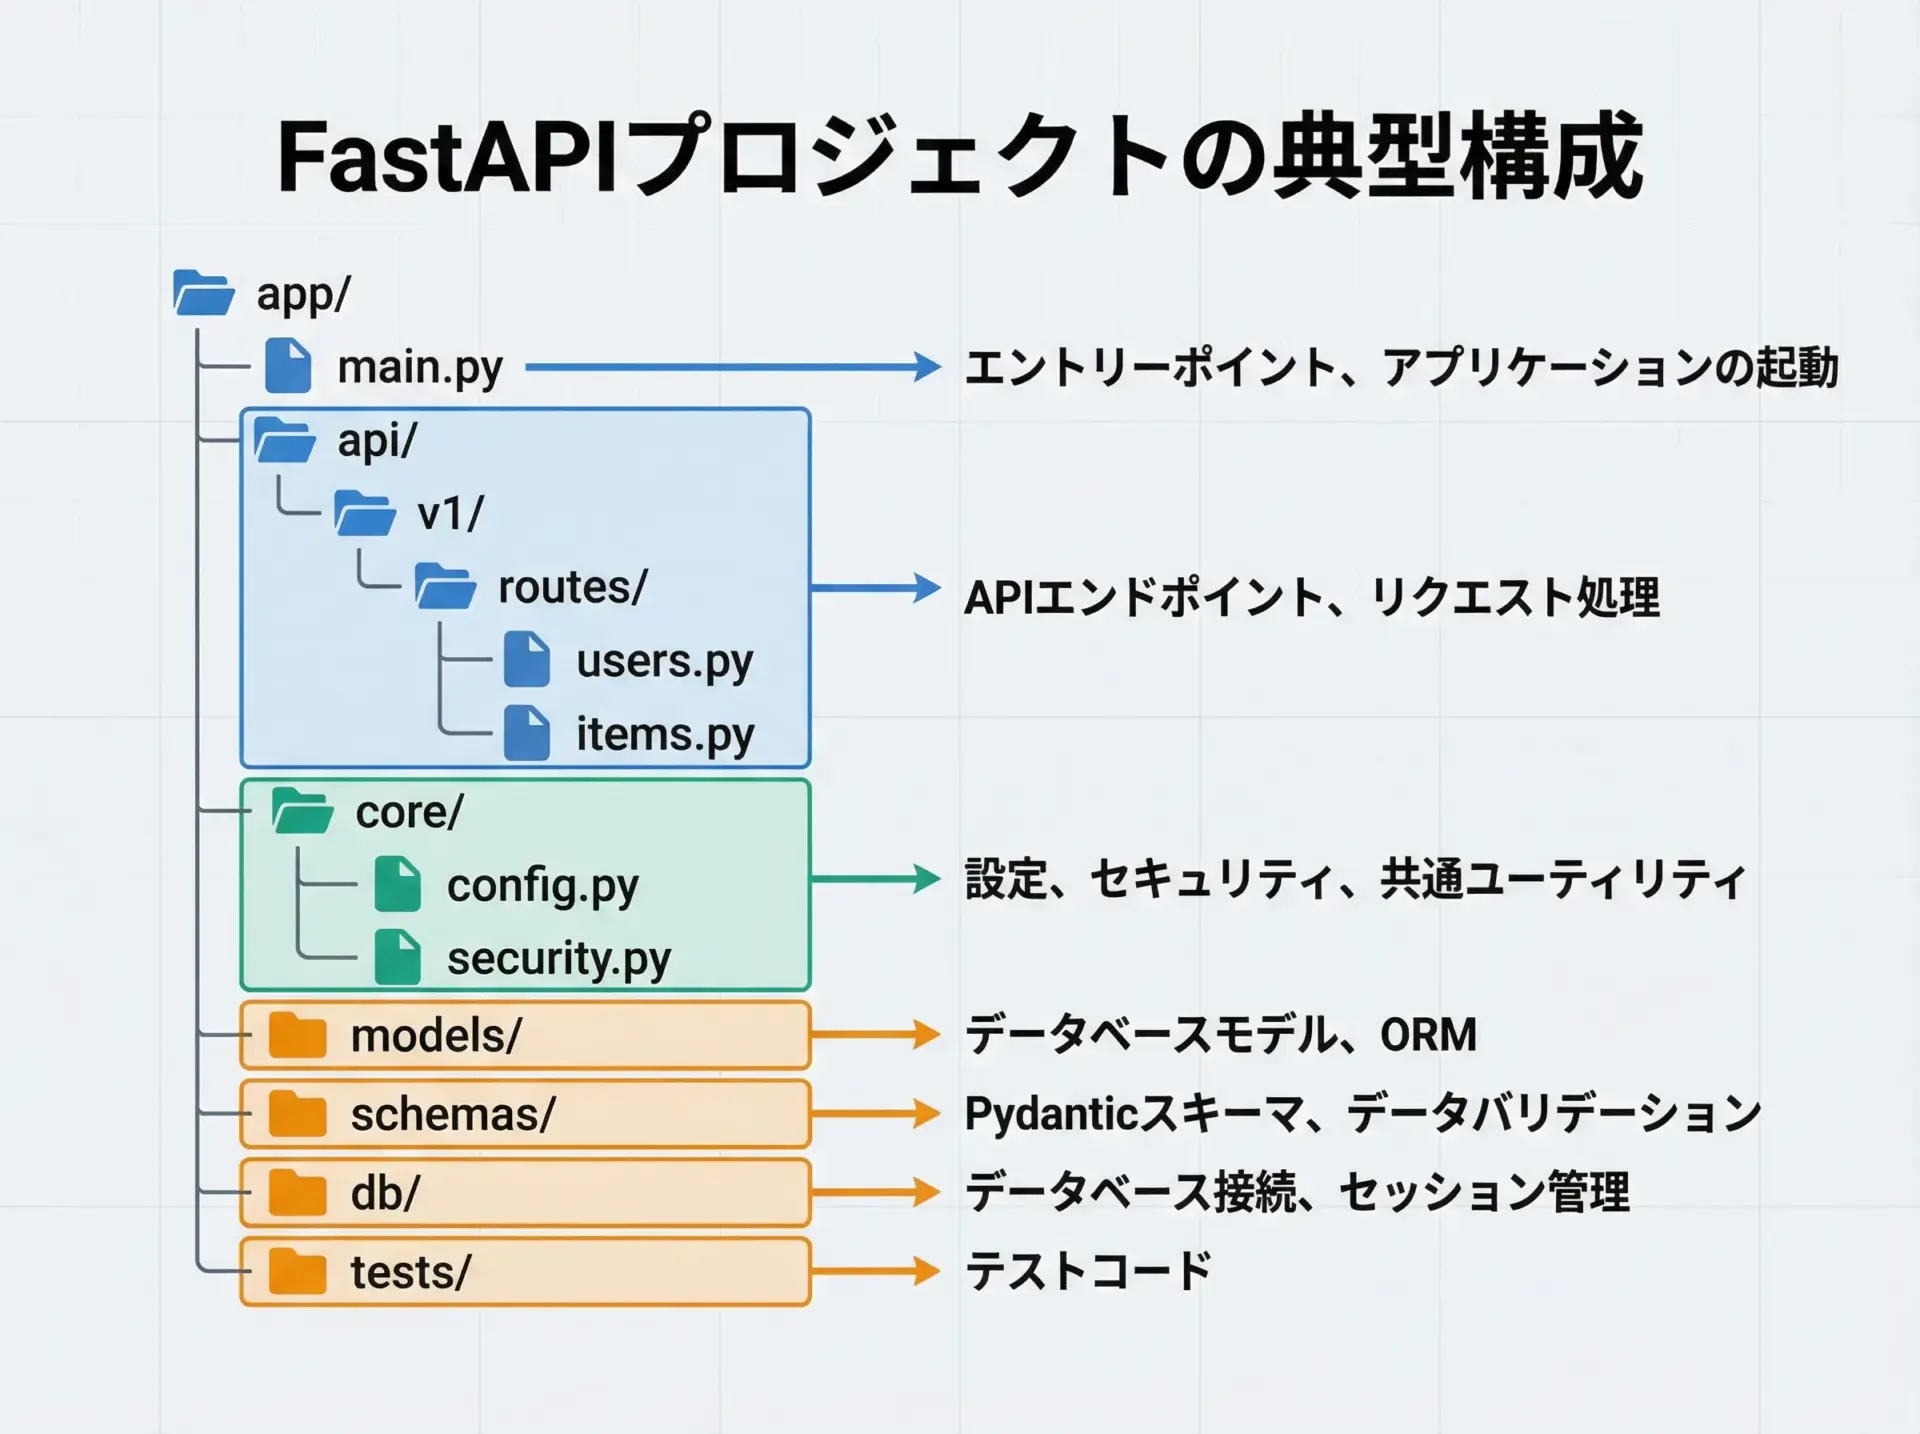
実践的なFastAPIアプリでは、責務ごとにディレクトリを分割する構成がよく採用されます。
例えば次のような構成です。
app/
  main.py           # エントリーポイント
  api/
    v1/
      routes/
        users.py    # ユーザー関連エンドポイント
        items.py    # アイテム関連エンドポイント
  core/
    config.py       # 設定クラスやアプリ共通設定
    security.py     # 認証/認可関連の共通処理
  models/           # DBモデル(SQLAlchemyなど)
  schemas/          # Pydanticモデル(リクエスト/レスポンス)
  db/
    session.py      # セッション管理
tests/
  test_users.py
test_items.pyこのように、エンドポイント(api)、スキーマ(schemas)、DBモデル(models)、設定(core)などを明確に分離しておくと、チーム開発でも迷いにくく、長期運用にも耐えやすくなります。
データベース連携
FastAPIとSQLAlchemyでDBアクセスを実装
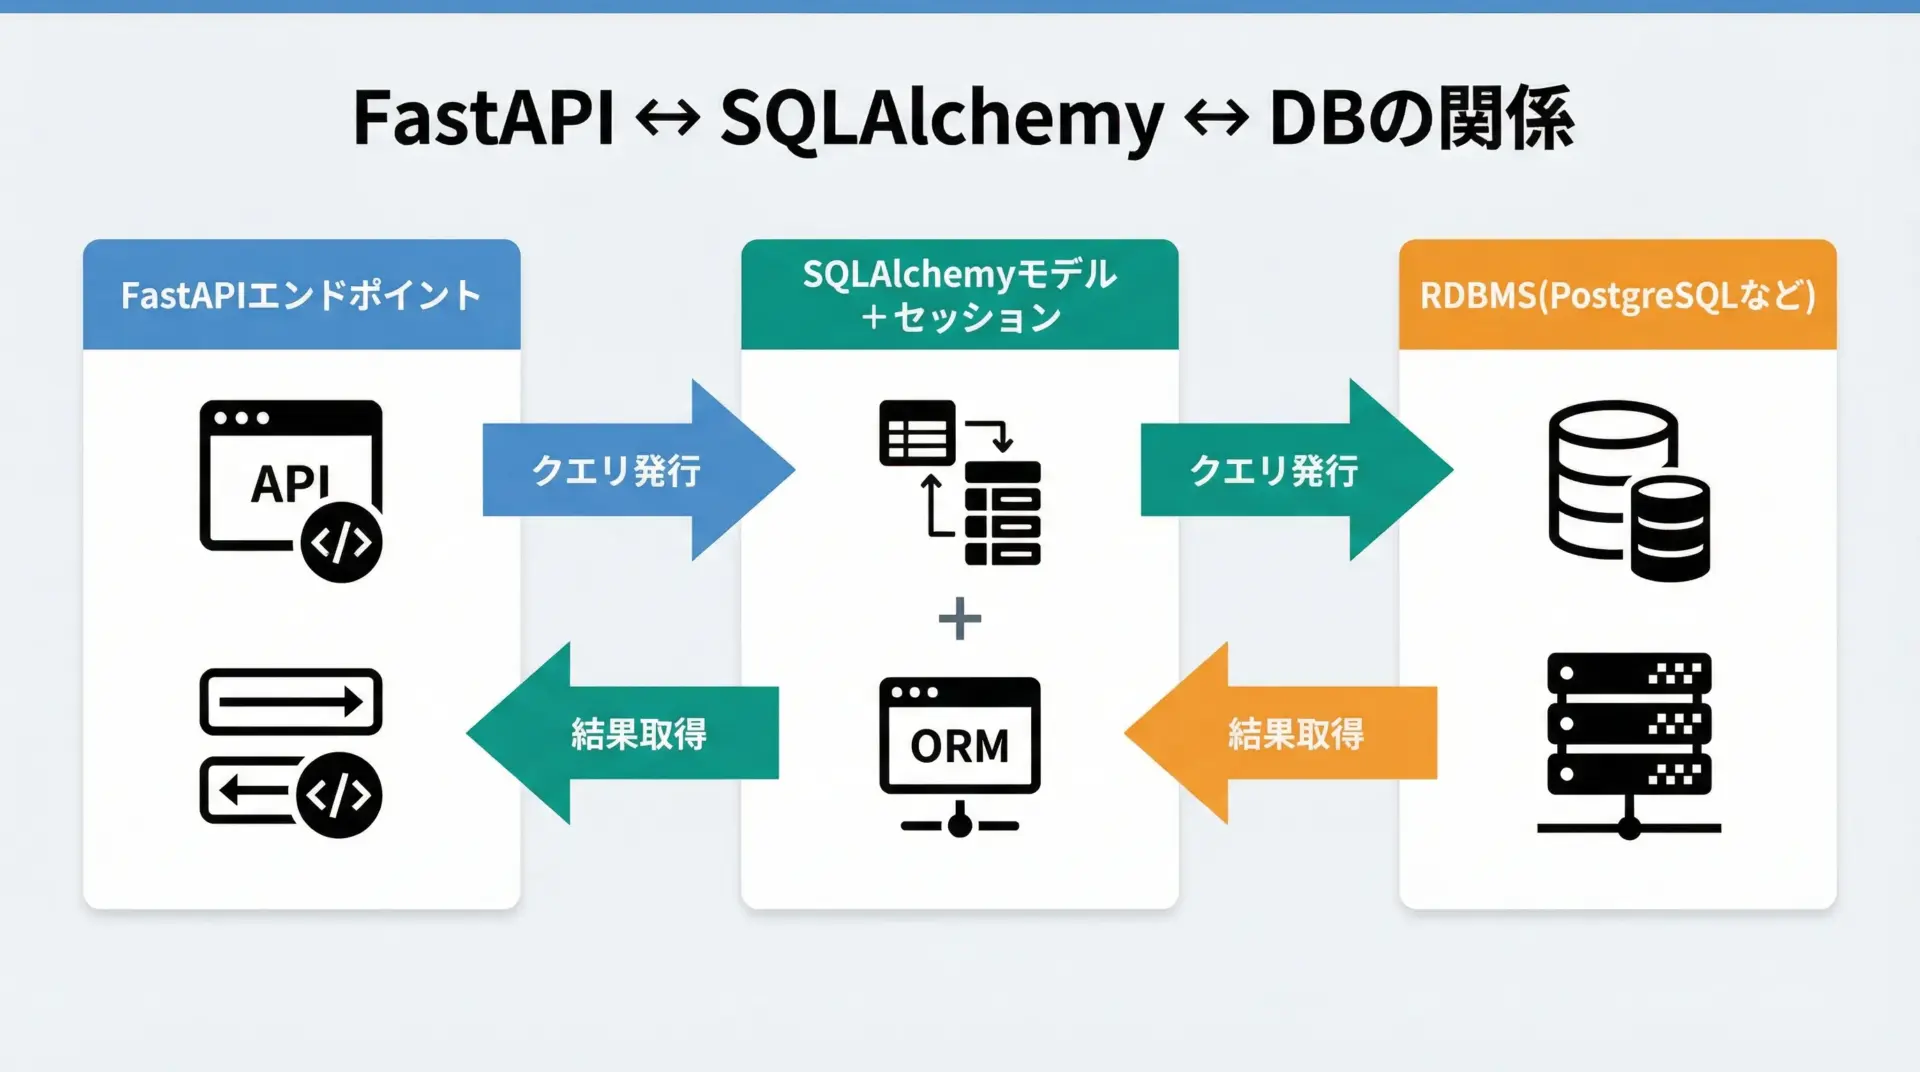
RDBMSと連携する場合、PythonではSQLAlchemyが定番のORMです。
FastAPIと組み合わせるときは、セッションを依存性注入で扱うパターンがよく使われます。
以下は非常に簡略化した例です。
# db/session.py
from sqlalchemy import create_engine
from sqlalchemy.orm import sessionmaker, Session

DATABASE_URL = "sqlite:///./test.db"  # 簡易的なSQLite

engine = create_engine(
    DATABASE_URL, connect_args={"check_same_thread": False}
)
SessionLocal = sessionmaker(
    autocommit=False, autoflush=False, bind=engine
)

# FastAPIで利用するセッション依存関数
def get_db() -> Session:
    db = SessionLocal()
    try:
        yield db  # 呼び出し側にセッションを渡す
    finally:
db.close()# models/user.py
from sqlalchemy import Column, Integer, String
from sqlalchemy.orm import declarative_base
Base = declarative_base()
class User(Base):
__tablename__ = "users"
id = Column(Integer, primary_key=True, index=True)
name = Column(String, index=True)# main.py
from fastapi import Depends, FastAPI
from sqlalchemy.orm import Session
from db.session import get_db
from models.user import User, Base, engine
# テーブル作成(チュートリアル用。実際はAlembicなどで管理)
Base.metadata.create_all(bind=engine)
app = FastAPI()
@app.get("/users-from-db")
def list_users(db: Session = Depends(get_db)):
# SQLAlchemyでクエリを実行
users = db.query(User).all()
return usersここではSQLiteを使ったシンプルな例ですが、実際にはPostgreSQLやMySQLなどを利用し、接続URLを環境変数から取得する形が一般的です。
セッション管理とトランザクションの基本
FastAPIとSQLAlchemyを組み合わせる場合、リクエストごとにDBセッションを生成し、処理終了時に必ずクローズするのが基本パターンです。
先ほどのget_db関数では、yieldを使ってセッションをエンドポイントに渡し、処理終了後にfinallyで閉じています。
トランザクションはautocommit=Falseの設定により、必要に応じてdb.commit()を呼び出すスタイルになります。
エラー発生時にはdb.rollback()を行うことで、データ整合性を保てます。
このように、セッション管理とトランザクション制御を明確に意識したうえでエンドポイントを設計することが、信頼性の高いWeb APIを構築するための重要なポイントです。
テストとデバッグ
TestClientを使ったFastAPIのAPIテスト
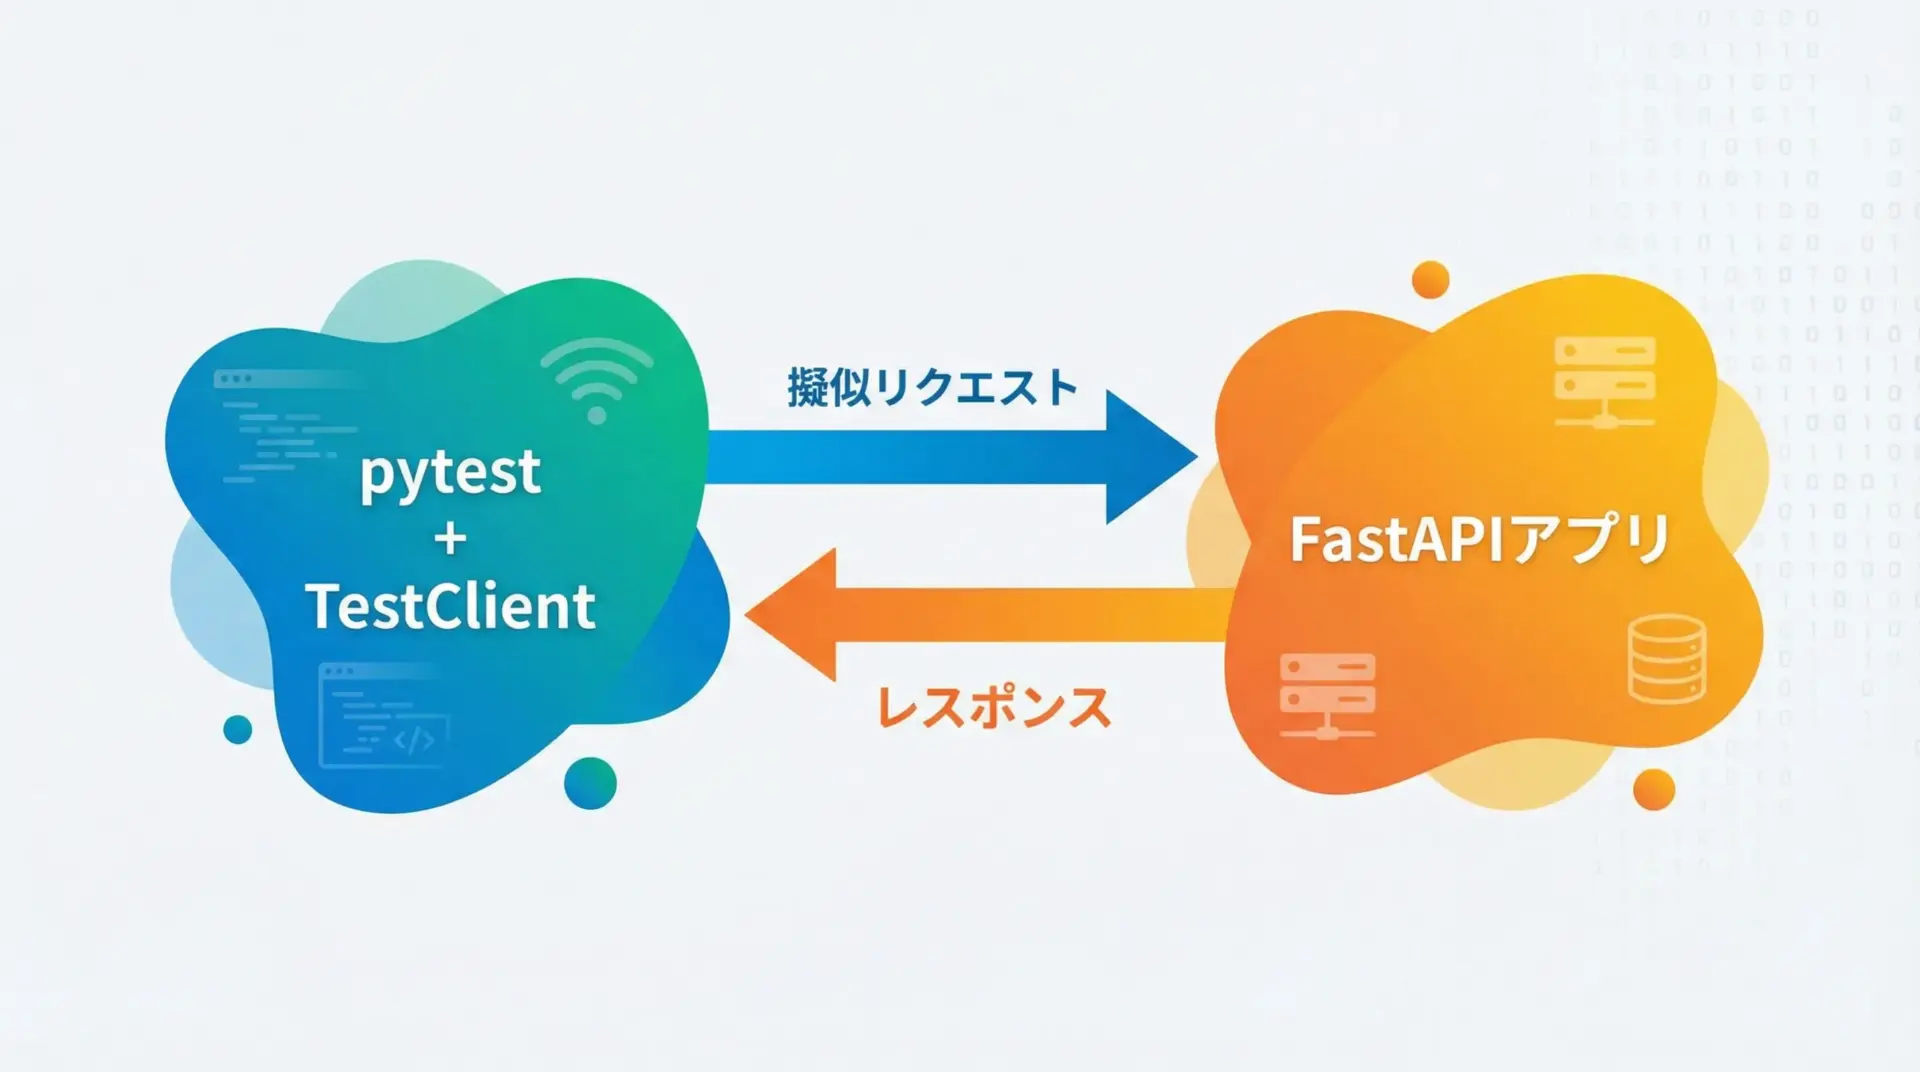
FastAPIにはStarlette由来のTestClientが用意されており、PythonコードからAPIエンドポイントを簡単にテストできます。
TestClientは内部的にはrequestsライクなインターフェースを持っているため、直感的に扱えます。
# test_main.py
from fastapi.testclient import TestClient
from main import app

# FastAPIアプリからTestClientを生成
client = TestClient(app)

def test_read_root():
    # ルートパスにGETリクエストを送信
    response = client.get("/")
    assert response.status_code == 200
    # JSONレスポンスの検証
assert response.json() == {"message": "Hello World"}このようなテストをpytestなどで実行することで、リファクタリングや機能追加の際もAPIの振る舞いを自動的に確認できます。
ログ出力とデバッグのコツ
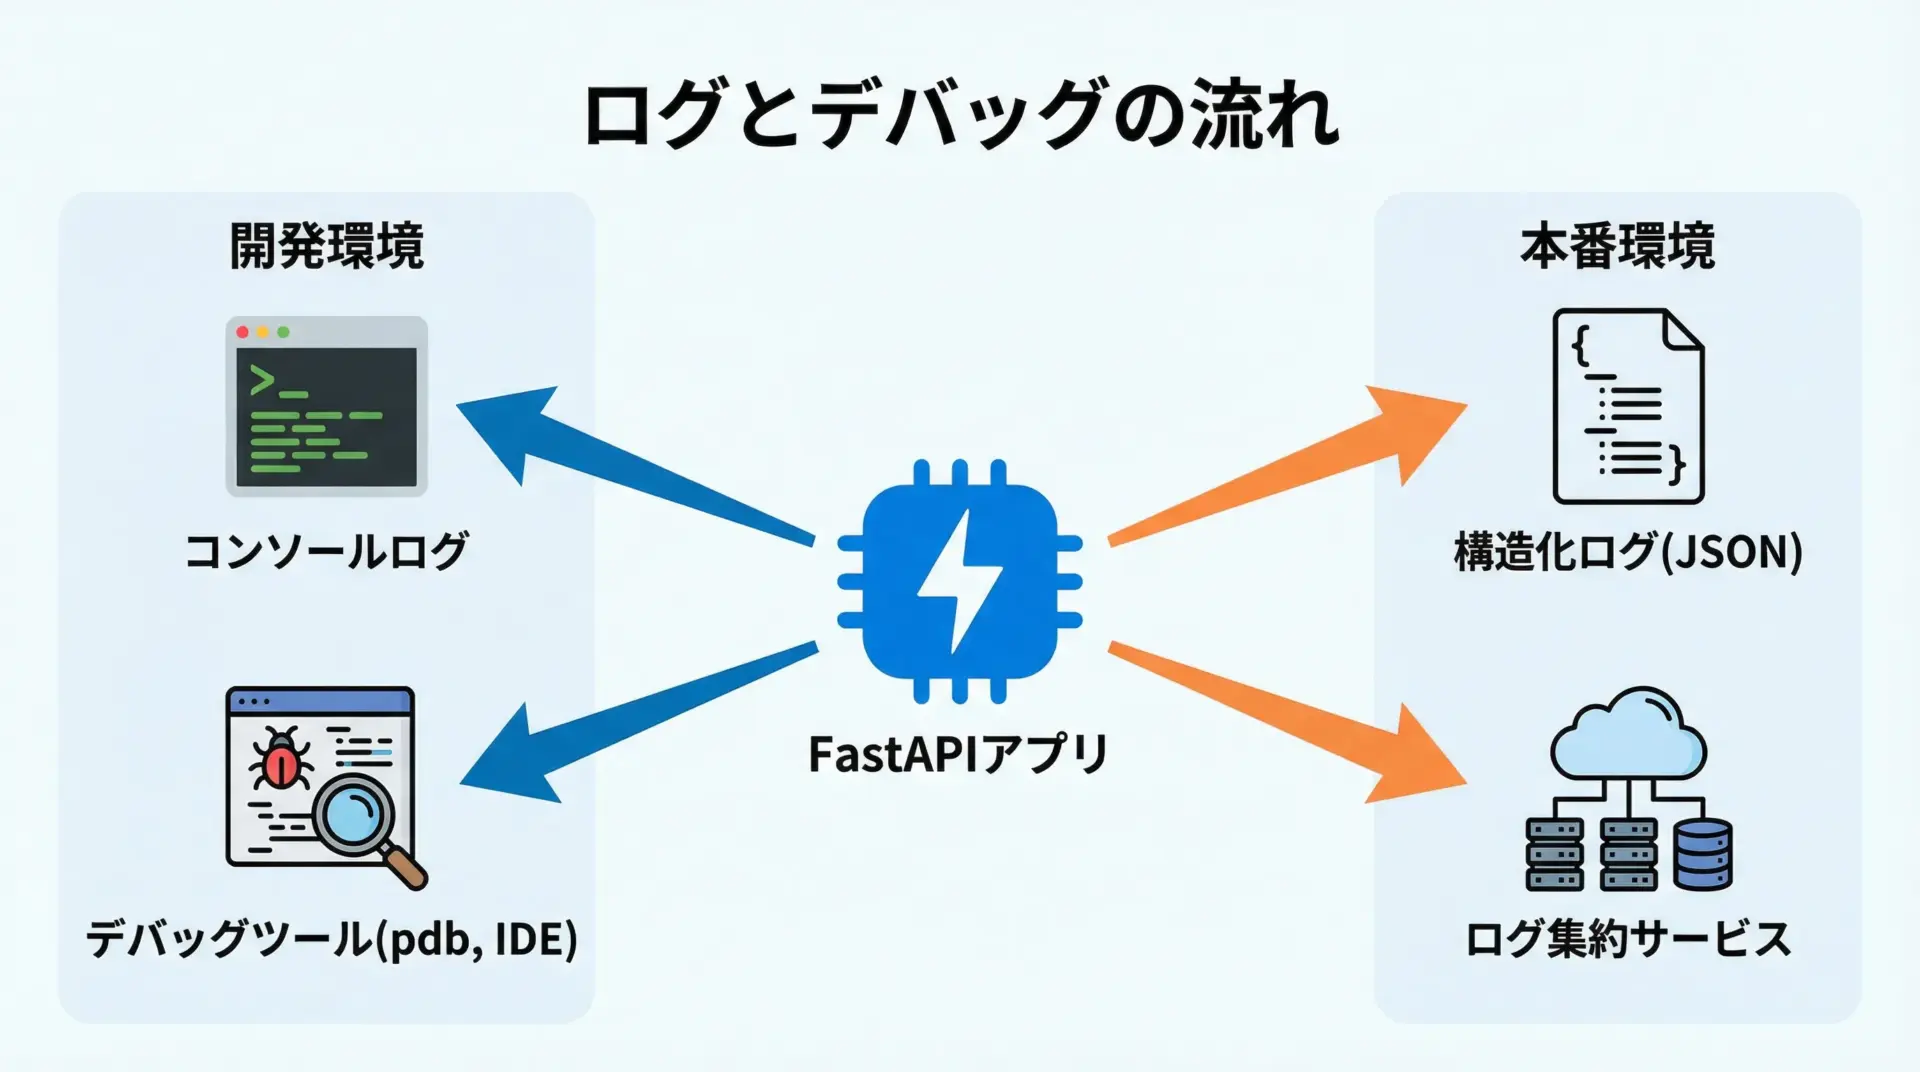
FastAPIのデバッグ時には、標準のloggingモジュールを使うのが基本です。
Uvicornもログ出力機能を持っており、ログレベルを調整することで詳細な情報を得られます。
import logging
from fastapi import FastAPI

logger = logging.getLogger("myapp")

app = FastAPI()

@app.get("/debug-example")
def debug_example():
    logger.info("debug_example endpoint called")
return {"message": "check your logs"}開発中は--reloadオプションと合わせて、ログを活用しながら挙動を確認します。
ロジックの途中にログを適切に挿入することで、複雑なバグの原因を素早く特定しやすくなります。
本番環境では、JSON形式の構造化ログを出力し、FluentdやCloud Loggingなどのログ収集基盤と連携させることで、障害時の調査やメトリクスの可視化に役立てることができます。
まとめ
FastAPIは、Pythonの型ヒントや非同期処理を最大限に活用しながら、高速で安全なWeb APIを構築できるモダンなフレームワークです。
本記事では、Hello Worldから始まり、Pydanticによる型安全なバリデーション、APIRouterでのルーティング分割、レスポンスモデルとエラー処理、認証・認可の基本、OpenAPIによる自動ドキュメント、非同期I/Oとパフォーマンス、設定管理やディレクトリ構成、SQLAlchemyとのDB連携、テストとログによる品質向上まで、一連の要素を概観しました。
ここで紹介した構成やパターンをベースに、実際のプロジェクトで少しずつ機能を拡張しながら、自分に合ったFastAPIアプリケーションのスタイルを確立していってください。
