テストコードを書く時、毎回似たような前処理や後処理を書いていて「もっと楽にできないかな」と感じたことはないでしょうか。
pytestのfixtureを使うと、テスト用の準備や片付けをきれいに共通化でき、テストコードの可読性と再利用性が大きく向上します。
本記事では、基本的な使い方からスコープやパラメータ、実務レベルの設計ポイントまでを丁寧に解説します。
pytest fixtureとは
pytest fixtureの基本概要
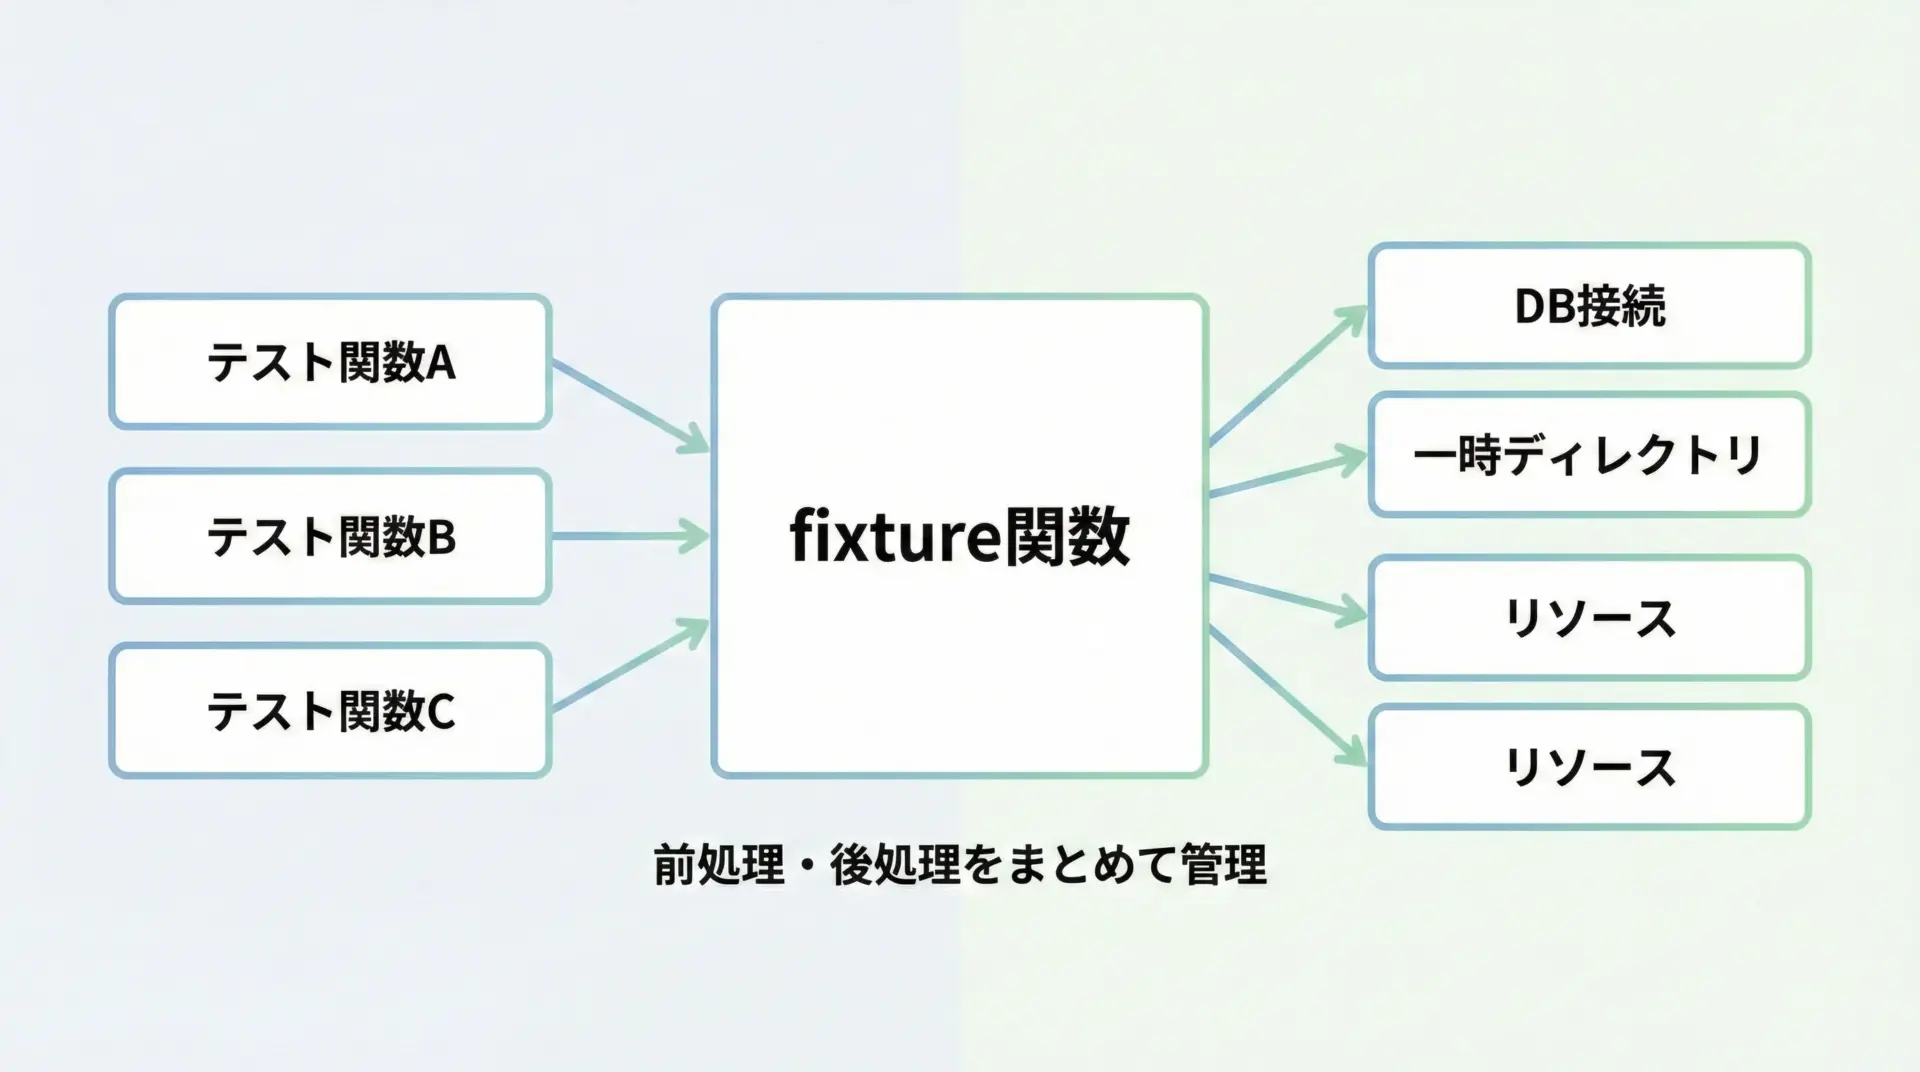
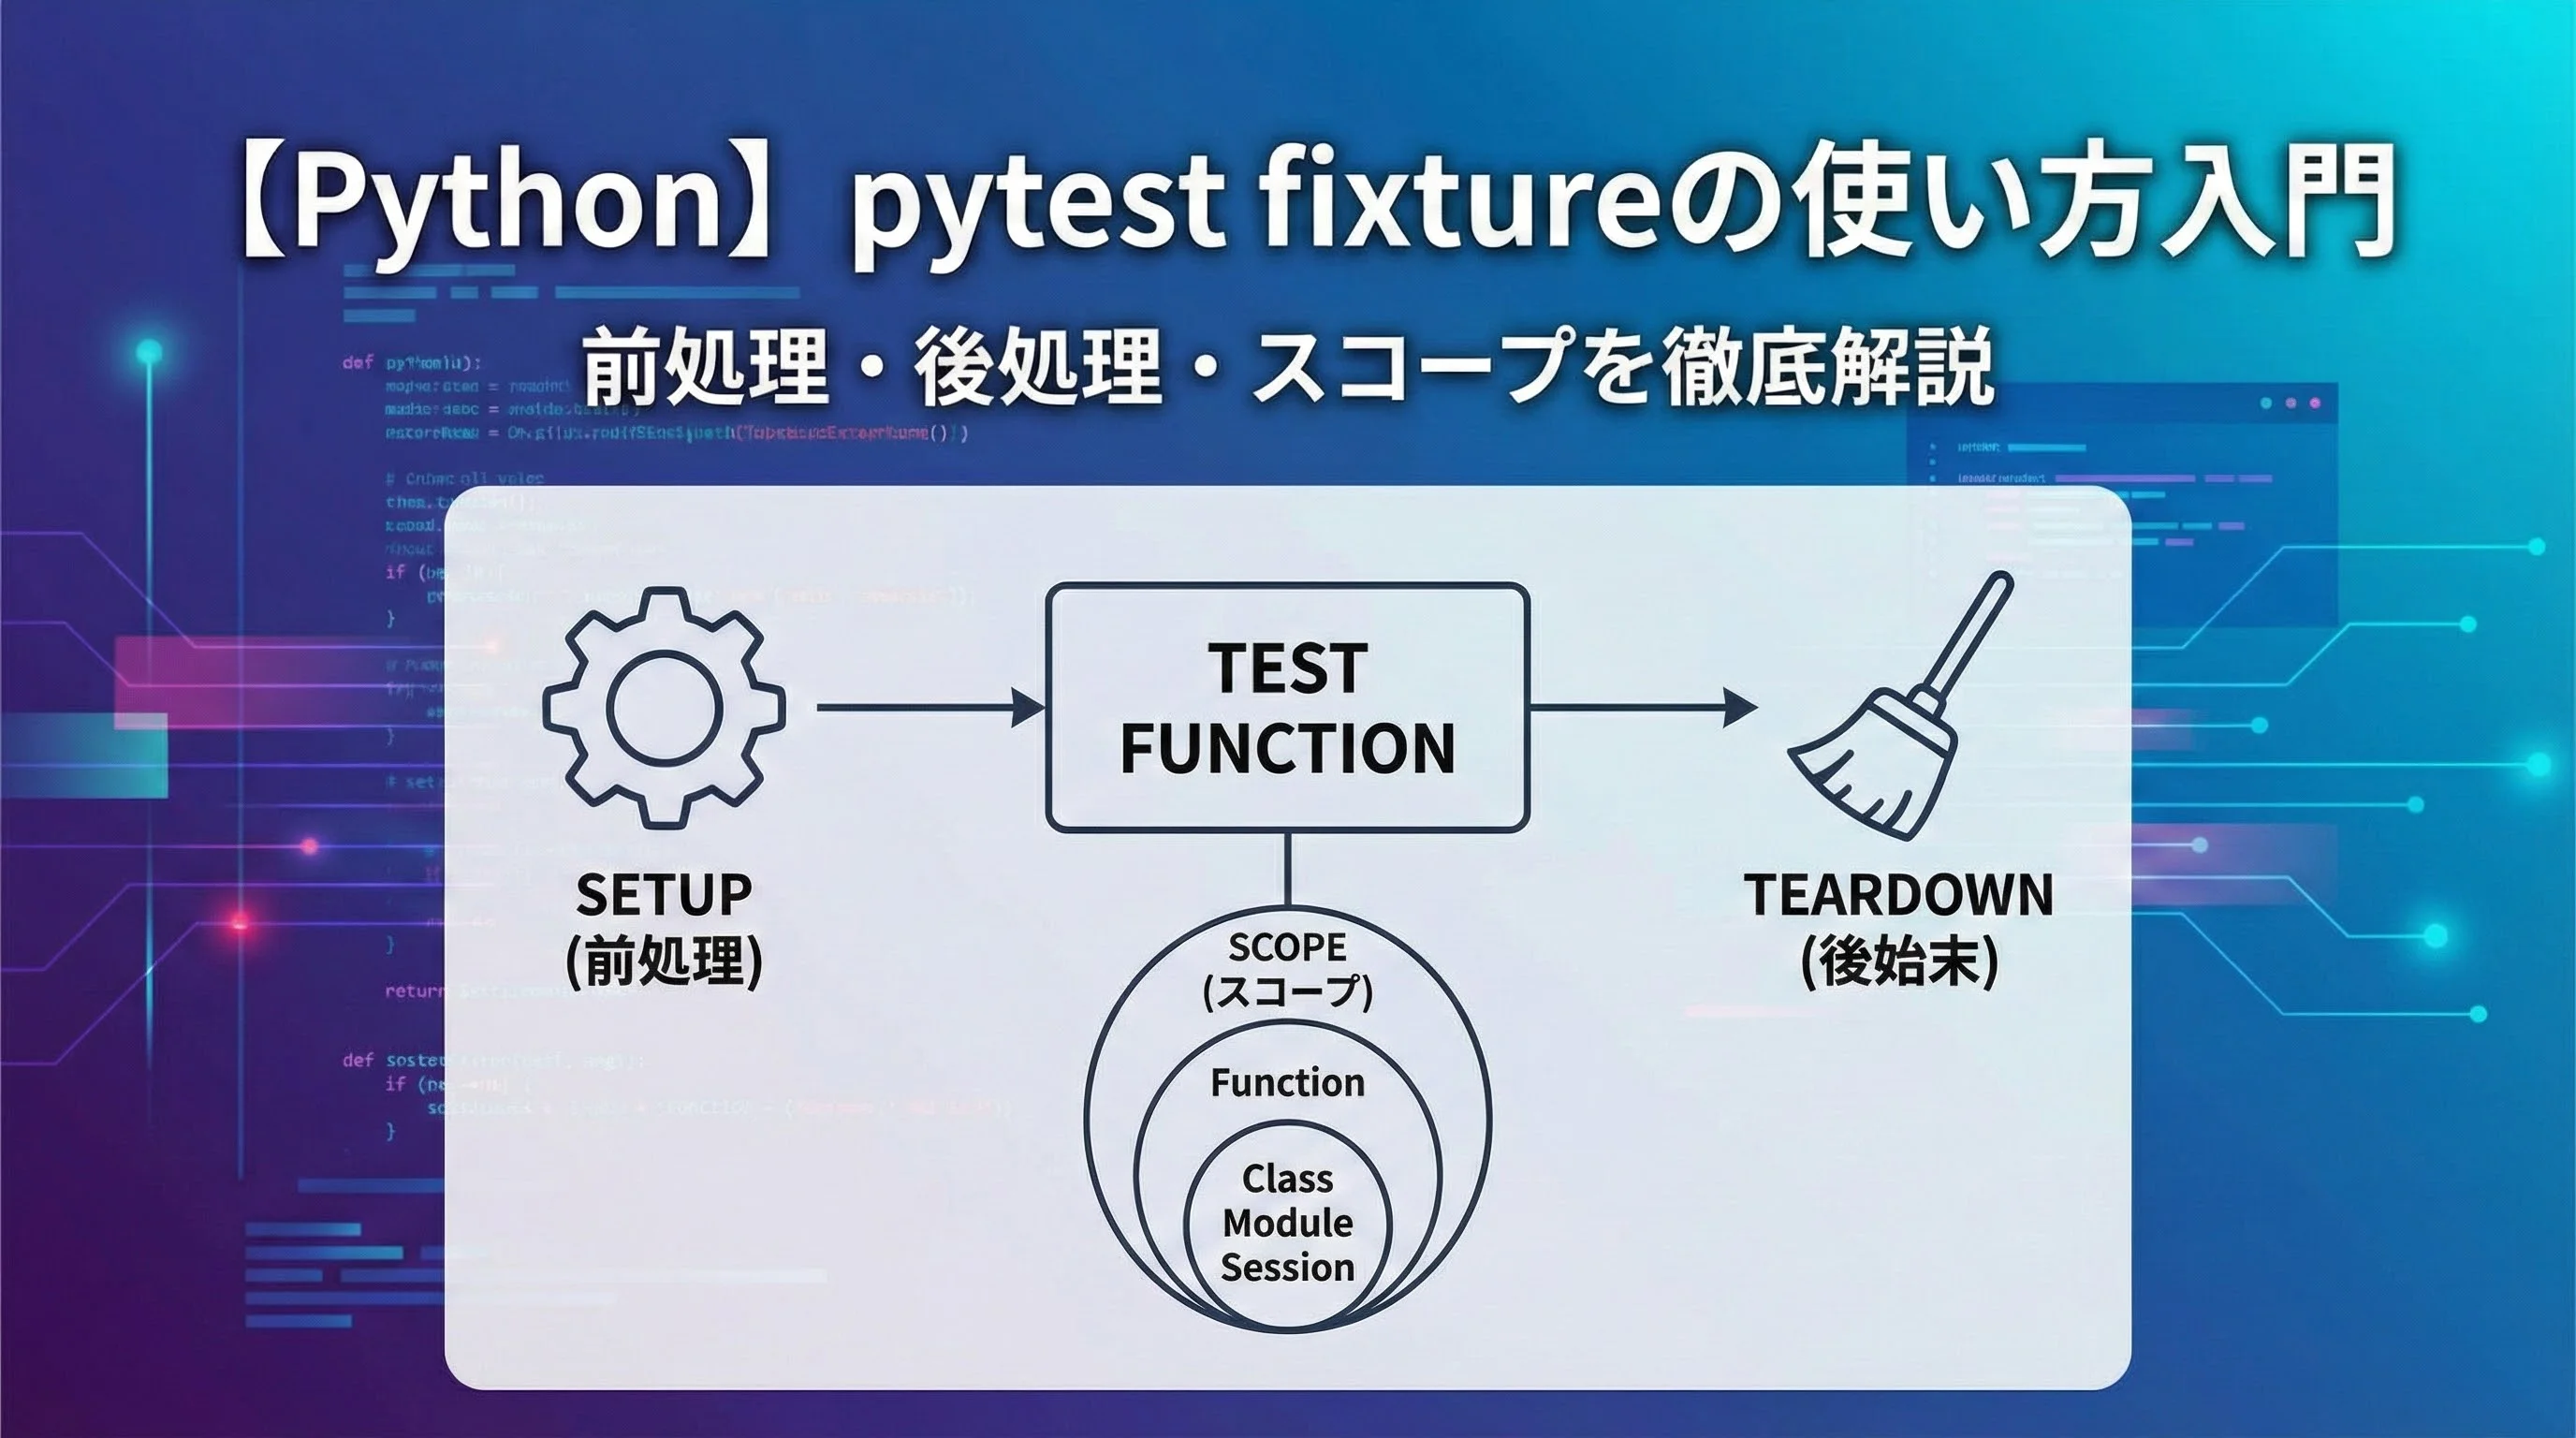
pytestのfixtureは、テスト実行時の前処理(setup)と後処理(teardown)をまとめて定義し、テスト関数から簡単に呼び出せる仕組みです。
テストでは、たとえば次のような準備が必要になることが多いです。
- テスト用データベースの接続を作る
- テスト用の一時ファイルや一時ディレクトリを用意する
- ダミーの設定オブジェクトやクライアントオブジェクトを作る
これらを毎回テスト関数に直接書いてしまうと、コードが重複し、修正時の影響範囲も読みにくくなってしまいます。
pytest fixtureを使うことで、こうした前処理・後処理を再利用可能な関数として切り出し、テストから引数として受け取るだけで使えるようになります。
unittestとの違いとpytest fixtureを使うメリット
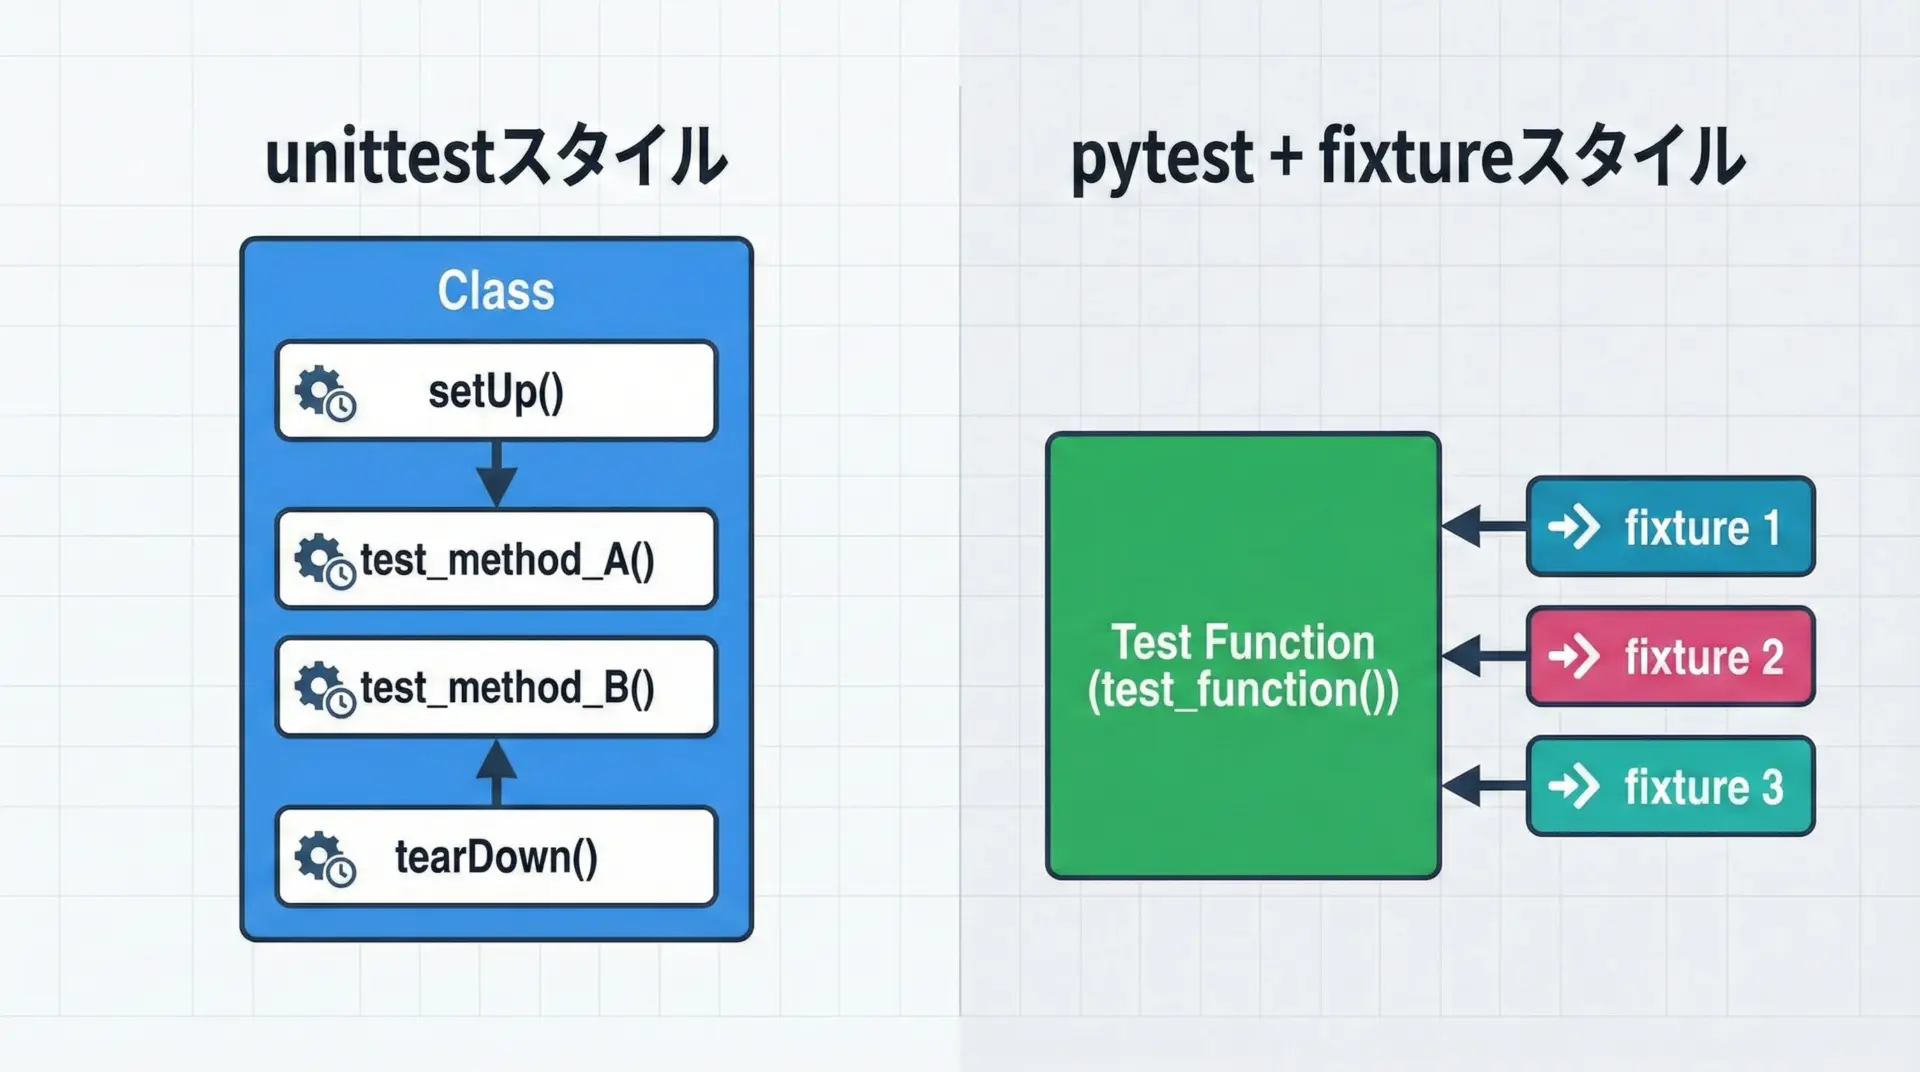
Python標準ライブラリのunittestでは、主にsetUpとtearDownメソッドを使って前処理・後処理を記述します。
これはテストクラス単位で共有されるため、同じクラス内の全テストに一律に適用されます。
一方、pytest fixtureには次のような特徴があります。
- 関数ベースで柔軟に再利用できる
→ 必要なテストだけが、必要なfixtureだけを引数として受け取れます。 - スコープ(function/module/sessionなど)を細かく制御できる
→ 1回だけ初期化したいもの、テストごとに作り直したいものを明示できます。 - ネストや依存関係を表現しやすい
→ fixture同士が引数として依存し合い、複雑なセットアップも分割して設計できます。 - parametrizeとの組み合わせが強力
→ 同じテストロジックで、複数パターンのデータを簡単に試せます。
このように、pytest fixtureを使うとテストコードの見通しが良くなり、保守性も高くなるため、実務ではunittest単体よりもpytest + fixtureが選ばれることが多くなっています。
pytest fixtureの基本的な書き方
@pytest.fixtureの書き方と引数
pytestでfixtureを定義するには、関数に@pytest.fixtureデコレータを付けます。
最もシンプルな例は次のようになります。
# test_sample.py
import pytest


@pytest.fixture
def sample_number():
    """テストで使うサンプルの数値を返すfixture"""
    value = 42  # ここで前処理を行ってもよい
    return value


def test_sample_number_is_even(sample_number):
    # fixtureの戻り値が引数として渡される
assert sample_number % 2 == 0この例では、sample_numberというfixtureが42を返し、テスト関数test_sample_number_is_evenの引数として渡されます。
@pytest.fixtureには、いくつかのよく使われる引数があります。
scope: fixtureのスコープ(function/module/sessionなど)autouse: テストの引数に書かなくても自動で適用するかどうかparams: パラメータ付きfixtureを定義するときの値リスト
まずは引数なしの基本形から慣れ、次にスコープやautouseを必要に応じて組み込んでいくと理解しやすいです。
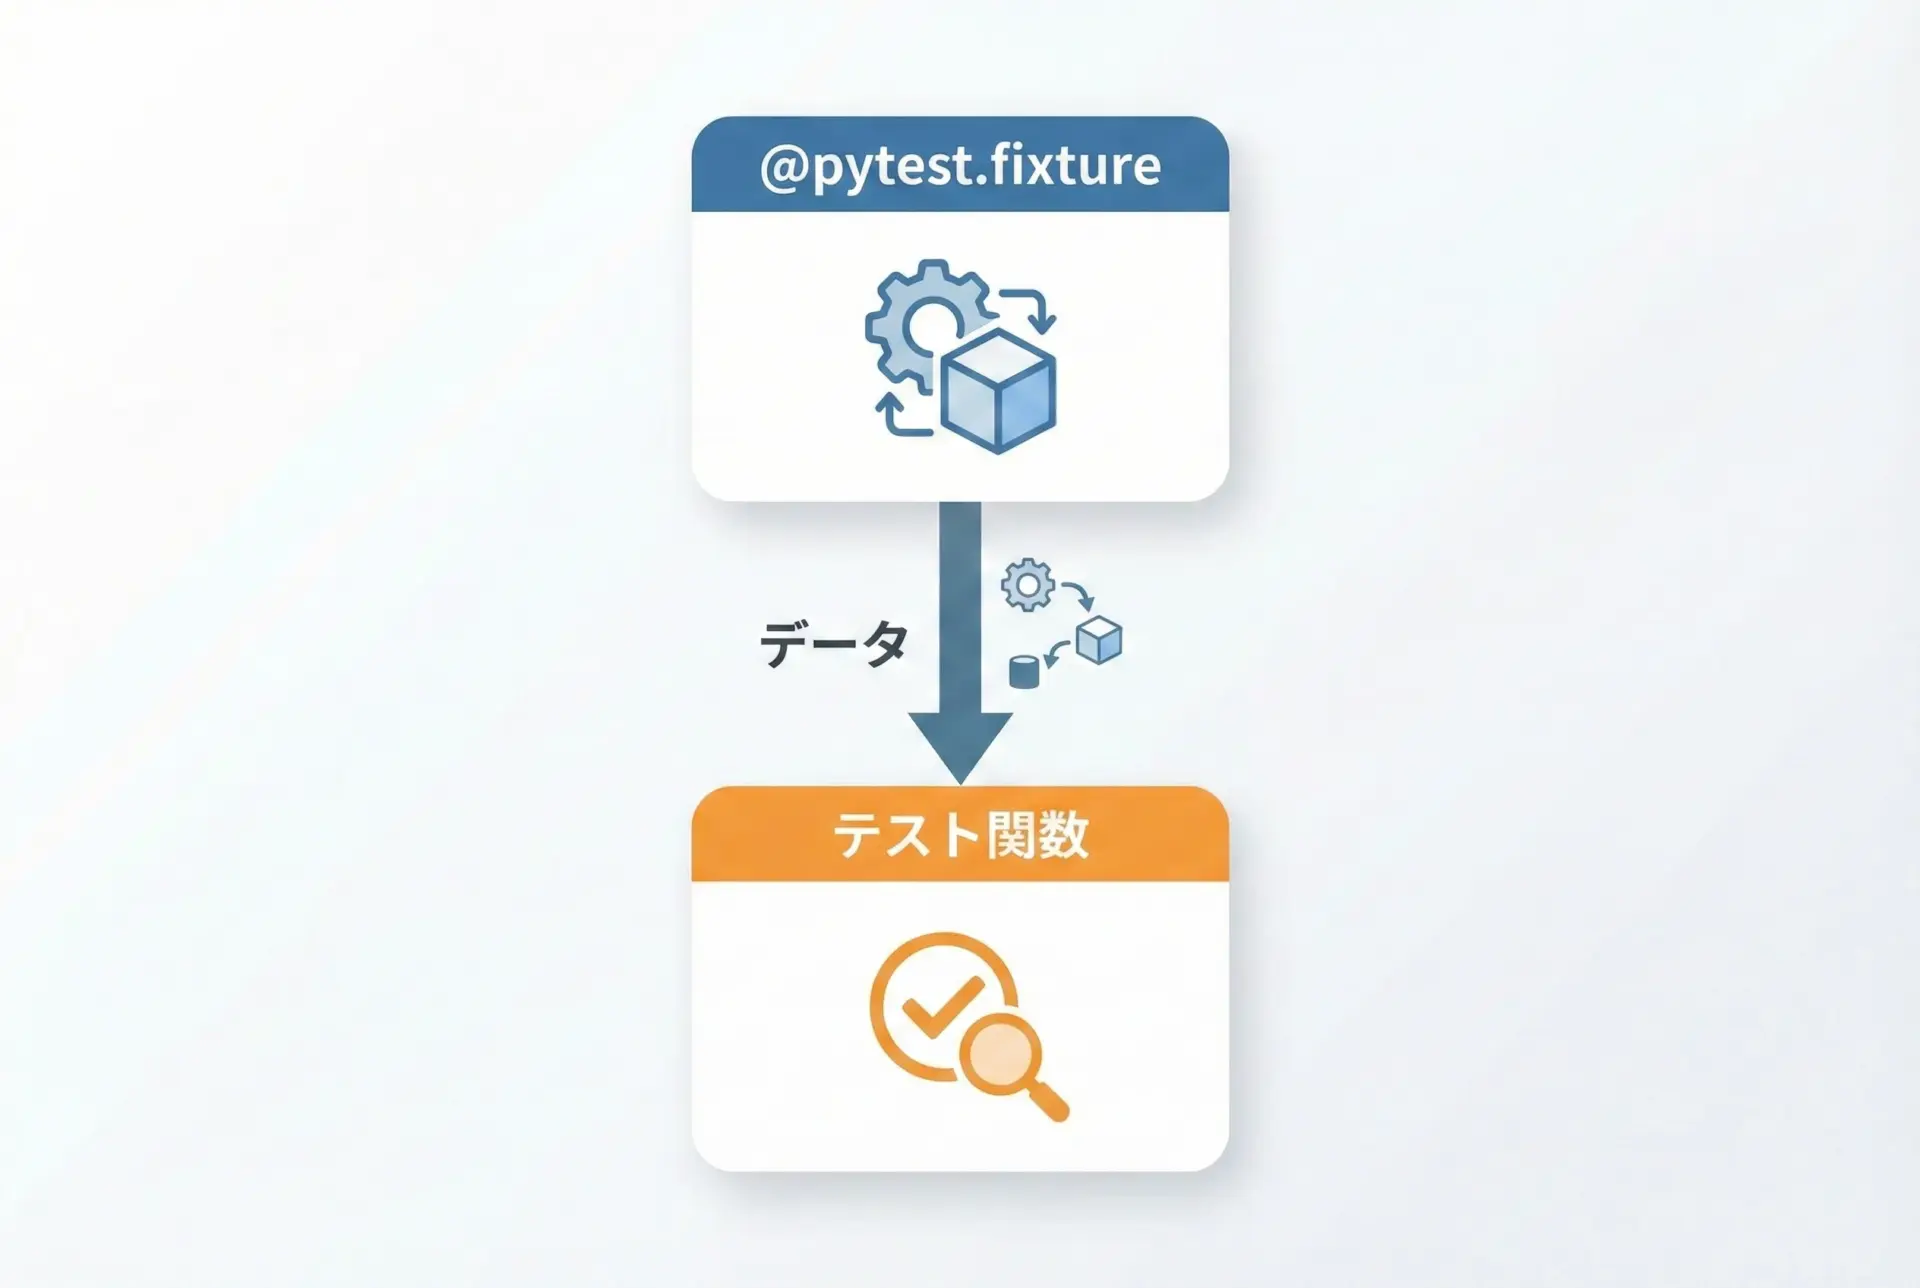
fixture関数の戻り値をテストで受け取る方法
fixtureの戻り値はテスト関数の引数名とfixture関数名を一致させることで自動的に渡されます。
特別な呼び出しコードは不要で、pytestが名前に基づいて解決します。
import pytest


@pytest.fixture
def user_name():
    """テスト用のユーザー名を返すfixture"""
    return "alice"


def test_user_name_length(user_name):
    # user_name は fixture user_name() の戻り値 "alice"
    assert len(user_name) == 5


def test_user_name_content(user_name):
    # 複数のテストから同じfixtureを再利用できる
assert user_name.startswith("a")ここで重要なのは、fixtureの戻り値の型には制限がないことです。
文字列、数値、辞書、クラスインスタンス、DB接続オブジェクトなど、テストに必要なものなら何でも返せます。
fixture名とテスト関数の依存関係
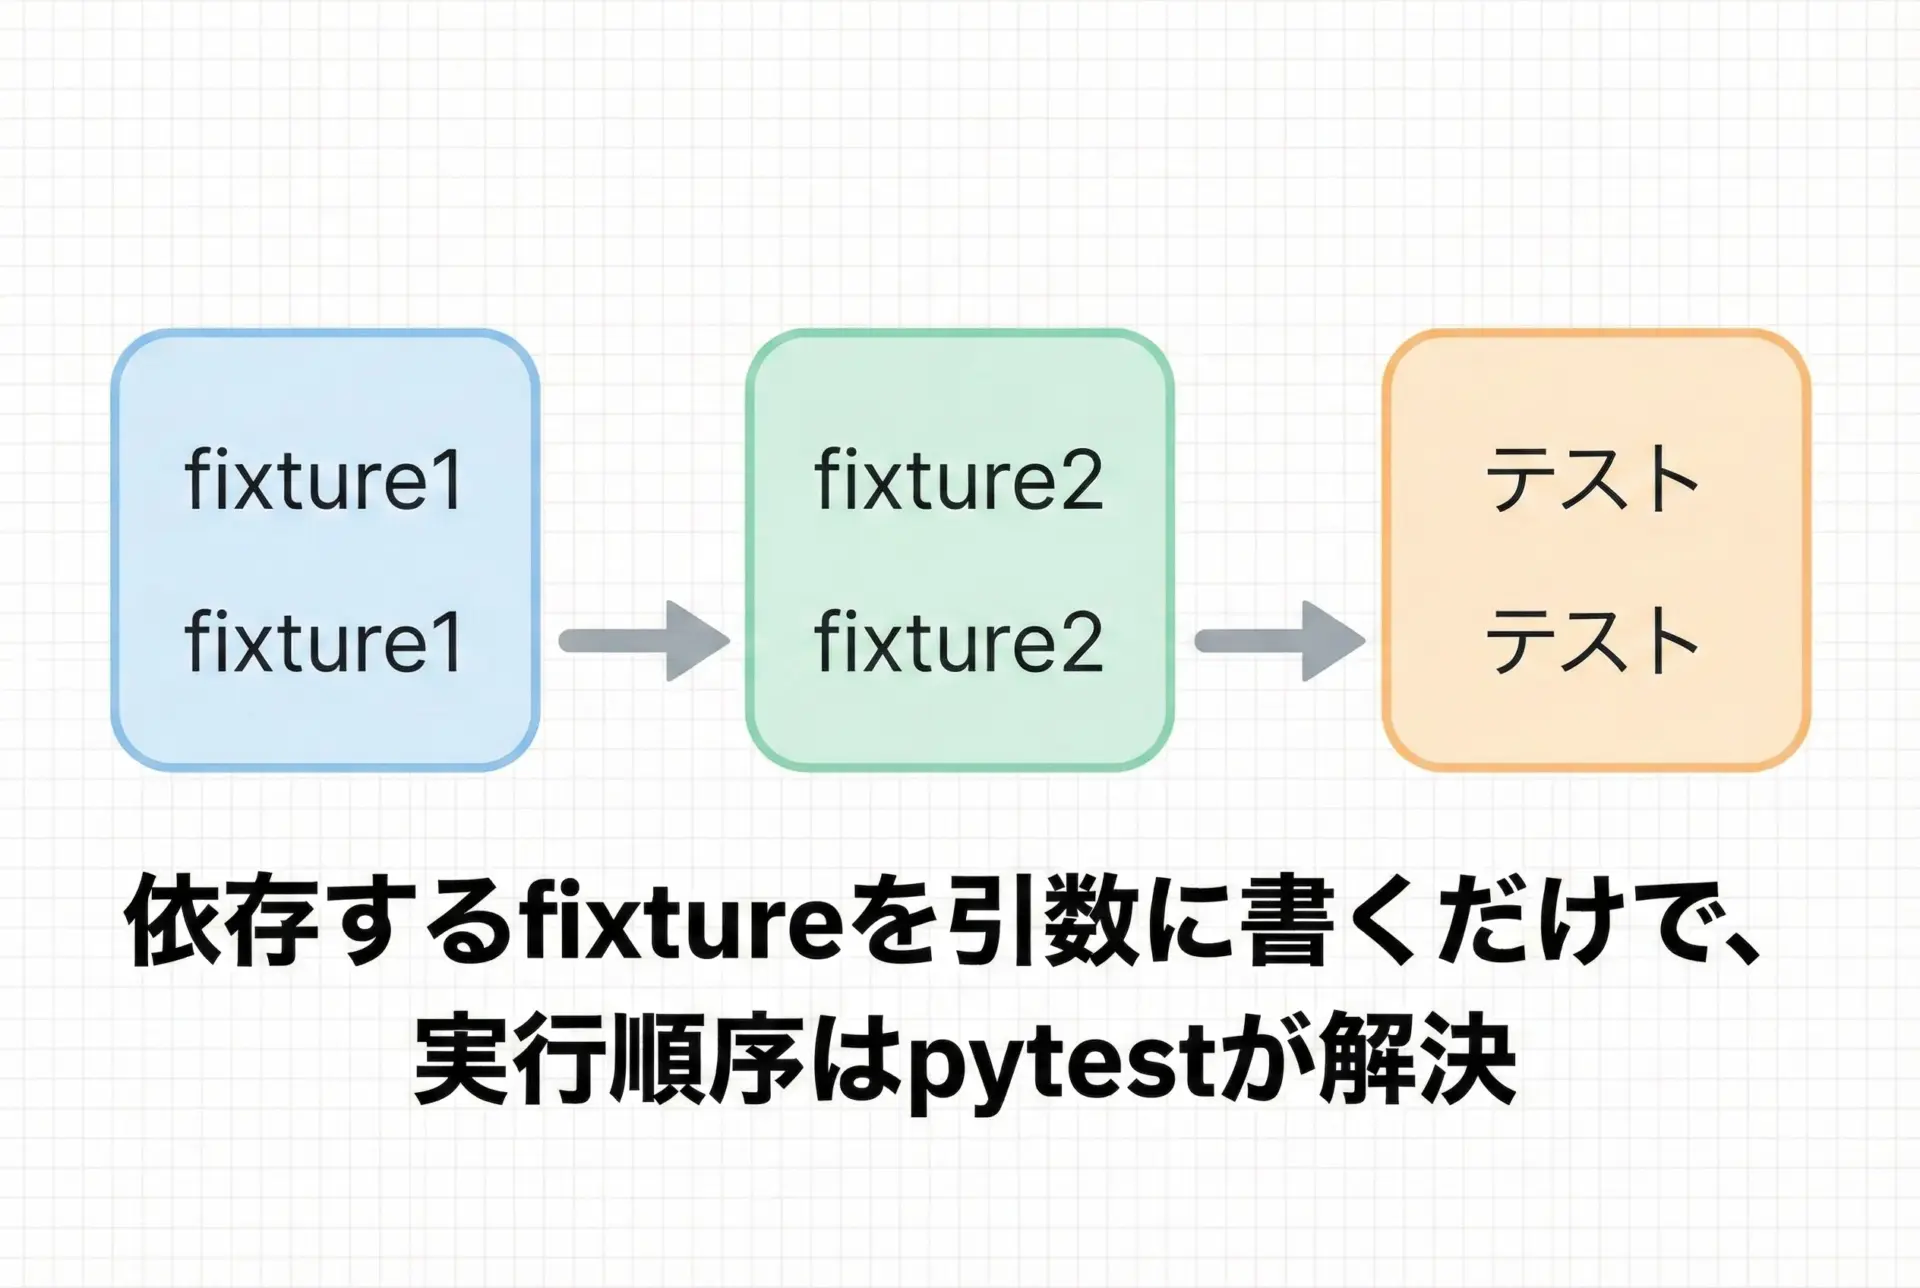
pytest fixtureは、名前による依存関係解決が強力なポイントです。
fixtureは他のfixtureに依存することもできます。
import pytest


@pytest.fixture
def base_url():
    return "https://api.example.com"


@pytest.fixture
def user_endpoint(base_url):
    """別のfixture(base_url)に依存するfixture"""
    # base_url をもとにエンドポイントURLを組み立てる
    return f"{base_url}/users"


def test_user_endpoint(user_endpoint):
    # user_endpoint は "https://api.example.com/users"
assert user_endpoint.endswith("/users")このように、fixture同士も引数を通じてつながるため、大きなセットアップを小さな責務に分割して定義できます。
pytestは依存関係を自動的に解析し、適切な順序でfixtureを実行してくれます。
pytest fixtureで実現する前処理・後処理
前処理(setup)をfixtureで書く方法
fixtureは、単に値を返すだけでなく、前処理を含めた初期化処理をまとめるのに適しています。
たとえば、一時ディレクトリを用意する前処理は次のように書けます。
# test_tempdir.py
import pytest
import os
import tempfile


@pytest.fixture
def temp_dir():
    """テスト用の一時ディレクトリを作成するfixture"""
    # 前処理: 一時ディレクトリを作成
    dir_path = tempfile.mkdtemp(prefix="pytest_example_")
    # テストで使えるようパスを返す
    return dir_path


def test_temp_dir_exists(temp_dir):
    # fixture から渡されたディレクトリが存在することを確認
    assert os.path.isdir(temp_dir)
この例では、後処理(一時ディレクトリの削除)はしていませんが、前処理だけでもfixtureとして十分に有用です。
ただし、一時ディレクトリが増え続けると困るため、本来は後処理もセットで行う必要があります。
そこでyield fixtureが登場します。
後処理(teardown)にyield fixtureを使う
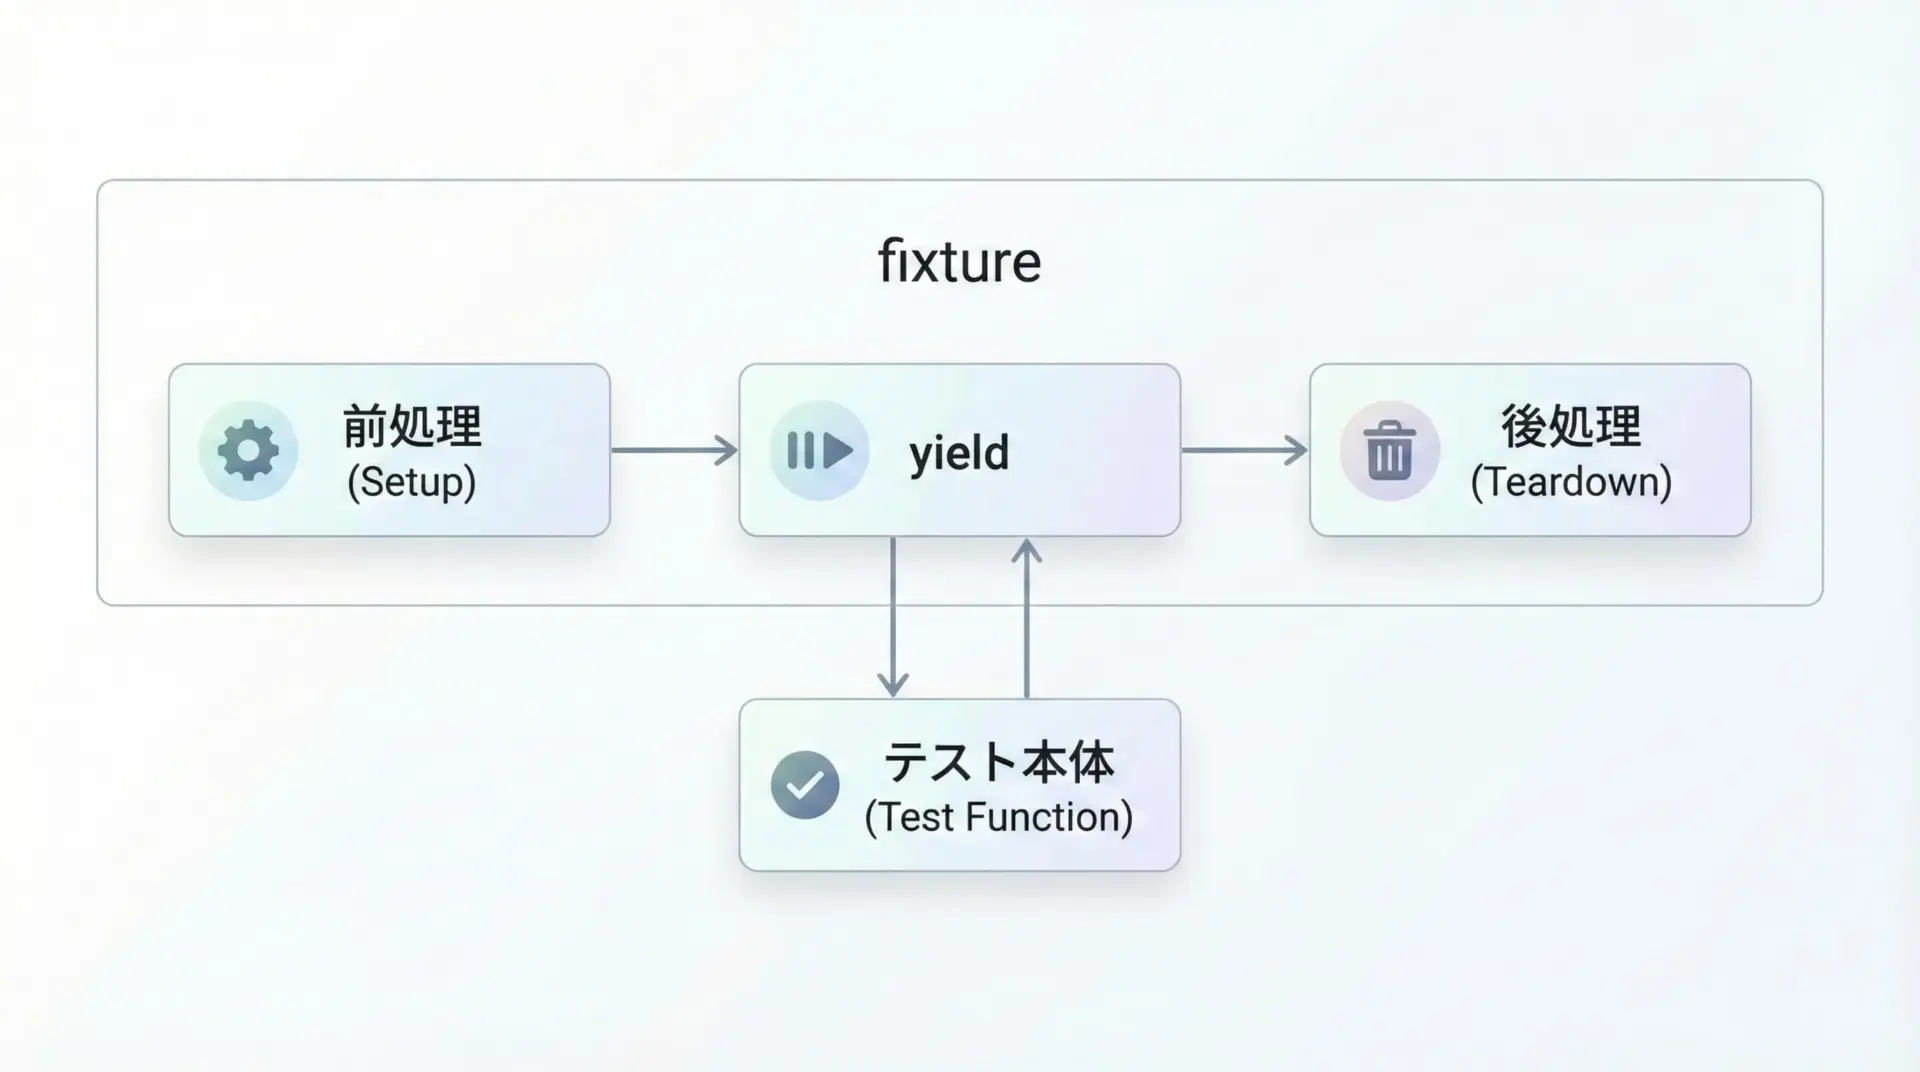
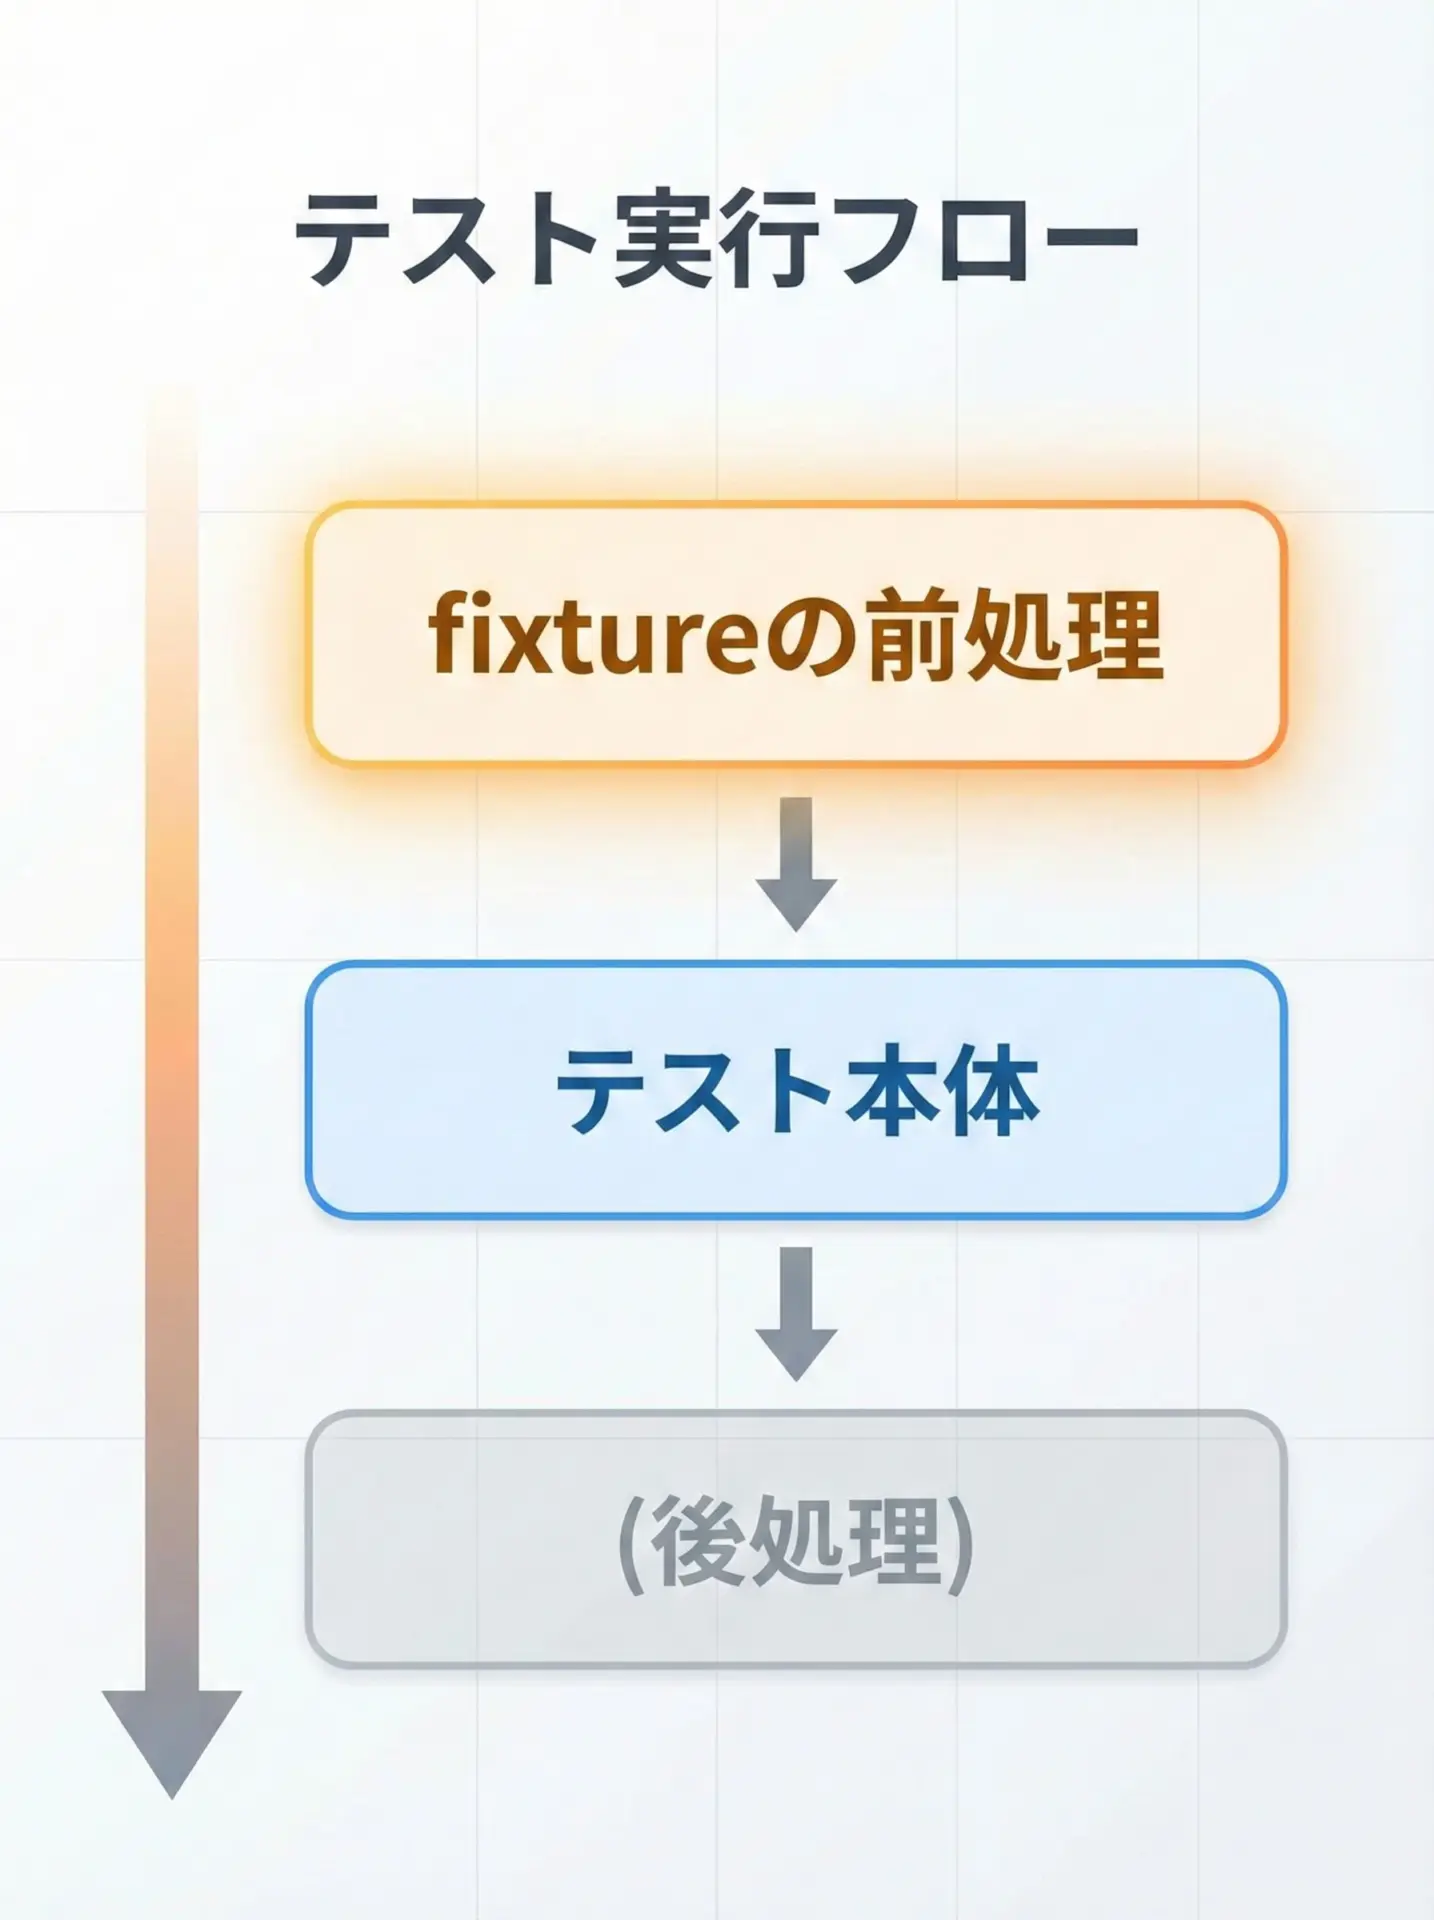
pytestでは、@pytest.fixture付きの関数内でyieldを使うと、yieldの前が前処理、yieldの後が後処理として扱われます。
先ほどの一時ディレクトリ例を、後処理付きにしたコードがこちらです。
# test_tempdir_yield.py
import pytest
import os
import shutil
import tempfile


@pytest.fixture
def temp_dir():
    """前処理と後処理をまとめたyield fixtureの例"""
    # 前処理: 一時ディレクトリを作成
    dir_path = tempfile.mkdtemp(prefix="pytest_example_")
    print(f"[SETUP] create temp dir: {dir_path}")

    # yield でテストに値を渡す
    # この return 位置が「テスト本体の前後」を区切る境界になる
    yield dir_path

    # 後処理: テストが終わったあとにディレクトリを削除
    print(f"[TEARDOWN] remove temp dir: {dir_path}")
    shutil.rmtree(dir_path)


def test_temp_dir_exists(temp_dir):
    # SETUP 後に実行される
assert os.path.isdir(temp_dir)このファイルをpytest -sで実行すると、標準出力に前後処理のログが表示されます。
# 実行例 (一部抜粋)
[SETUP] create temp dir: /tmp/pytest_example_abcd1234
[TEARDOWN] remove temp dir: /tmp/pytest_example_abcd1234
yield fixtureのポイントは次の通りです。
- yieldの前で行うのが前処理(setup)
- yieldでテストに渡す値を返す
- yieldの後は、テストが終わった後に必ず実行される後処理(teardown)
これにより、クリーンアップ漏れを防ぎつつ、テストコードをすっきり保つことができます。
with文やcontextlibとの使い分け
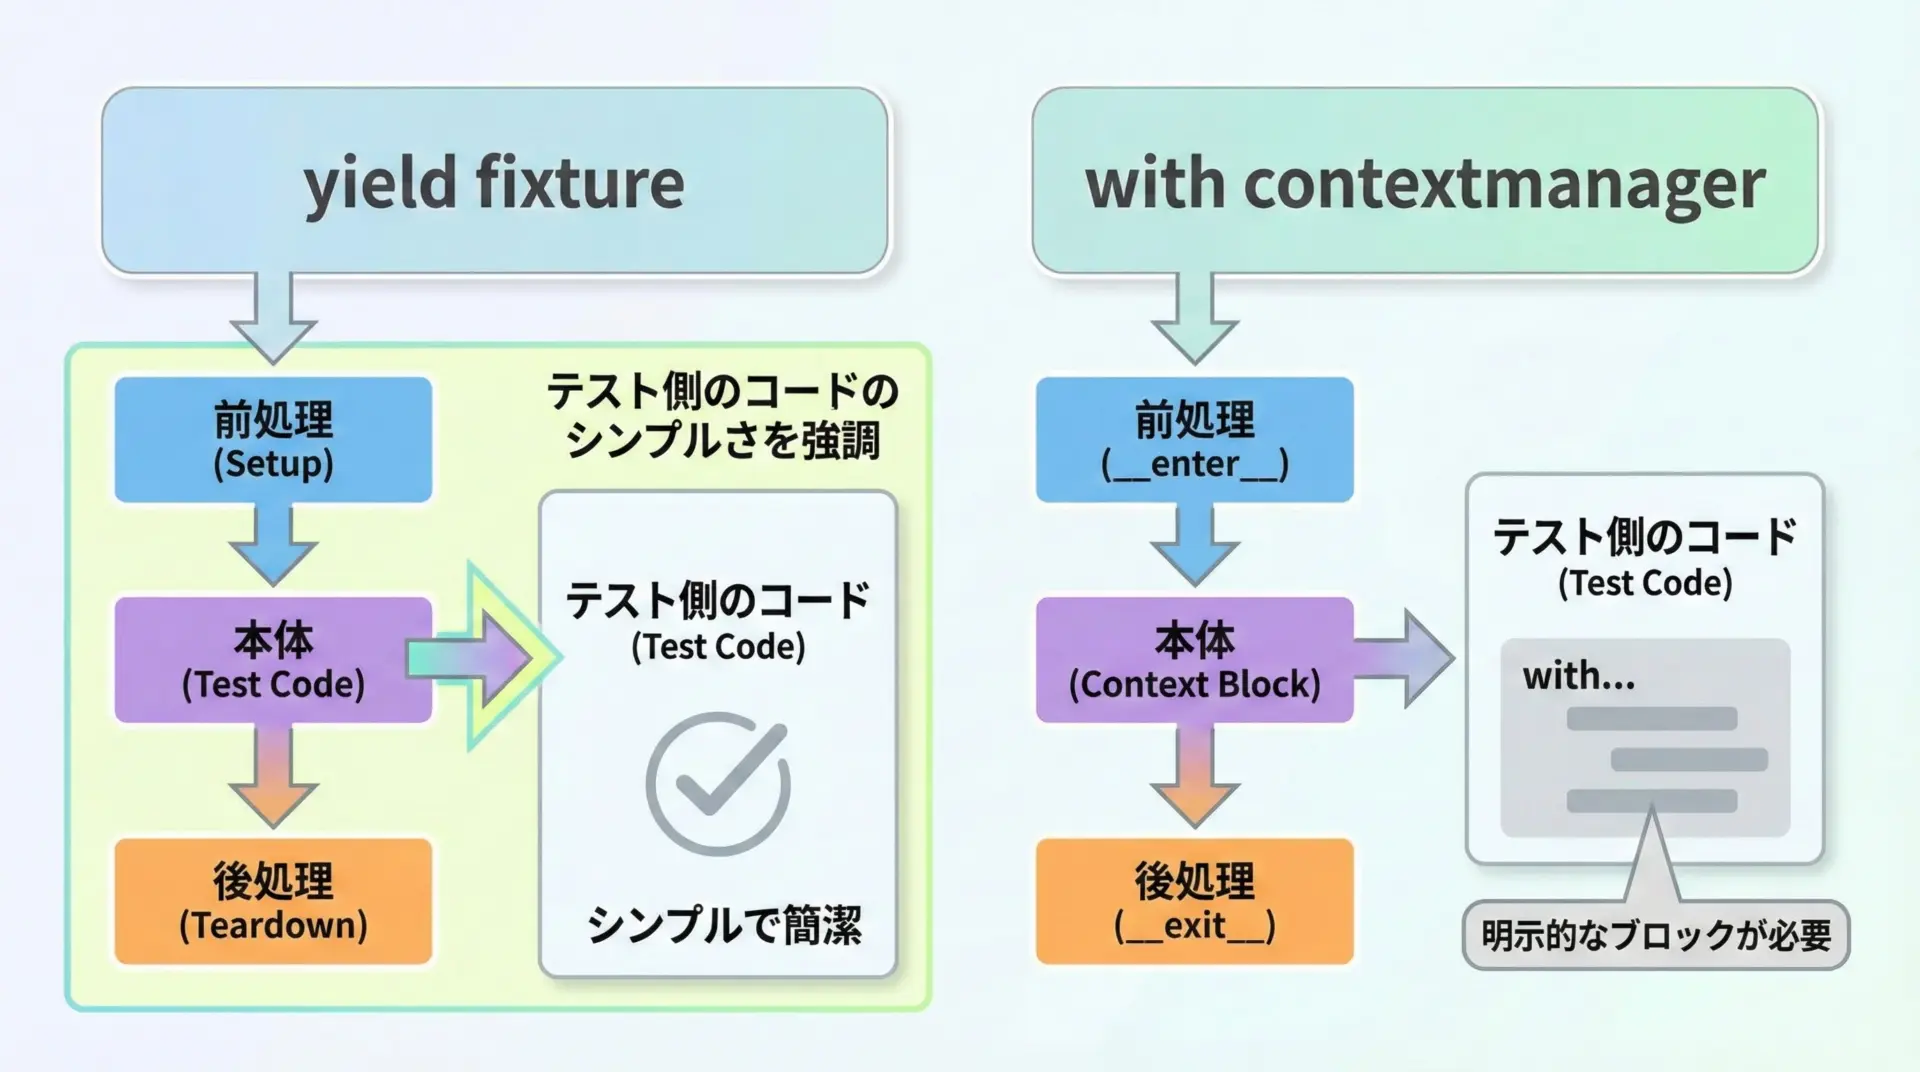
Pythonではもともとwith文とcontextlib.contextmanagerで前処理・後処理を表現できます。
pytestのyield fixtureは、これと非常によく似たパターンです。
# 単体で使う contextmanager の例
from contextlib import contextmanager


@contextmanager
def open_file(path):
    f = open(path, "w")
    try:
        yield f
    finally:
        f.close()
この構造はfixtureでも同じです。
ただし、テストコードから見た使い勝手が違います。
- contextmanager: テスト側で
with open_file(...) as f:と書く必要がある - fixture: テスト関数の
引数に書くだけで前後処理が自動で動く
テストコードをできるだけシンプルに保ちたい場合、テスト用の前処理・後処理はfixtureに寄せる方が見通しが良くなります。
一方で、テスト以外の通常コードでも使いたいリソース管理はcontextmanagerで実装しておき、それをfixtureから呼ぶ、という設計もよく使われます。
pytest fixtureのスコープと応用
scopeオプション(function/sessionなど)の違い

fixtureにはscope引数を指定できます。
これは「どの単位で一度だけ前処理・後処理を実行するか」を決める重要なオプションです。
代表的なスコープは次の4つです。
| scope値 | 実行単位 | よくある用途 |
|---|---|---|
| function | 各テスト関数ごと(デフォルト) | ほぼすべての通常fixture |
| class | 各テストクラスごと | クラス単位で共有するリソース |
| module | 各テストファイルごと | モジュール内で共有したい高コストな初期化 |
| session | テストセッション全体で1回 | DB起動、外部サービスのモックサーバ起動など |
具体例として、scope="module"のfixtureを見てみます。
# test_db.py
import pytest


@pytest.fixture(scope="module")
def db_connection():
    """モジュール内のテストで共有するDB接続の例"""
    print("[SETUP] connect to DB")
    conn = object()  # 本来は実際の接続オブジェクトを作る
    yield conn
    print("[TEARDOWN] close DB connection")


def test_query_1(db_connection):
    assert db_connection is not None


def test_query_2(db_connection):
assert db_connection is not Noneこの場合、db_connectionの前処理・後処理は、モジュール内の複数テストを通して1回だけ実行されます。
重い初期化処理を何度も繰り返さずに済み、テスト全体の速度を改善できます。
autouse fixtureで自動的に前処理・後処理を実行する
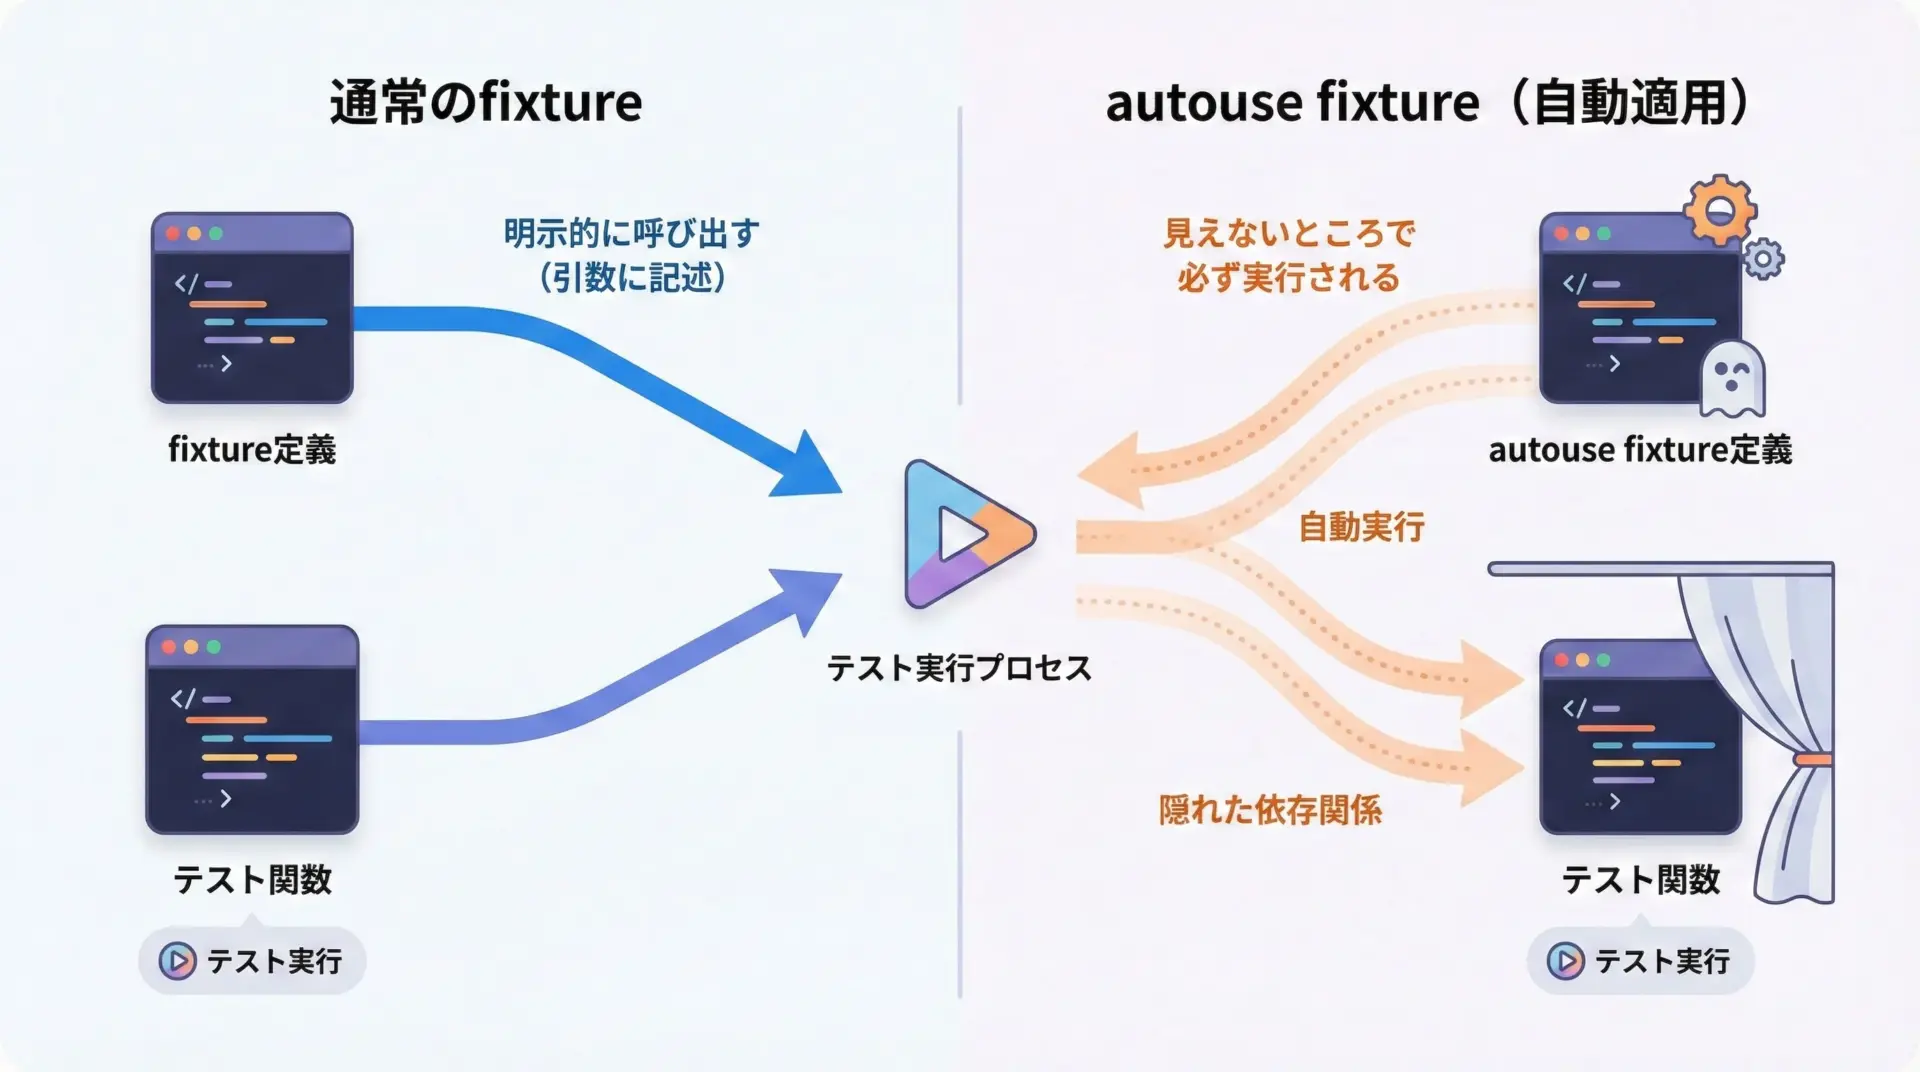
通常、fixtureを使うにはテスト関数の引数にその名前を書く必要があります。
しかし、@pytest.fixture(autouse=True)とすると、そのスコープに含まれるテストに自動的に適用されます。
# test_autouse.py
import pytest


@pytest.fixture(autouse=True)
def add_hello_to_env(monkeypatch):
    """全テストで自動的に環境変数をセットするfixture"""
    monkeypatch.setenv("HELLO", "world")


def test_env_1():
    import os
    assert os.getenv("HELLO") == "world"


def test_env_2():
    import os
    # 引数に何も書いていなくても、fixtureが効いている
    assert os.getenv("HELLO") == "world"
autouse fixtureは非常に便利ですが、乱用すると「どこで何がセットされているのか分かりにくい」状態になってしまいます。
そこで次のように使い分けるとよいです。
- 全テストで必須の環境初期化 → autouse=Trueでよい
- 特定のテストだけで使いたい準備 → 通常のfixtureとして引数に明示する
また、scope="session"とautouseを組み合わせて、テスト全体の最初と最後に1回だけ実行する初期化処理を定義することもよくあります。
conftest.pyで共通fixtureを管理する方法
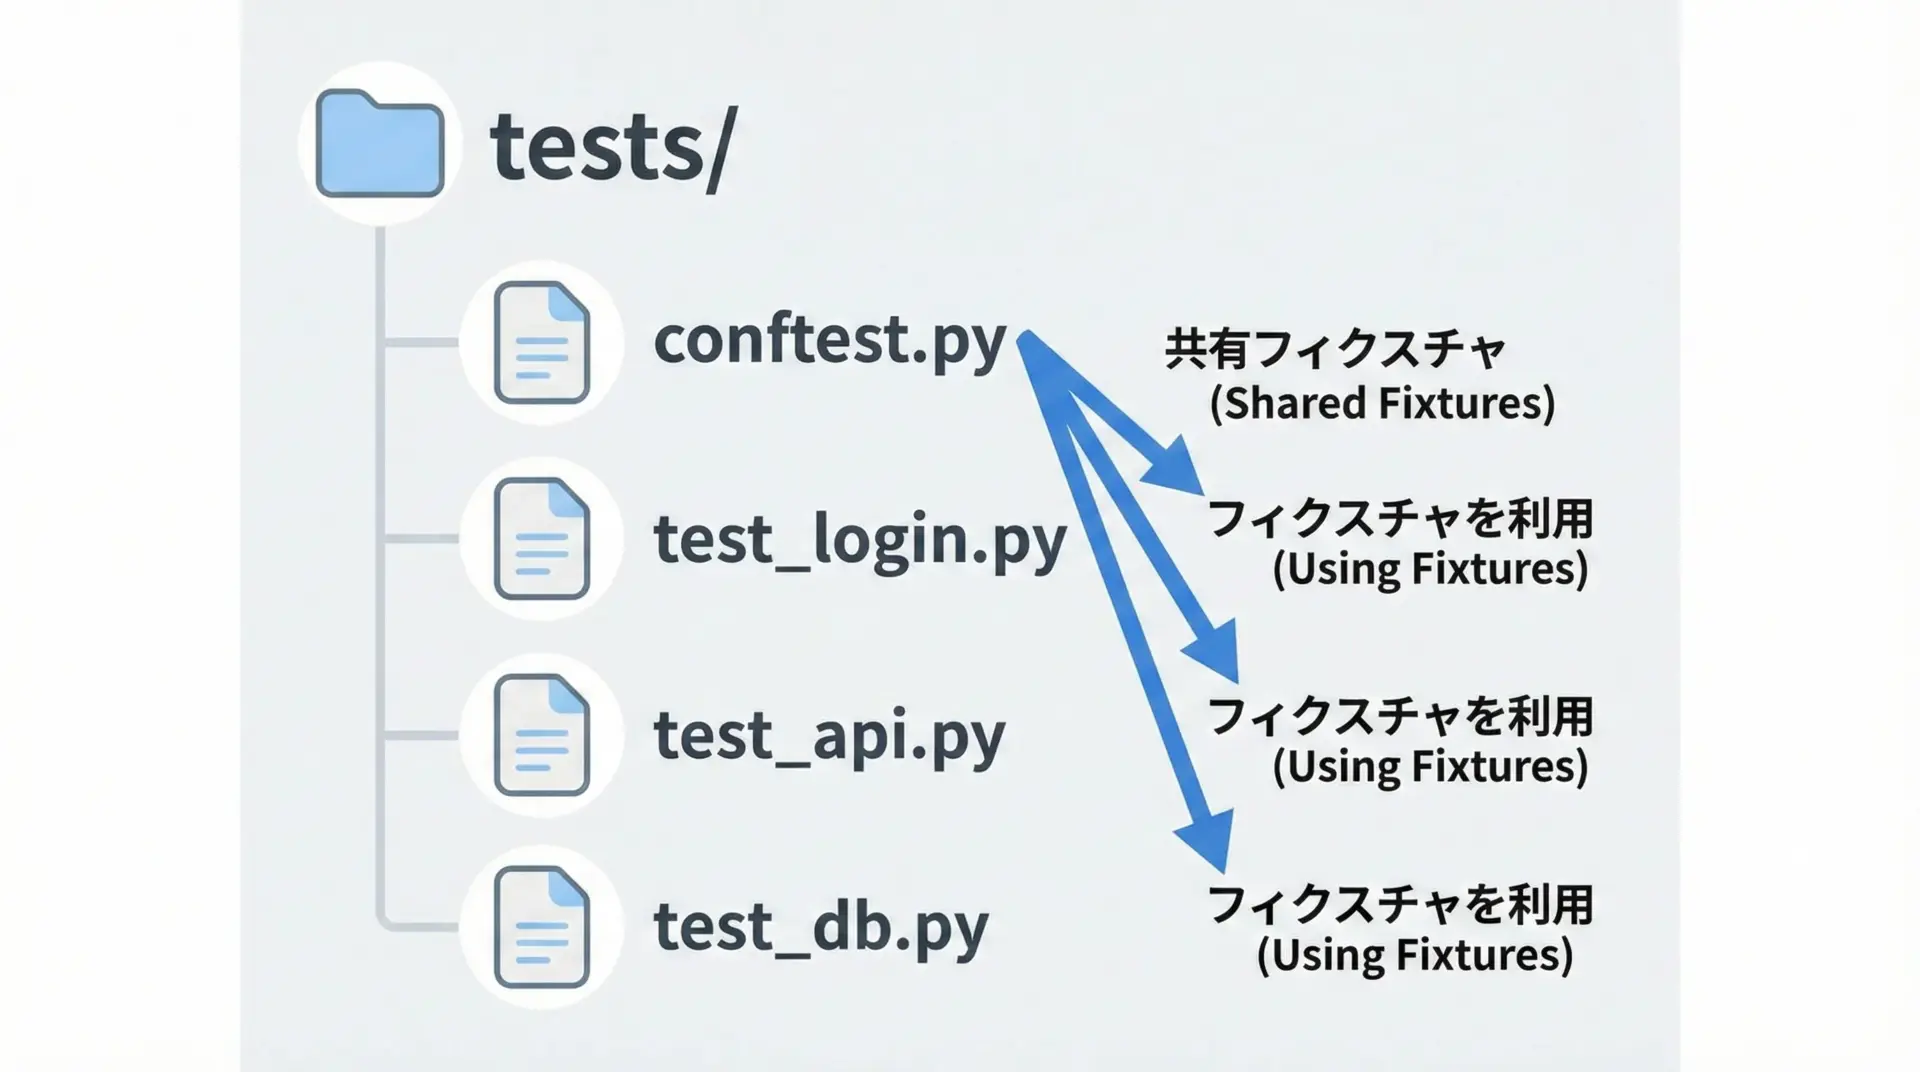
pytestでは、同一ディレクトリ内の全テストから共有したいfixtureをconftest.pyに定義するのが一般的です。
特別なimportは不要で、pytestが自動的に読み込んでくれます。
ディレクトリ構成の例:
tests/
    conftest.py
    test_api.py
test_models.pyconftest.pyの中身:
# tests/conftest.py
import pytest


@pytest.fixture
def api_base_url():
    """APIのベースURLを共有するfixture"""
    return "https://api.example.com"


@pytest.fixture(scope="session")
def api_client(api_base_url):
    """テストセッションを通じて1つだけ持つAPIクライアント"""
    # 実際にはHTTPクライアントなどを初期化する
    client = {"base_url": api_base_url}
    return client
各テストファイルでは、importなしでそのままfixtureを使えます。
# tests/test_api.py

def test_get_users(api_client):
    # api_client は conftest.py で定義したfixture
assert api_client["base_url"].endswith("example.com")この仕組みにより、テストプロジェクト全体の共通基盤をconftest.pyに集約できます。
大規模プロジェクトでは、階層ごとに複数のconftest.pyを置き、スコープ別にfixtureを整理する設計もよく用いられます。
パラメータ付きfixture(parametrize)の基本
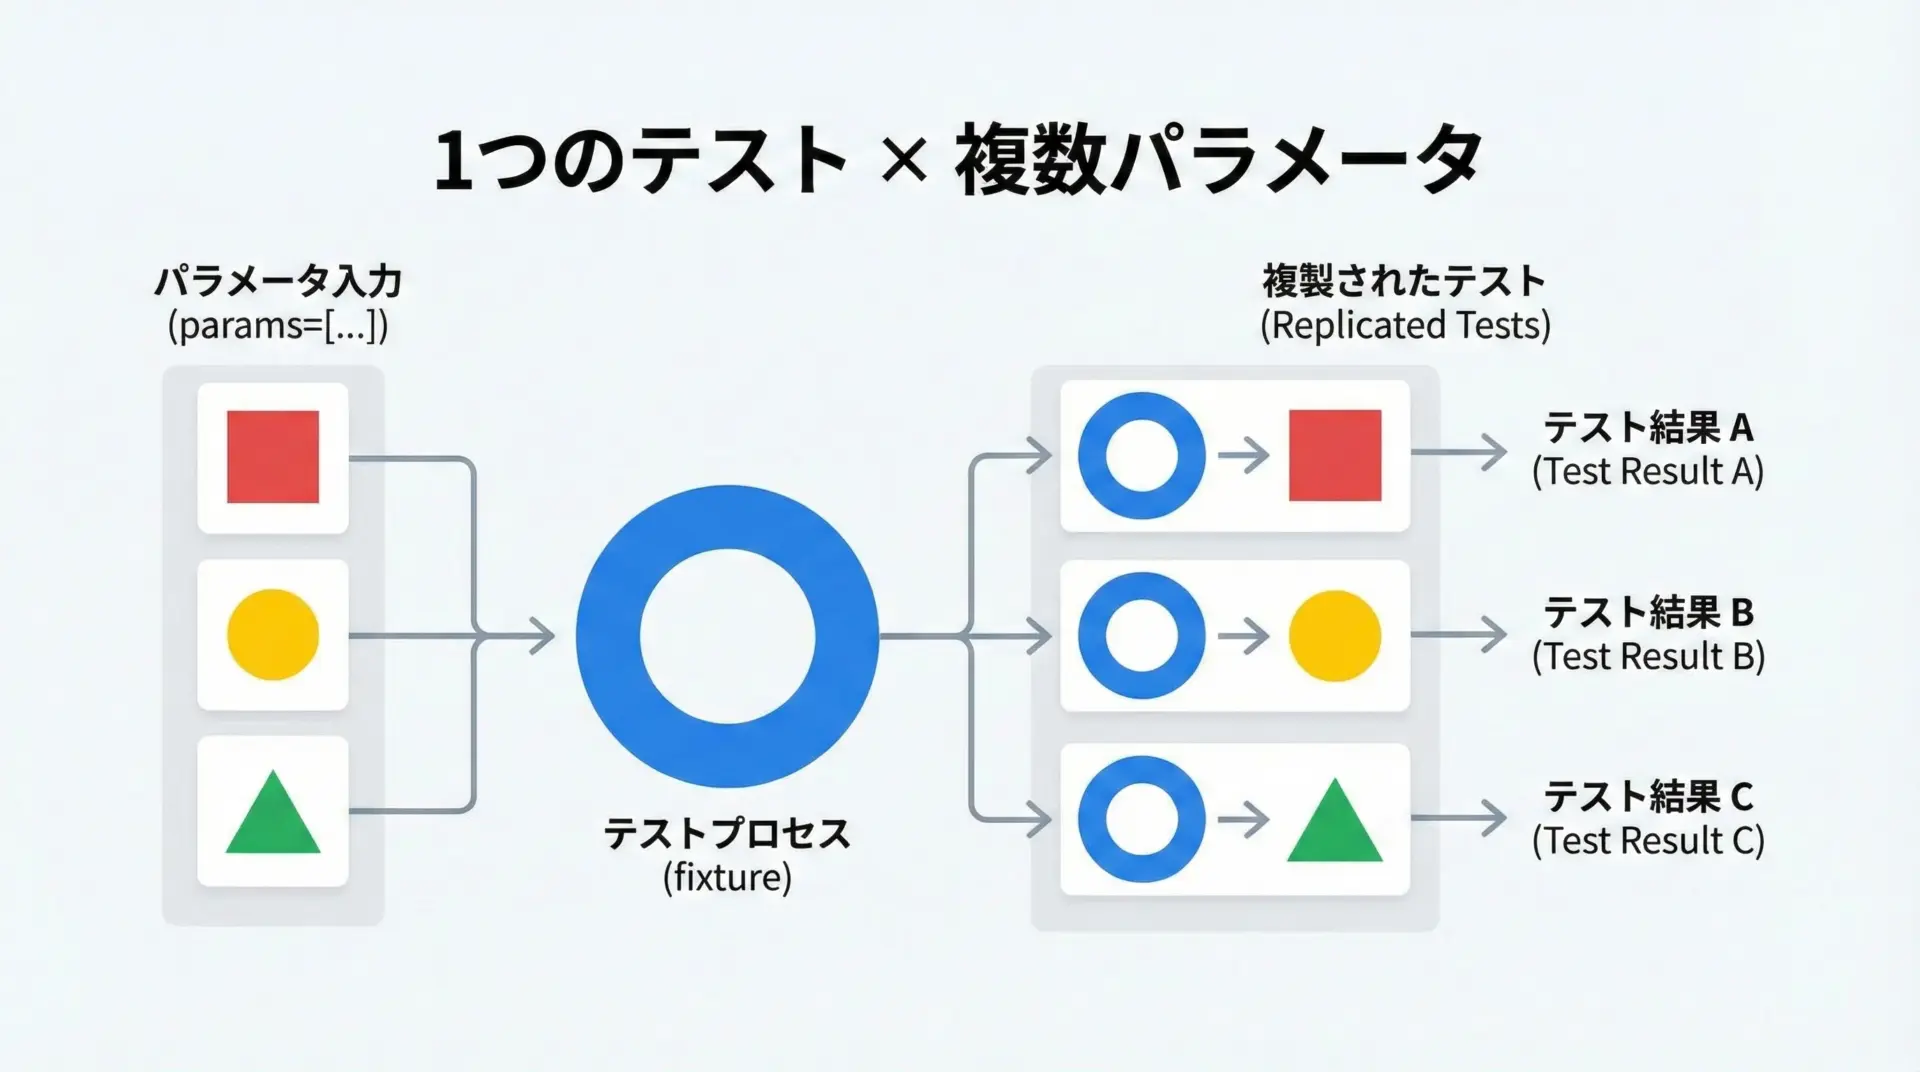
pytestでは@pytest.mark.parametrizeでテスト関数自体をパラメータ化できますが、fixture側をパラメータ化することも可能です。
これはパラメータ付きfixtureと呼ばれます。
# test_params_fixture.py
import pytest


@pytest.fixture(params=[1, 2, 3])
def number(request):
    """1, 2, 3 の3パターンを提供するパラメータ付きfixture"""
    # request.param に現在のパラメータが入る
    return request.param


def test_number_is_positive(number):
    # このテストは number=1,2,3 の3ケースとして実行される
assert number > 0この例では、test_number_is_positiveが3回実行され、それぞれnumber=1, number=2, number=3になります。
パラメータ付きfixtureは次のような場面で便利です。
- 同じテストロジックに対して、複数の設定パターンを試したい
- DBの種類やAPIエンドポイントのバージョン違いなど、テスト対象の環境が複数ある
- テスト関数側を複雑にparametrizeしたくない場合に、環境差分をfixtureに寄せたい
@pytest.mark.parametrizeと組み合わせると、テストロジックと環境パターンの2軸でパラメータ化することも可能です。
実務で役立つfixture設計のポイント
実務でpytest fixtureを使う際に意識しておきたいポイントを整理します。
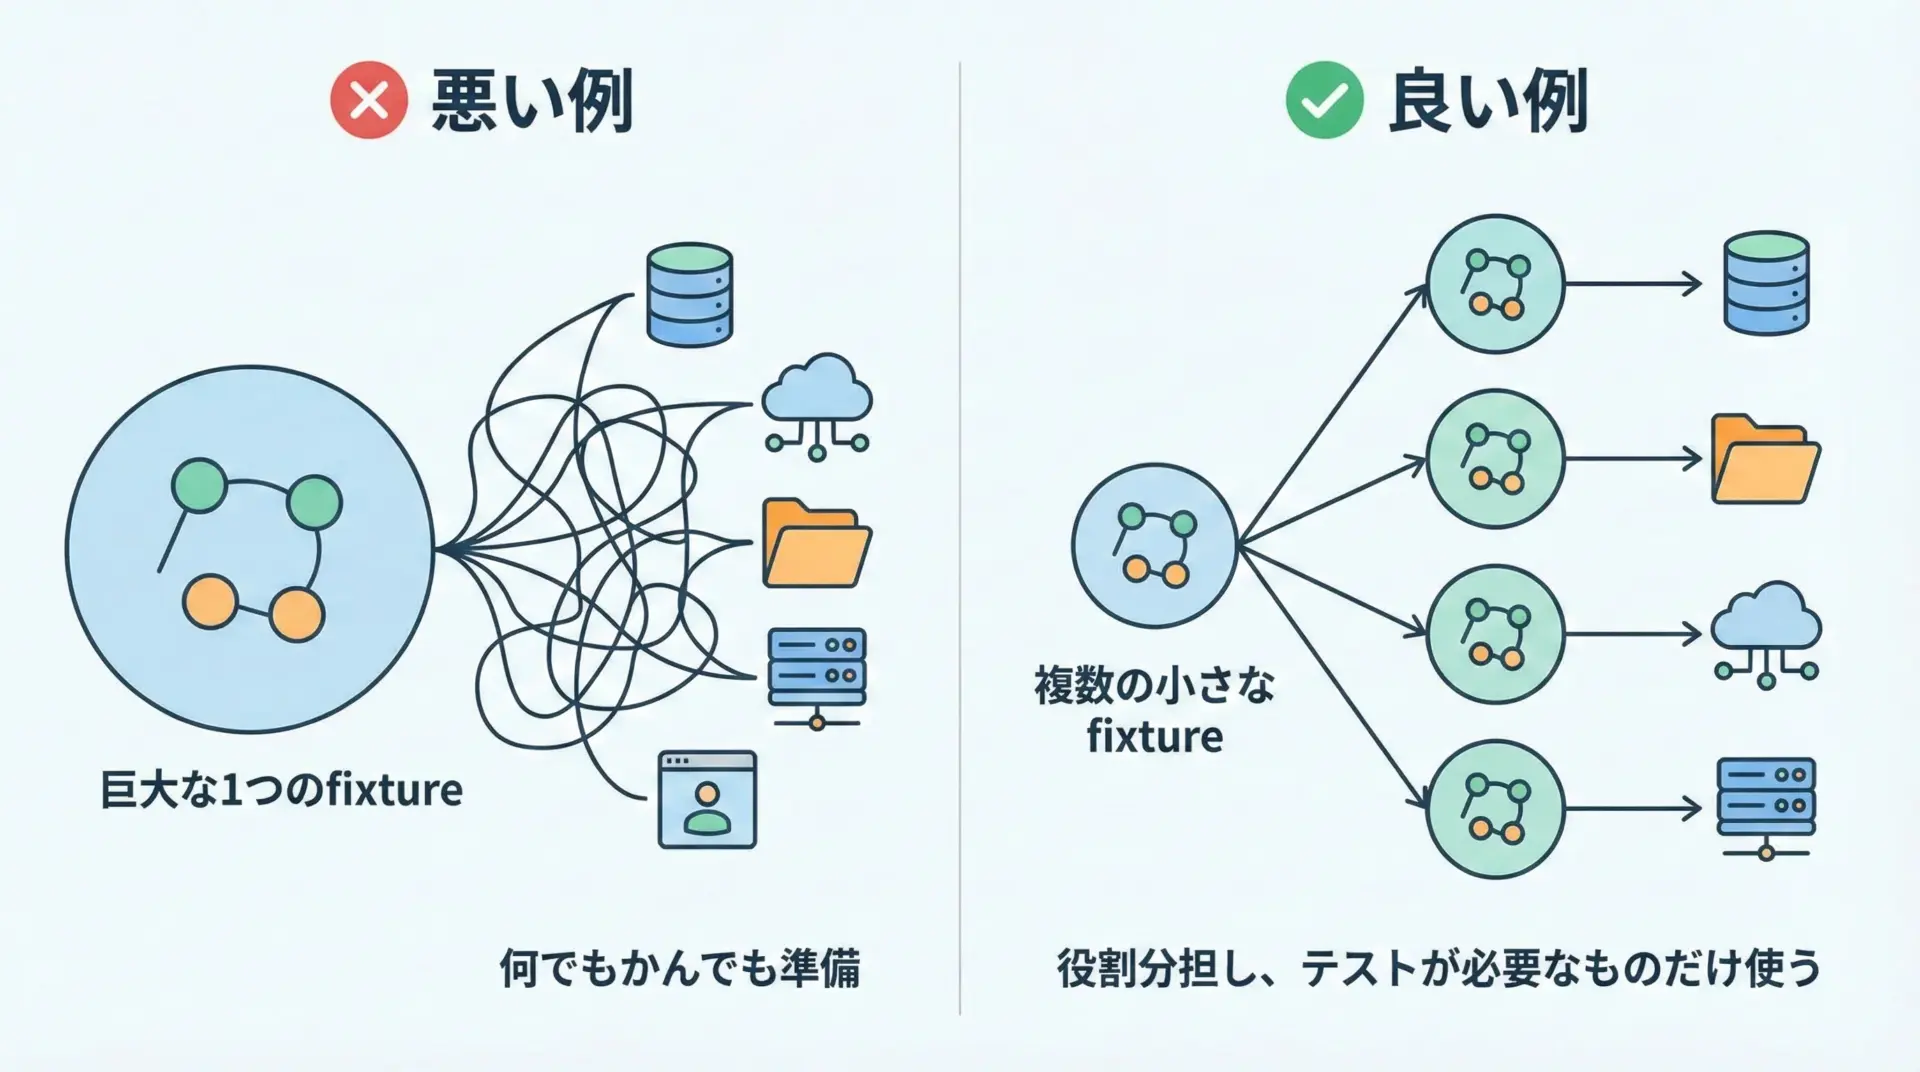
1. 「小さいfixture」を組み合わせる
何でもかんでも1つのfixtureで準備しないことが重要です。
大きなfixtureは、責務が曖昧になり、変更に弱くなります。
悪い例:
@pytest.fixture
def heavy_setup():
    # DB, APIクライアント, 設定ファイルなど全部ここで用意してしまう
    ...
良い例:
@pytest.fixture
def db():
    ...

@pytest.fixture
def api_client():
    ...

@pytest.fixture
def app_config():
    ...

@pytest.fixture
def app(db, api_client, app_config):
    # 小さなfixtureを組み合わせてアプリケーションを構築
...このように分割しておけば、必要なテストだけが必要なfixtureを選んで使えるようになります。
2. スコープは「厳しめ」に始めて必要に応じて緩める
スコープはデフォルトのfunctionから始め、パフォーマンス上の問題が出たときにmoduleやsessionに広げていくと、安全に設計できます。
いきなりsessionにしてしまうと、テスト間で状態が共有されて予期せぬ依存関係を生むことがあります。
3. autouseは「インフラ寄り」の処理だけに絞る
ログ設定、環境変数の初期化、一時ディレクトリの基盤設定など、全テストで必須のインフラ的初期化にはautouse fixtureが向いています。
一方で、ビジネスロジックに近いセットアップはテストの引数に明示した方が、テストの意図が読み取りやすくなります。
4. conftest.pyの分割と命名を整理する
大規模プロジェクトではconftest.pyが肥大化しやすいです。
その場合は、次のように階層構造と命名ルールを整えると管理しやすくなります。
- tests/conftest.py: 全テスト共通の基盤fixture
- tests/api/conftest.py: APIテスト用のfixture
- tests/db/conftest.py: DBまわりのテストで使うfixture
fixture名は役割が分かる短い英単語にし、必要ならdocstringで補足説明を書くと、後から読む人にも親切です。
まとめ
pytest fixtureは、テストコードにおける前処理・後処理・共有リソース管理を強力かつ柔軟に行うための仕組みです。
@pytest.fixtureで関数を定義し、テスト関数の引数として受け取るだけで、複雑なセットアップも整理された形で再利用できます。
スコープやautouse、conftest.pyによる共通化、さらにはパラメータ付きfixtureまで活用すれば、大規模なテストコードでも見通しよく保つことができます。
まずは小さなfixtureから始め、必要に応じて分割やスコープ調整を行いながら、自分のプロジェクトに最適なfixture設計を育てていってください。
